The control board is the brain of a modern furnace, sequencing the igniter, blower, gas valve, and safety switches in the right order every time you call for heat. When it fails, the whole system goes silent or throws confusing error codes, and a furnace circuit board replacement becomes the fix. Understanding what a furnace circuit board replacement involves, from the warning signs to the real cost, helps you decide whether to call a technician or tackle it yourself, and how to keep the new board from burning out early. This guide covers symptoms, diagnosis, costs, and the replacement process.
- What the Furnace Circuit Board Does
- Signs You Need a Furnace Circuit Board Replacement
- Diagnosing Before You Replace
- What Furnace Circuit Board Replacement Costs
- DIY vs Hiring a Pro
- Step-by-Step Replacement Overview
- Preventing Repeat Failures
- Reading the Diagnostic Codes
- OEM vs Universal Boards
- Deciding Between Repair and Replacement
What the Furnace Circuit Board Does
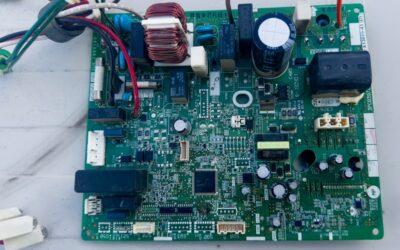
Also called the integrated furnace control (IFC) board, this green circuit board manages the entire heating sequence. When your thermostat calls for heat, the board verifies safety switches, energizes the inducer motor, lights the igniter, opens the gas valve, and finally starts the blower, all timed to the second. It also flashes diagnostic codes through a small LED when something goes wrong.
Because the board touches every part of the ignition sequence, its failure can mimic a dozen other problems. A furnace that will not start might have a bad igniter, a failed blower, or a fried board, and telling them apart is the first job.
Signs You Need a Furnace Circuit Board Replacement
A failing board rarely dies cleanly. It usually produces intermittent, maddening symptoms first. Watch for these:
- The furnace does not respond to the thermostat: No inducer, no igniter, nothing, even though the thermostat has power.
- Blower runs constantly or not at all: A board that has lost blower control.
- Short cycling: The furnace starts, then shuts off within a minute or two, repeatedly.
- Visible damage on the board: Scorch marks, a burnt smell, corroded traces, or bulging capacitors.
- Erratic or frozen LED codes: The diagnostic light flashes nonsense or stays dark when it should signal.
- Relays clicking without action: You hear the board trying but nothing downstream responds.
Before blaming the board, confirm the basics: a tripped breaker, a blown low-voltage fuse on the board (usually a small 3- or 5-amp automotive fuse), a dead thermostat battery, or a clogged filter causing safety shutdowns. These cheap culprits mimic board failure and are worth ruling out first.
Diagnosing Before You Replace
Never swap a $150 board on a hunch. Start with the LED diagnostic code, which nearly every furnace prints on a label inside the burner door. Count the flashes and match them to the legend to see whether the board reports a fault elsewhere, such as a pressure switch or flame sensor.
Check the low-voltage fuse on the board itself. If it is blown, something shorted, and simply replacing the fuse without finding the short will pop the new one instantly. Look closely for burnt spots, cracked solder joints, and swollen capacitors. A multimeter set to test the 24-volt output at the R and C terminals confirms whether the board is delivering control voltage. If the transformer feeds the board 24 volts but the board sends nothing to the igniter or gas valve during a heat call, the board is the likely culprit.
What Furnace Circuit Board Replacement Costs
The board itself is not especially expensive; the labor and diagnostics drive the total.
- Control board part alone: $80 to $350 depending on brand and whether it is OEM or universal.
- Professional replacement, parts and labor: $300 to $650.
- Emergency or after-hours service: $500 to $900.
- Universal replacement board (aftermarket): $60 to $150 for the part.
OEM boards from Carrier, Trane, Lennox, or Goodman cost more but match perfectly. Universal boards like the White-Rodgers 50A55 series cost less and work across many furnaces, but require careful wiring translation. If your furnace is more than 15 years old and this is the second major repair, weigh the board cost against putting that money toward a new furnace.
DIY vs Hiring a Pro
Replacing a control board is mechanically straightforward, but it involves gas appliances and line-voltage wiring, so honesty about your skill level matters. If you are comfortable with basic electrical work, can photograph and label wires methodically, and have a multimeter, a like-for-like OEM board swap is within reach for a careful DIYer.
Hire a licensed HVAC technician if you are dealing with a universal board that needs rewiring, if you cannot confidently diagnose that the board is the actual fault, or if the furnace is under warranty, since DIY work can void it. Gas and high-voltage components leave no room for guesswork, and a misdiagnosis means you buy the board and still pay for a service call.
Step-by-Step Replacement Overview
- Cut all power. Shut off the furnace switch and the breaker. Verify with a voltage tester.
- Photograph everything. Take clear pictures of every wire and connector before touching anything.
- Label the wires. Use tape flags matched to the board’s terminal markings.
- Remove the old board. Disconnect the wire harnesses, then unscrew or unclip the board from its standoffs.
- Mount the new board. Secure it in the same position and transfer connectors one at a time, matching your photos.
- Set any jumpers or dip switches. Match blower timing and speed settings to the old board or the furnace spec plate.
- Restore power and test. Run a full heat cycle and confirm ignition, blower, and shutdown all sequence correctly.
Transfer connectors one at a time so you never have two disconnected at once, which is where mix-ups happen.
Preventing Repeat Failures
A board that fails once can fail again if the underlying cause is not addressed. The most common killers are power surges, overheating from restricted airflow, and rodent damage. Install a whole-home or dedicated HVAC surge protector, a $50 to $150 investment that shields the new board from voltage spikes that fry electronics.
Change your furnace filter every one to three months so the system does not overheat and cook its own board, and seal any gaps where mice can nest near the electronics and chew wiring. Keep the burner compartment clean and have the furnace serviced annually.
Reading the Diagnostic Codes
The small LED on the control board is your best free diagnostic tool, and learning to read it saves guesswork and money. Most GAF, Carrier, Trane, Goodman, and Lennox furnaces flash a code by blinking the light in patterns, then pausing and repeating. A steady on or off, a slow flash, or a rapid flash each mean something specific, and the legend is printed on a label inside the burner-compartment door.
Common codes point to a pressure switch stuck open, a flame not detected, a limit switch tripped from overheating, or a low-voltage fuse blown. None of these necessarily means the board is bad; often the board is correctly reporting a fault elsewhere. That is why you read the code before condemning the board. If the light is dark when it should be signaling, or flashes a code that indicates internal control failure, the board itself is suspect. Snap a photo of the label and the flashing pattern so you can match it precisely and avoid buying a part you do not need.
OEM vs Universal Boards
When you shop for the replacement, you face a choice between an original-equipment board and a universal aftermarket one, and each has a place. An OEM board is the exact part your furnace shipped with, so it drops in with no rewiring and matches every connector and timing setting. It costs more, sometimes double a universal board, and can be harder to find for older models, but it is the simplest, most reliable swap.
A universal board, such as the White-Rodgers 50A55 series or a Honeywell equivalent, is designed to replace many different boards across brands. It costs less and is widely stocked, but it requires you to translate the old wiring to the new terminals and set jumpers for blower timing, which demands more electrical confidence. For a straightforward like-for-like repair, buy OEM if it is available; reach for a universal board only when the original is discontinued or you are comfortable with the wiring translation.
Deciding Between Repair and Replacement
A failed control board sometimes forces a bigger question: fix this furnace or replace it. Run the numbers. If your furnace is under 12 years old and otherwise healthy, a $300 to $650 board repair is money well spent, since a good furnace lasts 15 to 20 years. If the unit is already 15-plus years old and this is the second or third significant repair, that repair cash is better applied toward a new high-efficiency furnace.
Watch for the pattern of failures. A furnace that has needed an igniter, then a blower motor, and now a board is telling you the whole system is wearing out, and throwing another part at it only delays the inevitable. Weigh the repair cost against a new furnace’s $4,000 to $7,000 price and the efficiency gains a modern 96 percent AFUE unit brings. For a young furnace, replace the board; for a tired one nearing 20 years, put the money toward its successor.
Address those basics, and a fresh control board should run reliably for the remaining life of the furnace.