The herringbone tile pattern has endured for centuries — from ancient Roman roads to the floors of European palaces — and it remains one of the most sought-after designs in modern homes. The interlocking V-shaped arrangement transforms ordinary rectangular tiles into a dynamic visual that adds movement, depth, and architectural interest to any surface.
Whether you are planning a kitchen backsplash, bathroom floor, or an entire entryway, this guide covers everything about herringbone tile: the pattern variations, best tile materials, size considerations, cost factors, and installation complexity so you can make an informed decision for your project.
What Is the Herringbone Pattern
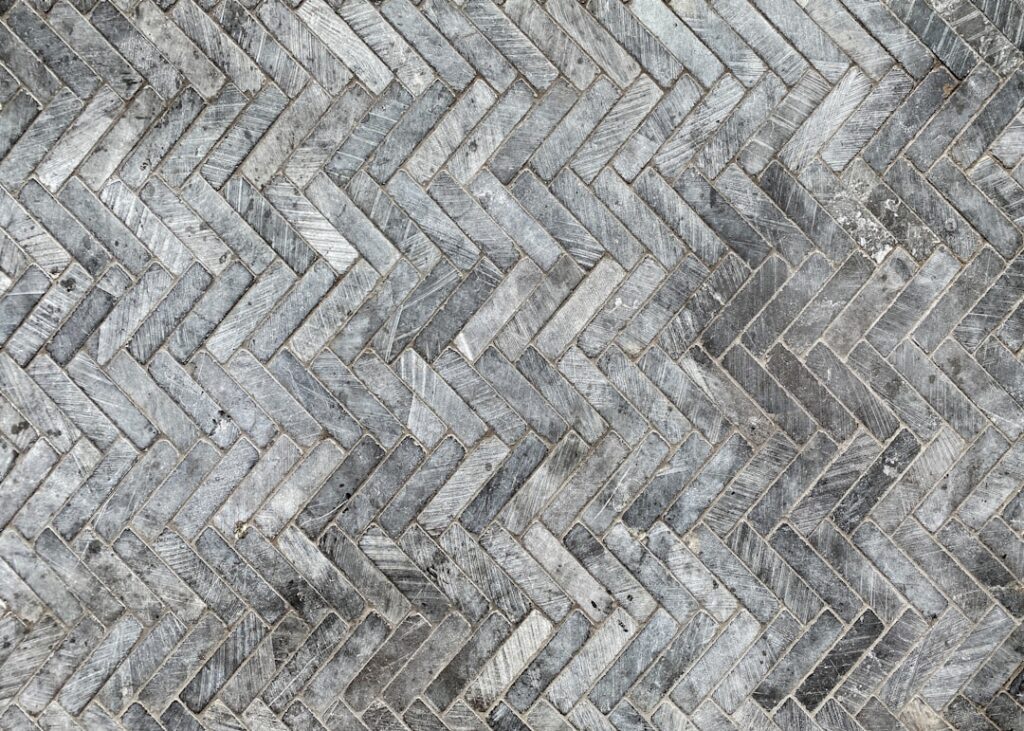
Herringbone arranges rectangular tiles at 45-degree angles to form a continuous zigzag. Each tile sits perpendicular to its neighbor, creating interlocking V-shapes that repeat across the surface. The pattern gets its name from the herring fish, whose skeletal structure mirrors this arrangement.
Standard Herringbone
In standard herringbone, each tile is the same size and placed at alternating 90-degree angles. The short end of one tile meets the long side of the next. This is the most common and recognizable version of the pattern, suitable for floors, walls, and backsplashes.
Double Herringbone
Double herringbone uses two tiles side by side instead of one, creating a wider, bolder version of the pattern. This variation works well with smaller tiles (like 2×4 or 2×6 subway tiles) and produces a less busy look than single herringbone in large spaces. It is particularly effective on feature walls and large floor areas.
Diagonal vs Straight Herringbone
Standard herringbone runs at a 45-degree angle to the walls, creating a dynamic diagonal flow. Straight herringbone aligns the pattern parallel to the walls for a more structured, formal appearance. Both orientations use the same tile arrangement — only the starting angle differs. For more herringbone layout inspiration, see our herringbone flooring guide.
Herringbone vs Chevron
Herringbone and chevron are often confused, but they use different tile cuts and create distinctly different visuals.
| Feature | Herringbone | Chevron |
|---|---|---|
| Tile shape | Standard rectangle | Parallelogram (angled ends) |
| Joint pattern | Staggered, broken zigzag | Continuous, clean zigzag |
| Visual effect | Complex, textured | Sleek, modern |
| Tile cost | Standard — no special cuts | Higher — requires angled cuts |
| Installation difficulty | Moderate | High |
| Best for | Traditional, transitional, farmhouse | Modern, contemporary |
In herringbone, the rectangular tiles create a broken zigzag where each joint is offset. In chevron, the tile ends are cut at matching angles so the joints form a continuous, unbroken V-shape. Chevron looks cleaner and more modern, while herringbone has more visual complexity and texture.
Best Tile Materials for Herringbone
The herringbone pattern works with any rectangular tile, but certain materials bring out the best in the design.
Porcelain Tile
Porcelain is the most versatile choice for herringbone tile installations. It is extremely durable (PEI 4 or 5 for floors), water-resistant, available in wood-look, marble-look, and concrete-look finishes, and dimensionally consistent — critical for tight herringbone joints. Porcelain herringbone works on floors, walls, and backsplashes in any room including showers and outdoor spaces.
Ceramic Tile
Ceramic tiles cost less than porcelain and work well for wall applications and backsplashes. For floors, choose ceramic tiles rated PEI 3 or higher. Ceramic is slightly less dimensionally consistent than porcelain, so minor size variations may show in the tight herringbone joints. Budget-conscious homeowners often choose ceramic for backsplashes and porcelain for floors.
Marble Tile
Marble herringbone is a premium choice that creates stunning visual impact. The natural veining of marble interacts beautifully with the herringbone pattern, creating organic movement across the surface. Carrara, Calacatta, and Bianco Dolomiti are the most popular marble varieties for herringbone. Keep in mind that marble requires sealing, is softer than porcelain (susceptible to scratching and etching), and costs significantly more. Best suited for bathroom floors, shower walls, and statement backsplashes.
Subway Tile Herringbone
Standard 3×6 subway tiles arranged in herringbone create an elevated version of the classic subway tile backsplash. This approach uses an inexpensive, widely available tile in a more interesting layout. White subway tile in herringbone is a perennial kitchen backsplash favorite. For backsplash ideas, see our tile backsplash guide.
Glass Tile
Glass herringbone tiles add shimmer and light reflection, making them ideal for backsplashes and accent walls. Glass is not suitable for floors (too slippery and fragile underfoot) but creates stunning visual effects on vertical surfaces. The translucent quality of glass combined with the herringbone pattern creates exceptional depth.
Tile Size Impact on the Pattern
The size of the tile dramatically changes how the herringbone pattern reads in a space. This is one of the most important design decisions you will make.
| Tile Size | Pattern Scale | Best Application | Visual Effect |
|---|---|---|---|
| 1″ x 3″ mosaic | Fine, intricate | Shower floors, small backsplashes | Delicate, detailed |
| 2″ x 6″ (small subway) | Small-medium | Backsplashes, accent walls | Classic, refined |
| 3″ x 6″ (subway) | Medium | Backsplashes, bathroom walls | Timeless, versatile |
| 3″ x 12″ | Medium-large | Bathroom floors, entryways | Elongated, elegant |
| 4″ x 12″ | Large | Kitchen floors, living areas | Bold, architectural |
| 4″ x 24″ (plank) | Extra large | Large floors, open concept | Dramatic, wood-like |
Small tiles (1″ x 3″ to 2″ x 6″) create intricate, detailed patterns that work best in small areas. On large floors, small herringbone tiles can look busy and create excessive grout lines that are difficult to maintain.
Medium tiles (3″ x 6″ to 3″ x 12″) offer the most versatile scale. They read clearly as herringbone without overwhelming a space and work on both floors and walls.
Large tiles (4″ x 12″ and above) create bold, architectural statements. Large-format herringbone works best on floors in open-concept spaces, entryways, and kitchens where the full pattern can be appreciated. The larger tile size means fewer grout lines and easier maintenance. Visit our tile flooring page for more options.
Floor vs Wall Applications
Herringbone Floor Tile
Herringbone floors create dramatic visual impact in entryways, kitchens, bathrooms, and living areas. Floor herringbone requires tiles rated for foot traffic (PEI 3 or higher for residential, PEI 4+ for high-traffic areas). Porcelain and natural stone are the primary floor choices.
One design consideration: herringbone on floors makes rooms feel larger when the pattern runs along the longest dimension. In narrow hallways, herringbone can create a sense of width. In small bathrooms, it adds visual interest that distracts from the limited square footage. See our bathroom tile ideas for more inspiration.
Herringbone Wall Tile and Backsplash
Wall applications are where herringbone truly shines in contemporary design. A herringbone kitchen backsplash adds movement and texture to an otherwise flat surface. Bathroom herringbone accent walls create spa-like visual interest.
Wall herringbone has fewer material restrictions — ceramic, glass, and even natural stone work well because they do not need to resist foot traffic. Lighter-weight tiles are preferred for walls to reduce the load on the adhesive and reduce installation complexity.
Shower Herringbone
Herringbone in showers creates a luxurious spa aesthetic. Small mosaic herringbone (1″ x 3″ or 2″ x 4″) on shower floors provides good drainage slope flexibility while adding visual interest. Larger herringbone on shower walls creates a striking feature. Use porcelain or natural stone with proper waterproofing membrane behind the tile.
Grout Color and Width
Grout choices affect the look of herringbone tile as much as the tile itself.
Matching grout (tile color = grout color): Creates a subtle, monolithic look where the herringbone pattern is visible through texture and shadow rather than contrasting lines. This approach is popular with marble and white porcelain herringbone for a clean, sophisticated aesthetic.
Contrasting grout: Dark grout with light tile (or vice versa) emphasizes every joint and makes the herringbone pattern highly visible. This bold approach works well in contemporary and industrial designs. White subway tile with dark gray grout in herringbone is a classic example.
Grout width: Thinner grout lines (1/16″ to 1/8″) create a refined, seamless look. Wider grout lines (1/4″) make the pattern more visible and accommodate natural stone tiles with dimensional variation. Rectified (precision-cut) porcelain tiles allow the thinnest grout lines.
Installation Complexity
Herringbone is one of the more demanding tile patterns to install correctly. Understanding the complexity helps you budget time and labor appropriately.
Why Herringbone Is Harder to Install
More cuts: Every edge tile where the herringbone meets a wall requires an angled cut. A straight-set pattern only needs straight cuts. This dramatically increases cutting time.
Layout precision: The first row must be perfectly straight and square. Any deviation compounds across the pattern, creating visibly crooked lines. Careful chalk line layout and dry-fitting before setting any tiles are essential.
More grout lines: The herringbone pattern creates significantly more linear feet of grout than a standard brick or straight-set pattern with the same tile. More grout means more grouting time and more maintenance.
Tile waste: Budget 15% to 20% extra material for waste — compared to 10% for standard patterns. The angled edge cuts produce more unusable offcuts.
DIY vs Professional Installation
Herringbone backsplashes are a feasible DIY project for experienced tile setters. Herringbone floors, especially in large areas, are best left to professionals. The stakes are higher on floors (uneven tiles create trip hazards), the layout must be precisely planned, and the cutting volume is substantial. Professional installation typically adds $5 to $10 per square foot over standard straight-set installation.
Cost and Budget Considerations
Herringbone adds a premium over standard tile installations, driven primarily by increased labor and material waste.
| Cost Factor | Standard Pattern | Herringbone Pattern | Difference |
|---|---|---|---|
| Tile material | $2 – $15/sq ft | $2 – $15/sq ft | Same tile price |
| Material waste | 10% | 15% – 20% | +5% – 10% more tile |
| Installation labor | $5 – $10/sq ft | $8 – $15/sq ft | +$3 – $5/sq ft |
| Total installed (porcelain) | $8 – $20/sq ft | $12 – $28/sq ft | +30% – 50% premium |
| Total installed (marble) | $15 – $35/sq ft | $22 – $50/sq ft | +30% – 50% premium |
The cost premium for herringbone comes entirely from labor and waste — the tiles themselves cost the same. A 50-square-foot backsplash in herringbone might cost $200 to $400 more than a straight-set pattern. A 200-square-foot floor could cost $1,000 to $2,000 more. The visual impact typically justifies the premium for homeowners who prioritize design.
Budget tips: Use porcelain instead of marble to save on material. Choose a 3×12 tile instead of smaller tiles to reduce labor time. Start with a backsplash if you want the herringbone look on a smaller budget. Consider herringbone in a focal area only (entryway, powder room) rather than the entire house.
Frequently Asked Questions
Is herringbone tile more expensive?
The tiles themselves cost the same as any other pattern — herringbone is a layout, not a product. However, installation costs 30% to 50% more due to increased cutting, layout precision, and grouting time. Material waste is also higher (15% to 20% versus 10% for standard patterns).
Is herringbone tile hard to install?
Yes, herringbone is one of the more challenging tile patterns. It requires precise layout, numerous angled cuts, and careful alignment to prevent compounding errors. Backsplash herringbone is manageable for experienced DIYers, but floor herringbone is best done by a professional.
What size tile is best for herringbone floors?
For residential floors, 3×12 and 4×12 tiles offer the best balance of visual impact and practical installation. Smaller tiles (2×6) work well in bathrooms and small spaces. Larger 4×24 plank tiles create dramatic herringbone on large open floors but require an experienced installer.
Does herringbone tile make a room look bigger or smaller?
Herringbone generally makes rooms appear larger. The diagonal lines draw the eye outward, creating a sense of movement and space. In narrow rooms, herringbone adds visual width. In small bathrooms, it creates visual interest that distracts from the limited square footage.
What grout color should I use with herringbone tile?
For a subtle, sophisticated look, match the grout to the tile color. For a bold, graphic statement, use contrasting grout. White tile with gray grout is a popular classic combination. When in doubt, choose a grout one shade darker than the tile for a balanced look.
Can I do herringbone with large format tiles?
Yes, large format tiles (4×24 and even 6×36) create stunning herringbone patterns on large floors. The bigger scale means fewer grout lines and a more contemporary look. However, large tiles require a perfectly flat subfloor and an experienced installer — any subfloor irregularity causes lippage (uneven tile edges) that is more noticeable in herringbone.
Prefer to explore on your own?
See how new flooring looks in your actual room in seconds — free, no signup.
Try the free Floor Studio →