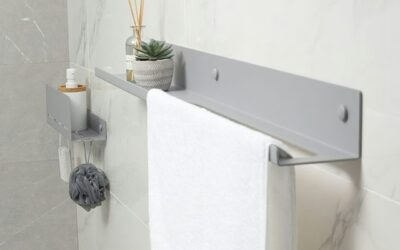
A towel bar that pulls out of the wall within six months is almost always an anchoring problem, not a product defect. Understanding how to install a towel bar correctly — matching the right anchor to your wall type — means the bar stays solid for years, even with wet, heavy bath towels. The job takes 15 to 30 minutes with a drill, a level, and about $5 worth of hardware beyond the bar itself.
- Choosing the Right Towel Bar Size
- Proper Mounting Height and Placement
- Mounting Into Wall Studs
- Mounting Into Drywall Without Studs
- Mounting Into Ceramic or Porcelain Tile
- Step-by-Step Installation Process
- Fixing a Towel Bar That Pulled Out
- Tips for a Professional-Looking Result
- Choosing Towel Bar Mounting Hardware for Your Wall Type
Choosing the Right Towel Bar Size
Standard towel bars come in 18-inch, 24-inch, and 30-inch lengths. An 18-inch bar holds one folded bath towel. A 24-inch bar handles two towels side by side without bunching, making it the most popular size for guest and master bathrooms. Reserve the 30-inch bar for wide wall sections where you need space for three towels or oversized bath sheets.
Most towel bar sets cost between $15 and $60 depending on finish. Brushed nickel and matte black are the two best-selling finishes right now, and both resist fingerprints better than polished chrome.
Proper Mounting Height and Placement
Mount the towel bar 48 inches from the finished floor for standard adult use. In children’s bathrooms, drop the height to 36 inches so kids can reach their towels independently. Keep the bar at least 18 inches away from the centerline of the toilet — closer than that makes the towel awkward to reach and positions it in the splash zone.
Avoid mounting directly above a heat register, which dries towels unevenly and can discolor fabric over time. Behind the bathroom door is a common alternative location that keeps towels accessible without taking up visible wall space.
Mounting Into Wall Studs
Studs provide the strongest hold for any towel bar. Use a stud finder to locate framing behind the drywall, then mark the center of each stud at your desired height. If both bracket positions line up with studs — which happens on about 30% of installations — simply drill 1/8-inch pilot holes and drive the included wood screws directly into the framing. No anchors needed.
A stud-mounted towel bar can support well over 50 pounds, making it strong enough for heavy robes, multiple wet towels, or kids who hang on it.
Mounting Into Drywall Without Studs
When studs do not align with your bracket positions, use toggle bolt anchors instead of the plastic anchors included with most towel bar kits. Those plastic anchors hold about 10 to 15 pounds in drywall — far too little for daily use. A 1/4-inch toggle bolt holds 50 pounds or more in standard 1/2-inch drywall.
- Mark bracket positions on the wall using a level
- Drill a 1/2-inch hole at each mark for the toggle bolt
- Thread the toggle bolt through the mounting bracket, then fold the toggle wings and push them through the hole
- Pull the bracket toward you while tightening the bolt until the toggle grips behind the drywall
Mounting Into Ceramic or Porcelain Tile
Tile installations require a carbide or diamond-tipped drill bit and a steady hand. Mark your bracket positions with painter’s tape to prevent the bit from wandering on the glazed surface. Drill through the tile at slow speed with no hammer action — engaging the hammer function on your drill will crack the tile. Once through the tile, switch to a standard masonry or wood bit to finish the hole into the substrate behind.
Use plastic expansion anchors designed for tile and masonry if you cannot reach a stud behind the tile. These anchors expand inside the hole as you drive the screw and hold 25 to 40 pounds in concrete backer board — adequate for a towel bar.
Step-by-Step Installation Process
Regardless of wall type, the assembly sequence is the same for most towel bar kits:
- Hold both mounting brackets against the wall at 48 inches and mark the screw holes with a pencil
- Check level between the two marks — even 1/16 inch off creates a visible tilt
- Drill pilot holes or anchor holes at each mark
- Secure both brackets to the wall using the appropriate fasteners
- Slide the towel bar ends into the brackets and tighten the set screws with the included hex key
- Give the bar a firm downward pull to confirm it holds
Fixing a Towel Bar That Pulled Out
If your existing towel bar has already ripped out of the drywall, you cannot simply drive new screws into the same holes. The drywall is damaged and will not hold. Fill the old holes with a two-part epoxy filler, let it cure for 24 hours, then redrill for toggle bolts. Alternatively, shift the bracket positions 1 to 2 inches in either direction to reach fresh drywall or, ideally, a stud.
For repeated failures in the same location, consider a freestanding towel stand or an adhesive-mounted bar rated for smooth tile surfaces. Adhesive bars from brands like Command hold up to 7.5 pounds — fine for a single towel but not reliable for heavier loads.
Tips for a Professional-Looking Result
Apply a small bead of clear silicone caulk behind the mounting bracket flanges before tightening them to the wall. This seals the bracket edges against moisture infiltration, which prevents mold growth behind the bracket in humid bathrooms. Wipe away any excess caulk immediately with a damp finger.
Knowing how to install a towel bar properly is one of those small skills that prevents repeated frustration. Match your anchor to your wall type, check level before drilling, and your towel bar will stay exactly where you put it.
Choosing Towel Bar Mounting Hardware for Your Wall Type
The screws and anchors packed in the box are designed to fit every wall in a generic way, which is exactly why they so often fail. Choosing towel bar mounting hardware on purpose, based on what sits behind your bracket, is the single biggest upgrade you can make to an inexpensive bar. Before buying anything, identify the wall: tap it, use a stud finder, and if possible look at the wall from an adjacent closet or the access panel behind a tub.
| Wall behind the bracket | Recommended hardware | Notes |
|---|---|---|
| Wood stud | Corrosion-resistant wood screws long enough to pass the drywall and bite well into framing | No anchor needed; pre-drill a pilot hole |
| Hollow drywall | Toggle bolts or strap-style toggles; self-drilling threaded anchors for lighter loads | Check the package rating against towel weight plus pulling force |
| Tile over backer board | Carbide or diamond bit, then tile-and-masonry anchors or a stud if reachable | Drill slowly, no hammer mode |
| Plaster and lath | Toggle bolts or screws into lath strips or studs | Plaster crumbles if anchors are overdriven |
Anchors, Screws, and Bracket Styles
Self-drilling threaded anchors screw straight into drywall with a driver and are quick to install, but they hold noticeably less than a toggle and are better suited to a hand towel ring than a full bath towel bar that gets yanked daily. For any fastener in a bathroom, choose stainless steel or coated screws; plain steel rusts in the humidity and can stain grout and paint around the bracket.
Look closely at how the bracket itself attaches. Most bars use a two-part system: a flat mounting plate that screws to the wall and a decorative cover post that slides over it and locks with a small set screw on the underside. Install the plates first, confirm they are level, then slide the posts on and tighten the set screws snugly without stripping them. Keep the hex key in a drawer, because loose set screws are the usual cause of a bar that wobbles even though the anchors are sound.
On tile walls, check what might be hidden behind the surface before drilling. Shower valves, supply lines, and wiring for lights or fans often run through bathroom walls, so avoid drilling directly above or below fixtures, scan with a detector that senses metal and live wiring, and stop immediately if the bit hits unexpected resistance behind the backer board.