Unsealed grout is a sponge. The cement-based material that fills the joints between your tiles is porous by nature, absorbing water, stains, mold spores, and bacteria into its surface. Over time, unsealed grout darkens, discolors, and becomes a persistent cleaning challenge. Learning how to seal grout is one of the simplest home maintenance tasks that delivers dramatic, lasting results — cleaner grout lines, easier maintenance, and better protection against moisture damage.
Part of our Tile & Grout guide — explore the full guide →
This guide walks you through every step of the grout sealing process: when to seal, which sealer type to choose, the tools you need, proper application technique, dry and cure times, how often to reseal, and how to test whether your grout needs sealing right now.


When to Seal Grout
New grout: Wait until the grout has fully cured before sealing. For most cement-based grouts, this means 48 to 72 hours after grouting. Some manufacturers recommend waiting a full 28 days for complete curing. Check your grout manufacturer’s instructions for the specific cure time. Sealing too early traps moisture inside the grout and prevents proper curing.
Existing grout: If your grout has never been sealed or the previous sealer has worn off, seal it as soon as possible. The longer grout goes unsealed, the more stains and moisture it absorbs, making it progressively harder to clean and seal effectively.
After cleaning: If you are sealing existing grout that is already stained, clean it thoroughly first. Use a grout cleaner and brush to remove dirt, mold, and discoloration, then allow the grout to dry completely (24 to 48 hours) before applying sealer. Sealing over dirty grout locks in the stains permanently. For cleaning methods, see our guide on how to clean grout.
Exception — epoxy grout: Epoxy grout does not need sealing. Unlike cement-based grout, epoxy grout is non-porous and already resistant to water, stains, and mold. If your tile was grouted with epoxy, you can skip the sealing process entirely.
Types of Grout Sealers
Penetrating (Impregnating) Sealers
Penetrating sealers soak into the grout and form a protective barrier below the surface. They do not change the appearance of the grout — the color and texture remain exactly the same. This makes penetrating sealers the preferred choice for most residential applications because they protect without altering the look of your tile work.
Penetrating sealers work by filling the microscopic pores in cement grout with silicone, siloxane, or fluoropolymer compounds that repel water and oil. They allow the grout to breathe (moisture vapor can still escape), which prevents trapped moisture problems. Protection typically lasts 3 to 5 years before reapplication is needed.
Topical (Membrane-Forming) Sealers
Topical sealers sit on the surface of the grout, forming a visible coating. They are available in matte, satin, and glossy finishes and can enhance or darken the grout color. Some topical sealers are specifically designed to change grout color — useful for refreshing stained grout without replacing it.
The trade-off is that topical sealers can peel, flake, or become cloudy over time, especially in high-moisture areas. They also make grout lines slightly slippery when wet. Topical sealers typically need reapplication every 1 to 3 years.
Spray Sealers vs. Applicator Bottle Sealers
Spray sealers cover large areas quickly and are convenient for sealing floors with narrow grout lines. However, spray overshoot lands on the tile surface, which must be wiped off unglazed tiles to prevent hazing. Applicator bottle sealers (with a roller tip or brush tip) apply sealer precisely to the grout line with minimal waste and no tile overspray. For most DIY projects, applicator bottles provide better control.
Best Grout Sealers (2026)
| Product | Type | Coverage | Price (approx.) | Best For |
|---|---|---|---|---|
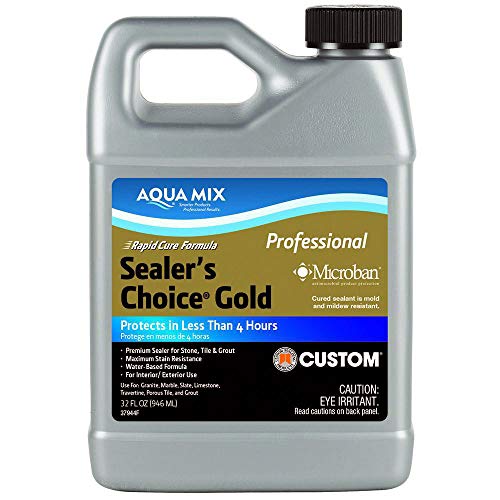
| Aqua Mix Sealer’s Choice Gold | Penetrating | 500 – 1,500 sq ft/qt | $25 – $35 / quart | Overall best; professional grade |
| Miracle Sealants 511 Impregnator | Penetrating | 500 – 1,500 sq ft/qt | $20 – $30 / quart | Natural stone and grout |
| Tuff Duck Granite, Grout, and Marble Sealer | Penetrating | 200 – 400 sq ft/22 oz | $15 – $20 | Budget-friendly, easy to apply |
| StoneTech BulletProof Sealer | Penetrating | 200 – 600 sq ft/qt | $30 – $45 / quart | Maximum protection, commercial grade |
| Grout Pen (various brands) | Topical (paint) | Varies | $8 – $12 | Color refresh only; cosmetic, not protective |
Tools and Materials Needed
Gathering the right tools before you start makes the process of learning how to seal grout much smoother.
- Grout sealer (penetrating or topical — see comparison above)
- Applicator bottle with roller tip, small foam brush, or spray bottle
- Clean dry cloths or paper towels (for wiping excess off tiles)
- Painter’s tape (optional, for protecting adjacent surfaces)
- Rubber gloves
- Knee pads (for floor grout)
- Grout cleaner and brush (if grout needs cleaning first)
- Vacuum or broom
Step-by-Step: How to Seal Grout
Step 1: Clean the grout thoroughly. Sweep or vacuum the tile surface to remove loose debris. If the grout is stained or dirty, clean it with a grout cleaner and stiff brush (nylon bristles, not metal). Rinse with clean water and allow the grout to dry completely — at least 24 hours for existing grout, 48 to 72 hours for new grout. The grout must be completely dry for the sealer to penetrate properly.
Step 2: Ventilate the area. Open windows and turn on fans. Most sealers have low VOCs but proper ventilation ensures faster drying and more comfortable working conditions.
Step 3: Test in an inconspicuous area. Apply a small amount of sealer to a hidden grout line (behind a toilet, under an appliance, or in a closet). Wait for it to dry and check that the appearance is acceptable. This is especially important with topical sealers that may change the grout color.
Step 4: Apply the sealer to the grout lines. Using the applicator bottle, foam brush, or spray, apply sealer directly to the grout lines. Work in small sections (3 by 3 feet) to maintain control. Apply enough sealer to saturate the grout without flooding the tile surface. The grout should appear wet but not dripping.
Step 5: Allow the sealer to penetrate. Let the sealer sit on the grout for 5 to 15 minutes (check the product label for the specific dwell time). During this time, the sealer is soaking into the pores of the grout.
Step 6: Wipe excess sealer off the tiles. Before the sealer dries on the tile surface, wipe away any excess with a clean, dry cloth. Sealer left on glazed tile will create a hazy film. On unglazed tile or natural stone, excess sealer can darken the surface permanently. This is the most important step — do not let sealer dry on the tile.
Step 7: Apply a second coat. Most sealers require two coats for full protection. Wait the recommended time between coats (typically 15 to 30 minutes) and repeat steps 4 through 6. The second coat ensures complete coverage and maximum penetration. For grouting basics, refer to our guide on how to grout tile.
Step 8: Allow full cure time. After the final coat, allow the sealer to cure fully before exposing it to water or traffic. See the dry times below.
Dry and Cure Times
| Stage | Time | Notes |
|---|---|---|
| Between coats | 15 – 30 minutes | Surface should appear dry before second coat |
| Light foot traffic | 2 – 4 hours | Walk on with clean, dry shoes only |
| Normal use | 24 hours | Full foot traffic, furniture placement |
| Water exposure | 24 – 72 hours | No mopping, showering, or spills |
| Full cure | 48 – 72 hours | Maximum protection reached |
Important: These are general guidelines. Always follow the specific product’s instructions, as cure times vary by brand, sealer type, and environmental conditions (temperature and humidity).
The Water Drop Test
The water drop test is the simplest way to determine whether your grout needs sealing (or resealing). Here is how to seal grout only when it actually needs it.
Step 1: Place a few drops of water directly on a grout line.
Step 2: Wait 1 to 2 minutes and observe.
Step 3: Interpret the result:
- Water beads up and sits on the surface — the grout is properly sealed. No action needed.
- Water slowly absorbs (darkening the grout) over 1 to 2 minutes — the sealer is wearing thin. Reseal soon.
- Water absorbs immediately (grout darkens within seconds) — the grout is unsealed or the sealer has completely worn off. Seal immediately.
Perform this test every 6 to 12 months in high-use areas (kitchen floors, shower tile, bathroom floors) to stay ahead of sealer degradation.
How Often to Reseal Grout
| Location | Reseal Frequency | Why |
|---|---|---|
| Shower floor and walls | Every 1 – 2 years | Constant water, steam, soap exposure |
| Bathroom floor | Every 2 – 3 years | Frequent moisture and cleaning |
| Kitchen floor | Every 2 – 3 years | High traffic, spills, frequent mopping |
| Kitchen backsplash | Every 3 – 5 years | Less water exposure, lower wear |
| Entryway / mudroom | Every 2 – 3 years | Heavy traffic, dirt, moisture from shoes |
| Living room / bedroom tile | Every 3 – 5 years | Lower traffic and moisture |
Use the water drop test rather than relying solely on a calendar schedule. Environmental conditions, cleaning products used, and traffic levels all affect how quickly sealer wears down. For comprehensive tile care, browse our tile flooring guide.
Penetrating vs. Topical Sealers
| Feature | Penetrating Sealer | Topical Sealer |
|---|---|---|
| Location | Below the surface | On the surface |
| Appearance change | None (invisible protection) | May add sheen or darken grout |
| Breathability | Yes (vapor can escape) | No (traps moisture) |
| Durability | 3 – 5 years | 1 – 3 years |
| Slip resistance | No change | May decrease (glossy types) |
| Peeling or flaking | No | Possible over time |
| Best use | Floors, showers, natural stone | Backsplashes, decorative areas, color refresh |
| Price | $15 – $45 | $8 – $30 |
Frequently Asked Questions
Do I need to seal grout on tile floors?
Yes, if the grout is cement-based (which most residential grout is). Cement grout is porous and absorbs water, stains, and bacteria without a sealer. The only exception is epoxy grout, which is non-porous and does not require sealing.
Can I seal grout myself or do I need a professional?
Sealing grout is one of the easiest DIY home maintenance tasks. It requires no special skills — just a sealer, an applicator, and patience. A typical bathroom floor takes 30 to 60 minutes. The only reason to hire a professional is if the grout needs extensive cleaning or repair before sealing.
What happens if I do not seal grout?
Unsealed grout absorbs water, which can lead to mold and mildew growth, especially in showers and bathrooms. It also absorbs stains from food, drinks, and cleaning products, causing permanent discoloration. Over time, moisture penetration can weaken the grout bond and compromise the tile installation. Knowing how to seal grout prevents all of these issues.
Can I seal colored grout?
Yes. Penetrating sealers work on all grout colors without changing the appearance. Topical sealers may slightly darken or enhance the color. Always test in an inconspicuous area first if you are concerned about color change, especially with light-colored grouts.
Is grout sealer toxic?
Most modern grout sealers are water-based with low VOCs and are safe for residential use. Solvent-based sealers have stronger fumes and require better ventilation. All sealers should be applied with adequate ventilation and kept away from children and pets until fully cured. Look for products labeled low-VOC or zero-VOC for the safest options.
Can I apply too much grout sealer?
Excess sealer left on tile surfaces will create a hazy, sticky film. However, you cannot over-seal the grout itself — the grout absorbs what it needs and excess is wiped away. The key is removing sealer from the tile surface promptly (within 5 to 10 minutes of application) while allowing it to penetrate the grout fully.
Should I seal grout in a shower?
Absolutely. Shower grout is the most important grout to seal in your home. Constant water exposure makes shower grout highly susceptible to mold growth, discoloration, and deterioration. Use a penetrating sealer (not topical) in showers so the grout can breathe and release moisture vapor between uses. Reseal every 1 to 2 years.
Prefer to explore on your own?
See how new flooring looks in your actual room in seconds — free, no signup.
Try the free Floor Studio →