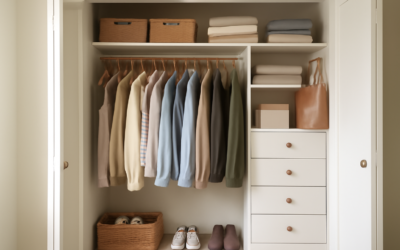
A standard reach-in closet with a single shelf and one hanging rod wastes more than half of its cubic footage, leaving three feet of dead air above the rod and a jumbled floor below. An inside closet organizer reclaims that space by stacking double-hang zones, dedicated shelving, and drawers into the same footprint, often doubling usable capacity without moving a wall. Whether you are outfitting a cramped hallway closet or a walk-in, choosing the right inside closet organizer comes down to matching the system material to your budget and your load.
Why an Inside Closet Organizer Beats a Single Rod
The math is simple once you see it. A typical reach-in closet is 6 to 8 feet wide, 24 inches deep, and 8 feet tall. A single rod at 66 inches uses one strip of that height for hanging and leaves everything above and below underused. By splitting part of the closet into a double-hang section, one rod at 42 inches and another at 84 inches, you fit twice as many shirts, jackets, and folded-over pants in the same width.
The other half of the win is zoning. Shoes get a rack, folded sweaters get adjustable shelves, and small items get drawers or bins. Nothing piles on the floor because everything has a home. That is the entire promise of a good organizer.
The Three Main System Types
- Ventilated wire (epoxy-coated steel): The budget workhorse. Brands like ClosetMaid and Rubbermaid. Cheap, breathable, and easy to cut. Small items can tip through the gaps, and the look is utilitarian.
- Wood and laminate (melamine): The mid-range favorite. Solid shelves, a built-in furniture look, and drawers with real glides. Heavier to install and pricier, but far more finished.
- Modular hanging systems: Rail-mounted panels like Elfa or freestanding tower kits. Reconfigurable, renter-friendly on a single top track, and endlessly expandable.
Wire holds up fine for everyday clothes; melamine shines when you want the closet to look built-in and support heavier loads like stacked denim and books.
What It Costs
Pricing spans a wide range. A basic wire kit for a reach-in closet runs $50 to $150 at a home center and covers a single rod plus shelving. A quality melamine tower-and-shelf kit for the same closet lands at $200 to $600. A configured modular system like Elfa for a reach-in typically costs $300 to $900 depending on drawers and accessories.
Custom, professionally installed closet systems for a walk-in run $1,000 to $3,500 and climb past $5,000 for a large primary closet with lighting, glass-front drawers, and specialty inserts. If you are handy, DIY installation of a kit saves the $300 to $800 labor charge a closet company would add.
Planning the Layout
Before buying anything, inventory what you actually store. Count your long-hang items (dresses, coats), short-hang items (shirts, folded pants), folded items, and shoes. That inventory dictates your zones.
Standard dimensions to design around:
- Double-hang sections: two rods at roughly 42 and 84 inches, each needing about 40 inches of vertical clearance
- Long-hang for dresses and coats: a single rod at 68 to 72 inches
- Shelf spacing for folded clothes: 12 to 14 inches apart
- Shoe shelves: 7 to 8 inches of vertical space, angled or flat
- Standard hanging rod height for shirts: 42 inches of clearance below the rod
Keep a 24-inch clear walkway in a walk-in. Sketch the wall to scale on graph paper so you buy the right components once instead of returning half of them.
A few planning habits separate a closet that works from one that just looks tidy on day one. Build in about 20 percent empty capacity, because wardrobes grow and a closet packed to the last inch becomes unusable within a season. Store items where you use them: everyday clothes at eye and reach level, seasonal and rarely-touched items on the high shelf, and heavy or bulky pieces low where a fall causes no harm. Group by category and then by color so getting dressed is faster, and keep a small step stool nearby if you run shelving to the ceiling, which you should, since that top zone is free storage most closets waste. Finally, measure your longest garments before setting rod heights; a floor-length coat or dress needs 68 to 72 inches of clear drop, and discovering that after the shelves are mounted means redoing the whole wall.
Installing a System Yourself
Most kits mount one of two ways. Rail-hung systems (Elfa, some ClosetMaid lines) rely on a single top track lag-bolted into studs; everything else clips onto that rail, which makes leveling forgiving and reconfiguring easy. Panel-based melamine systems mount to the wall or stand on the floor and require more precise leveling.
Find and mark your studs first, because a loaded closet rod can carry 40 to 60 pounds and drywall anchors alone will pull out. Use a 4-foot level, not a torpedo level, to keep long shelves true. Pre-drill, and for melamine use a fine-tooth blade to avoid chipping the edges. Plan on a half day for a reach-in and a full weekend for a walk-in.
Small-Closet Tricks That Add Capacity
When square footage is tight, go vertical and use the door. Add a top shelf above the highest rod for seasonal bins, run shelving all the way to the ceiling, and hang an over-the-door organizer for shoes or accessories. Slim velvet hangers alone can add 30 percent more rod capacity because they take half the space of bulky plastic hangers.
Pull-out baskets and clear bins keep folded items visible, and a stack of two shallow drawers replaces a dresser you can then remove from the bedroom. Even in a 4-foot closet, splitting one side into double-hang and dedicating the other to shelves transforms the capacity.
Accessories That Earn Their Keep
Once the bones of the system are in, the accessories decide whether it actually functions day to day. Some are worth every dollar; others just add cost. Prioritize the ones you will use every morning.
- Valet rod: A pull-out bar that extends 12 inches for hanging tomorrow’s outfit or holding clothes fresh from the dryer. Around $15 to $30 and one of the most-used add-ons.
- Belt and tie racks: Sliding or pull-out racks keep small accessories from cluttering a drawer. $10 to $40.
- Pull-out hampers: A basket on glides tucks laundry out of sight and rolls out for wash day. $30 to $80.
- Angled shoe shelves with fences: A small lip keeps shoes from sliding off and displays them at a glance.
- Drawer dividers: Cheap inserts that turn one deep drawer into organized zones for socks, watches, and jewelry.
Lighting is the upgrade people forget. A reach-in closet with the room’s overhead fixture behind you casts shadows onto the very shelves you are searching. Battery-powered LED puck lights or a motion-activated strip run $20 to $60 and make a windowless closet genuinely usable. In a walk-in, a hardwired ceiling fixture or LED strip under the top shelf transforms how the space feels and functions.
Resist the urge to buy every insert in the catalog. Match accessories to your actual habits: if you own three belts, you do not need a 20-hook belt rack. Spend that money on an extra bank of drawers or better lighting instead. A closet crammed with unused specialty hardware is just clutter that cost more.
Choosing the Right System for You
Match the system to how long you will stay and how the closet is used. For a rental or a starter home, a wire or single-track modular kit is affordable and removable. For a home you plan to keep, invest in melamine or a professionally installed system that adds resale appeal; buyers notice an organized primary closet. Whatever you choose, design around your real inventory, anchor into studs, and build in a little empty shelf space for the clothes you have not bought yet. A well-planned inside closet organizer pays you back every single morning.
One last tip that saves both money and frustration: order your components in phases if the budget is tight rather than buying a cheap complete system you will outgrow. Start with the core rods and shelving that solve your biggest pain point, live with it for a few weeks, then add drawers, baskets, and specialty racks once you see how the space actually gets used. Most modular lines are designed to expand, so a mid-range system you build up over time beats a bargain kit you replace entirely in two years. Measure twice, mount into the framing, and let the layout follow your habits instead of forcing your habits to follow the layout.