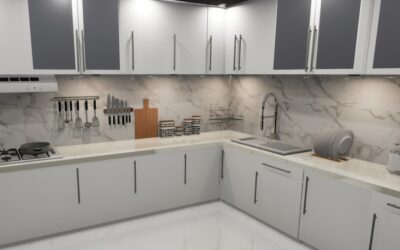
The difference between a kitchen that photographs beautifully and one that just functions often comes down to lighting you barely notice. Adding kitchen cabinet LED lights brings a professional glow to countertops, banishes the shadows your overhead fixture casts, and highlights a backsplash or glass-front cabinet like a showroom. Best of all, modern LED options make this a genuine weekend upgrade, from peel-and-stick strips you install in an afternoon to hardwired bars for a permanent, seamless look. Understanding the types and the wiring is all it takes to get it right.
Part of our Kitchen Remodeling guide — explore the full guide →
Where Cabinet Lighting Goes
There are three main zones for cabinet LEDs, and a complete kitchen often uses more than one. Under-cabinet lighting mounts beneath the upper cabinets to wash the countertop with task light where you actually chop, read recipes, and work. Over-cabinet lighting sits on top of the uppers and casts a soft uplight toward the ceiling for ambiance. In-cabinet lighting illuminates the inside of glass-front or open shelving to show off dishware.
Under-cabinet is the highest-value spot because it solves a real problem: your own body blocking the ceiling light and shadowing the counter. Start there if you do only one zone.
Types of LED Fixtures
Each fixture style suits a different look and skill level. Match the type to your goal:
- LED strip lights (tape): Flexible adhesive strips, ideal for continuous, even under-cabinet washes.
- Puck lights: Small round fixtures that cast focused pools, good for accenting or in-cabinet spots.
- Linear bar lights: Rigid low-profile bars that link together for a clean, uniform line.
- Under-cabinet light fixtures: Hardwired or plug-in bars with built-in switches for a finished look.
Strips give the most even, hidden effect; bar lights are the easiest to align in a straight run; pucks are simplest to place one at a time.
Choosing Color Temperature
Color temperature, measured in Kelvin, sets the entire mood, and it is the choice people most often get wrong. Warm white around 2700K to 3000K feels cozy and flatters wood tones and warm countertops. Neutral white near 3500K to 4000K reads clean and works well for task lighting and modern kitchens. Cool white above 4000K looks crisp but can feel clinical in a home kitchen.
For most kitchens, 3000K under the cabinets balances warmth with enough brightness to work by. Tunable LEDs that shift between warm and cool let you adjust for the time of day, a nice upgrade if your budget allows.
Powering and Wiring Options
How you power the lights determines how much work the install involves. Battery-operated and rechargeable pucks require no wiring at all and stick right up, perfect for renters. Plug-in LED strips and bars connect to a transformer that plugs into an outlet, hiding the cord along the cabinet back.
Hardwired systems tie into your electrical for a switch-controlled, cordless finish, but they need a junction box and often a permit, so many homeowners hire an electrician for that route. For a clean look without opening walls, a plug-in system routed to an outlet inside an upper cabinet is the sweet spot of appearance and simplicity.
Installing LED Strip Lights
Strip lights are the most popular DIY choice, and the process is straightforward. Measure the underside of each cabinet run and cut the strip only at the marked cut lines. Clean the surface with rubbing alcohol so the adhesive bonds, then peel and press the strip along the front inner edge of the cabinet, aimed down at the counter.
Mount the strip toward the front lip rather than the back so the light washes the whole counter and reflects off the backsplash. Connect the runs with the included clips or solderless connectors, plug into the transformer, and tuck the wiring up out of sight. Add a dimmer inline for full control over brightness.
Controls and Smart Features
Simple switches work, but a few control upgrades make cabinet lighting more useful. A dimmer lets you drop the lights low for evening ambiance and crank them up for detailed prep work. Motion sensors turn lights on automatically as you approach the counter, handy for a late-night glass of water.
Smart LED systems tie into Wi-Fi or a hub so you can adjust color and brightness by app or voice, and some sync with the rest of your smart home. These extras cost more but turn basic task lighting into a flexible design feature.
Cost and Whether It’s Worth It
A quality plug-in LED strip kit for a standard kitchen runs $30 to $100, puck light sets land around $20 to $60, and premium hardwired linear systems can reach $200 or more before installation. Given the dramatic improvement in both function and appearance, it is one of the highest-impact upgrades per dollar in any kitchen.
Start with under-cabinet strips at 3000K, add a dimmer, and you will wonder how you ever cooked in the shadow of your own cabinets. From there, expand to over-cabinet and in-cabinet accents to complete a layered lighting scheme that makes the whole kitchen feel custom.
Brightness and Beam Spread
Beyond color temperature, pay attention to brightness, measured in lumens, and how the light spreads. For task lighting over a countertop, aim for roughly 175 to 300 lumens per foot of strip so you have enough light to chop and read by without squinting. Accent lighting inside a glass cabinet can be dimmer, since its job is atmosphere rather than work.
The spacing of the LEDs on a strip matters too. A high-density strip with closely packed diodes casts a smooth, continuous line of light, while a cheap low-density strip shows a row of visible dots and dark gaps between them. Look for at least 60 LEDs per meter for a clean wash. Adding a diffuser channel, an aluminum track with a frosted cover, both hides the individual diodes and helps dissipate heat, giving under-cabinet lighting a finished, built-in appearance that looks far more expensive than the parts cost.