The kitchen is the hardest-working room in any house, and the floor takes the worst of it. Choosing among the many kitchen floor coverings means weighing water resistance against comfort, budget against longevity, and looks against the reality of dropped cast-iron pans. Most homeowners pick based on a showroom sample and regret it within two years. The smarter approach is to match the material to how you actually cook, clean, and live.
Part of our Kitchen Remodeling guide — explore the full guide →
Below is a contractor’s breakdown of every realistic option, what each costs installed, and where each one fails so you can spend your money once.
- What a Kitchen Floor Actually Has to Handle
- Luxury Vinyl Plank: The Modern Default
- Porcelain and Ceramic Tile: Built to Last Decades
- Hardwood and Engineered Wood: Warmth With a Catch
- Sheet Vinyl and Linoleum: Budget Workhorses
- Cost Comparison at a Glance
- Matching the Floor to Your Household
- Comfort, Maintenance, and the Details People Forget
- Underlayment, Subfloor, and Installation Realities
- Final Word
What a Kitchen Floor Actually Has to Handle
Before comparing materials, get clear on the demands. A kitchen floor faces standing water from dishwasher leaks, grease splatter, grit tracked from outside, and point loads from heavy appliances and stools. It also gets stood on for hours during meal prep, which is why comfort underfoot matters more here than in a bedroom.
I tell clients to rank three priorities: waterproofing, durability, and how the floor feels under bare feet. Almost no single material wins all three, so knowing your top priority steers the whole decision.
While you’re upgrading the kitchen floor, it might be a good time to rethink the seating too. Swapping out old bar stools is one of those small changes that makes the whole room feel more pulled together.
We may earn a commission when you purchase through our links.
Luxury Vinyl Plank: The Modern Default
Luxury vinyl plank, usually called LVP, has become the go-to for good reason. It is 100 percent waterproof, the rigid-core SPC versions shrug off dropped pots, and a wood-look finish fools most guests. Expect to pay $3 to $7 per square foot for the plank and another $1.50 to $3 for installation, putting a typical 200-square-foot kitchen around $1,200 to $2,000 installed.
The click-lock format floats over your existing subfloor, so a handy homeowner can install 200 square feet in a weekend. The downside is resale perception in higher-end homes, where buyers still expect tile or hardwood. For the money, though, nothing beats LVP for a busy family kitchen.
Porcelain and Ceramic Tile: Built to Last Decades
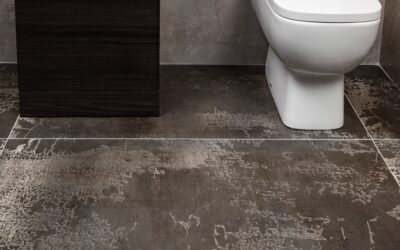
Tile is the most durable kitchen floor covering you can buy. Glazed porcelain rated PEI 4 or 5 will outlast the cabinets above it, resists water completely when grout is sealed, and wipes clean of grease in seconds. Material runs $2 to $8 per square foot, but installation is the expensive part at $7 to $14 per square foot because it demands a flat substrate, thinset, and grouting.
Two honest drawbacks: tile is cold and unforgiving. A glass dropped on porcelain shatters every time, and standing on it for an hour leaves your feet aching. A cushioned anti-fatigue mat at the sink solves the comfort problem for about $40.
Hardwood and Engineered Wood: Warmth With a Catch
Solid hardwood brings unmatched warmth and adds real resale value, but it and water are natural enemies. If you want wood, choose engineered hardwood with a waterproof core, or at minimum wipe spills immediately. Site-finished oak runs $8 to $15 per square foot installed; quality engineered planks land around $6 to $12.
One practical tip: avoid wood directly in front of the sink and dishwasher if you are a casual cleaner. Even sealed wood will cup and stain after repeated standing water.
Sheet Vinyl and Linoleum: Budget Workhorses
For a tight budget, sheet vinyl is hard to beat at $1 to $3 per square foot installed. A single large sheet means almost no seams for water to penetrate, making it genuinely practical in laundry-kitchen combos. Modern prints look far better than the 1980s versions most people remember.
Linoleum, made from linseed oil and cork dust, is the eco-friendly cousin at $3 to $5 per square foot. It is naturally antimicrobial and biodegradable, though it needs occasional resealing and can yellow under direct sunlight.
Cost Comparison at a Glance
Here is how the main kitchen floor coverings stack up installed, per square foot:
- Sheet vinyl: $1 to $3 — cheapest, fully waterproof, shortest lifespan (10 to 20 years)
- Luxury vinyl plank: $4 to $10 — best all-around value, waterproof, 15 to 25 years
- Linoleum: $3 to $7 — eco-friendly, needs resealing, 20 to 40 years
- Ceramic/porcelain tile: $9 to $22 — most durable, cold and hard, 50-plus years
- Engineered wood: $6 to $12 — warm and attractive, moderate water risk, 20 to 30 years
Matching the Floor to Your Household
Run the math against your life, not a Pinterest board. Have toddlers and dogs? LVP forgives spills and scratches and cleans with a damp mop. Hosting formal dinners in a high-end home? Porcelain tile or engineered wood pays back at resale. Renting out the property or flipping it? Sheet vinyl delivers a clean look for the least cash.
Whatever you choose, budget for proper subfloor prep. The single biggest installation failure I see is beautiful flooring laid over an uneven or damp subfloor, which telegraphs every dip and traps moisture. Spend the extra $200 to $400 leveling the base, and any of these kitchen floor coverings will serve you for a decade or more.
Comfort, Maintenance, and the Details People Forget
Two factors get overlooked in the showroom and matter every single day: how the floor feels and how hard it is to keep clean. Hard surfaces like porcelain and stone are murder on the legs during long cooking sessions, while resilient floors like vinyl, cork, and linoleum give slightly underfoot and ease joint fatigue. If you cook often, lean toward a resilient surface or plan for cushioned mats at your main work zones.
Maintenance differs sharply too. Tile demands grout sealing every year or two and grout lines trap grease in a busy kitchen. Vinyl and sheet flooring wipe clean with a damp mop and almost never stain. Wood needs the gentlest care of all, with no standing water and a pH-neutral cleaner only. Match the upkeep to how much cleaning you actually want to do, not the cleaning routine you imagine you will keep.
Underlayment, Subfloor, and Installation Realities
Whatever surface you choose, the layers beneath it decide how long it lasts. A concrete slab needs a moisture test before any wood or vinyl goes down, because trapped vapor will eventually buckle the floor. Over a wood subfloor, plan for a quarter-inch of cement backer board under tile to prevent cracked grout, and a quality underlayment under floating vinyl or laminate to quiet footsteps and smooth minor dips.
Installation timelines vary widely. A DIY LVP floor in a 200-square-foot kitchen takes a weekend; a professional tile job with proper substrate prep runs three to five days including cure time for thinset and grout. Build that downtime into your planning, since you cannot walk on fresh tile for at least 24 hours.
Final Word
There is no universally best kitchen floor, only the best floor for your budget and habits. If you remember one rule, make it this: prioritize waterproofing in a kitchen above almost everything else, because water damage is what destroys floors and resale value fastest. Get that right, weigh comfort and upkeep honestly, and the rest is a matter of taste.
Prefer to explore on your own?
See how new flooring looks in your actual room in seconds — free, no signup.
Try the free Floor Studio →