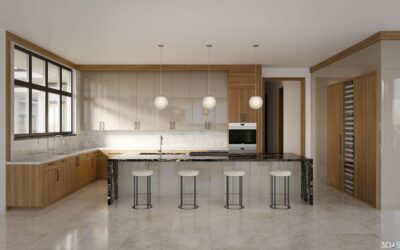
Well-planned kitchen island cabinets transform an ordinary island from a simple countertop into the hardest-working part of your kitchen. They add storage for pots, small appliances, and pantry goods, create room for a sink or cooktop, and often provide seating for casual meals. Because an island sits in the middle of the room where everyone can see it, its cabinetry sets the tone for the entire space.
Part of our Kitchen Remodeling guide — explore the full guide →
Getting the cabinet layout right means balancing storage, clearances, seating, and utilities. Squeeze too much into the island and you block traffic; build it too small and you waste the opportunity. This guide covers island cabinet types, sizing, materials, costs, and the design details that separate a great island from an awkward one.
- What Makes Island Cabinets Different
- Types of Island Cabinet Configurations
- Sizing Your Island and Its Cabinets
- Cabinet Materials and Construction
- Adding a Sink, Cooktop, or Appliances
- Cost Expectations
- Seating and Ergonomics
- Common Mistakes to Avoid
- Maximizing Island Storage
- Style and Finish Choices
What Makes Island Cabinets Different
Island cabinets differ from perimeter cabinets in a few key ways. They are finished on all visible sides, not just the front, because you see the island from every angle. That finished back and end panels add cost but are essential for a polished look. Islands also frequently combine base cabinets from both sides, doubling storage in a single footprint, and they may integrate a sink, dishwasher, cooktop, or beverage fridge.
Because the island is a freestanding structure, its cabinets must be securely anchored to the floor, and any plumbing or electrical runs beneath the subfloor. That utility routing is the biggest reason island projects cost more than adding wall cabinets.
Types of Island Cabinet Configurations
Islands can be assembled from standard stock cabinets or built as custom units. Common configurations include:
- Double-sided storage: base cabinets facing both directions for maximum capacity in a wide island.
- Storage plus seating: cabinets on one side and a knee-space overhang on the other for stools.
- Sink or cooktop island: a cabinet run interrupted by a sink base or a drop-in cooktop with drawers below.
- Prep island with drawers: deep pot-and-pan drawers that many cooks prefer over door cabinets.
- Display and open shelving: open cubbies on the end or back for cookbooks and decorative items.
Deep drawer banks are increasingly popular because they bring contents out to you instead of forcing you to crouch and reach into a dark cabinet.
Sizing Your Island and Its Cabinets
The island must fit the room with proper clearance on all sides. The standard minimum walkway around an island is 36 inches, and 42 to 48 inches is better in a busy kitchen where two people work or appliance doors swing open. Measure your kitchen and subtract these clearances before deciding on island size.
Standard base cabinets are 24 inches deep and about 34.5 inches tall before the countertop. A double-sided island using two rows of 24-inch cabinets back to back is roughly 48 to 50 inches deep. If you want seating, add a 12- to 15-inch counter overhang on the seating side, which pushes the island wider. A typical functional island runs 3 to 4 feet wide and 5 to 8 feet long.
Cabinet Materials and Construction
Island cabinets face the same material choices as the rest of your kitchen, and quality shows because the island is a focal point:
- Solid wood doors and drawer fronts (maple, oak, cherry) offer durability and a premium feel.
- Plywood boxes resist moisture and hold fasteners better than particleboard, making them the better choice near a sink.
- MDF doors take paint beautifully and resist seasonal expansion, ideal for a painted island in a contrasting color.
- Particleboard with melamine is the budget option found in stock cabinets, acceptable for dry storage but weaker over time.
A popular design move is to finish the island in a different color or wood tone from the perimeter cabinets. A navy or deep green island against white perimeter cabinets, for example, creates a designer contrast at little extra cost.
Adding a Sink, Cooktop, or Appliances
Integrating utilities turns an island into a true work center but raises the budget substantially. A sink requires water supply, a drain, and a vent run under the floor, typically $500 to $2,000 in plumbing depending on distance to existing lines. A cooktop needs a dedicated circuit and often downdraft ventilation. A dishwasher or beverage fridge needs both water and power.
Plan these utilities before the cabinets are ordered, because the cabinet layout must leave space for the appliance, its connections, and access panels. Retrofitting plumbing into a finished island is far more expensive than routing it during the original build.
Cost Expectations
Island cabinet costs vary widely with size, materials, and utilities:
- Basic stock-cabinet island, no utilities: $1,000 to $3,000 including countertop
- Mid-range semi-custom island with seating: $3,000 to $7,000
- Custom island with sink, cooktop, and premium counters: $7,000 to $20,000-plus
Countertop choice adds significantly: laminate runs $20 to $50 per square foot installed, quartz and granite $50 to $120, and premium natural stone more. Because the island top is a single visible slab, many homeowners splurge here.
Seating and Ergonomics
If you plan to seat people at the island, the overhang and stool height must be right. For a standard 36-inch counter-height island, plan a 12- to 15-inch overhang and use 24- to 26-inch counter-height stools. For a 42-inch raised bar section, use 29- to 30-inch bar stools. Allow 24 inches of width per seat so people are not elbow to elbow.
The knee space under the overhang must be open, which reduces storage on that side. Support a large overhang with steel brackets or corbels so the countertop does not crack under weight; stone overhangs beyond about 10 inches usually require hidden steel supports.
Common Mistakes to Avoid
The most frequent island mistake is making it too big for the room, choking the walkways so the kitchen feels cramped. The second is neglecting the finished sides, leaving raw cabinet backs visible. Others forget to plan electrical outlets, which building codes require on islands, or they mix seating and a cooktop on the same side, putting diners next to hot pans.
Maximizing Island Storage
The whole point of island cabinets is storage, so plan the interiors as carefully as the exterior. A few strategies dramatically increase how much your island holds and how usable it is:
- Deep pot-and-pan drawers on heavy-duty full-extension slides bring bulky cookware out to you instead of forcing you to reach into a dark box.
- Pull-out trash and recycling bins hidden behind a cabinet door keep waste out of sight and free up floor space.
- Vertical tray dividers store baking sheets, cutting boards, and platters on edge where they are easy to grab.
- Open end shelves on the island’s short sides display cookbooks or baskets and soften the boxy look.
- Toe-kick drawers reclaim the wasted space at the very bottom for flat items like linens or seldom-used trays.
- A microwave or beverage-fridge nook built into the base clears counter space elsewhere in the kitchen.
Because an island is accessible from multiple sides, you can dedicate one side to cooking storage and another to dishes or pantry goods, effectively creating two zones in one structure.
Style and Finish Choices
The island is the visual anchor of the kitchen, so its cabinet doors set the tone. Shaker-style doors remain the most popular for their clean, timeless lines that suit nearly any kitchen. Flat-panel slab doors read modern and minimalist, while raised-panel doors lean traditional. Hardware matters too: oversized bar pulls feel contemporary, cup pulls and knobs feel classic, and matte black or brushed brass finishes add a designer touch.
Consider making the island a deliberate focal point with a contrasting color, a butcher-block or waterfall stone top, or furniture-style legs and corbels that make it look like a freestanding piece of furniture rather than a run of cabinets. These touches cost relatively little but transform an ordinary island into the centerpiece of the room.
Plan the outlets, respect the clearances, finish every visible surface, and decide early whether the island is primarily storage, prep, or gathering. With thoughtful cabinet selection and layout, kitchen island cabinets become the storage-rich, hard-working centerpiece that makes the whole kitchen function better and look intentional.