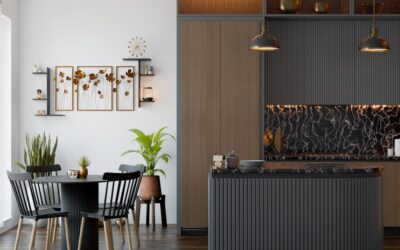
Scroll through any design feed and every kitchen island looks like a magazine cover, until you notice none of them show where the trash goes or how two people pass without a collision. Good kitchen island inspiration starts with function and lets the beauty follow, not the other way around. The most stunning island in the world fails if the clearances are wrong or the seating cramps your knees. This guide pulls together kitchen island inspiration grounded in the dimensions, storage tricks, and material choices that make an island genuinely work every day.
Part of our Kitchen Remodeling guide — explore the full guide →
I have designed and installed islands in galley remodels and 400-square-foot great rooms alike, and the winners always respect the same handful of rules. Let those anchor your inspiration.
- Kitchen Island Inspiration Built on the Right Dimensions
- Seating Layouts People Actually Enjoy
- Storage Ideas That Earn Their Space
- Material and Countertop Inspiration
- Lighting and Electrical the Island Needs
- Small Kitchen Island Ideas
- Adding Function: Sinks, Cooktops, and Appliances
- Pulling Your Island Design Together
Kitchen Island Inspiration Built on the Right Dimensions
Before you fall in love with a look, nail the numbers. The minimum walkway around an island is 36 inches, and you want 42 to 48 inches on the sides people work and pass through most. Squeeze below 36 and the space feels tight and appliance doors clash with the island.
A functional island is at least 4 feet long and 2 feet deep, but the sweet spot for a mixed prep-and-seating island is closer to 7 to 8 feet long by 40 to 42 inches deep. Standard counter height is 36 inches; a raised bar section runs 42 inches. Keep the island proportional to the room, a rule of thumb is that the island should take up no more than about 10 percent of the kitchen’s floor area to preserve flow.
Seating Layouts People Actually Enjoy
If your island doubles as a place to eat or gather, plan the seating deliberately. Each stool needs 24 inches of width to sit comfortably, and the overhang above their knees should be 12 inches for counter-height seating or 15 inches for bar height. Skimp on the overhang and diners bang their knees on the cabinet base.
A few seating configurations that work well:
- Single-level, all one side: clean and modern, best for longer islands with a 12-inch overhang
- Two-tier with a raised bar: hides prep mess behind the taller back edge while guests sit at 42 inches
- L-shaped or wrap-around seating: fits more stools on a large island and encourages conversation
- End seating: tucks one or two stools at the short end to keep a compact footprint
Storage Ideas That Earn Their Space
An island is prime real estate, so make every cubic foot work. The base can hold far more than a row of doors. Deep pot-and-pan drawers on the cooking side keep heavy cookware within reach of the range. A pull-out trash and recycling cabinet is the single most requested feature I install, and it belongs near the prep sink or the main work zone.
Other storage moves worth stealing: a microwave drawer that frees counter space and keeps the appliance off the perimeter, open shelving on the seating end for cookbooks and baskets, and a slim tray-divider cabinet for cutting boards and baking sheets. If your island houses a cooktop or sink, plan the plumbing and gas or electrical runs early, they dictate where the cabinets can go.
Material and Countertop Inspiration
The island is where many kitchens make a statement, and a contrasting island is one of the easiest high-impact moves. Painting the island a deep navy, forest green, or charcoal against white perimeter cabinets reads as intentional and custom. For the countertop, the island often justifies a splurge because it is a smaller area than the full perimeter:
- Quartz: the low-maintenance favorite, $50-$120 per sq ft installed, no sealing required
- Butcher block: warm and affordable at $40-$100 per sq ft, ideal for a prep-focused island
- Granite: durable natural stone with unique veining, $40-$100 per sq ft
- Waterfall edge: running the counter material down the sides for a dramatic modern look, adds material cost but huge visual payoff
Mixing materials, a stone perimeter with a butcher-block island top, gives you a durable work surface plus a warm gathering spot without committing the whole kitchen to wood.
Lighting and Electrical the Island Needs
Great islands are lit deliberately. Pendant lights are the classic move: hang two or three fixtures 30 to 36 inches above the countertop, spaced evenly, and size them so the total width of the pendants is about a third of the island length. Odd numbers usually look best over a single island.
Do not forget the working details. Building codes generally require at least one electrical outlet on an island, and in practice you want two, positioned where you will plug in a mixer or charge a laptop. Consider a pop-up or side-mounted outlet strip to keep the countertop clean. If the island holds a cooktop, plan for downdraft ventilation or an overhead hood, and coordinate that with your pendant placement so nothing collides.
Small Kitchen Island Ideas
Not every kitchen has room for an 8-foot island, and that is fine. A compact island of 3 to 4 feet still adds valuable counter and storage. In tight kitchens, a rolling island or a portable butcher-block cart delivers flexibility, you move it aside when you need the floor space. Another option is a slim peninsula that connects to existing cabinetry, giving you a work surface and casual seating without the all-around clearance an island demands.
For very small spaces, even a 24-inch-deep island with a single-level top and two tucked-in stools transforms how the kitchen functions. The key is honoring that 36-inch minimum walkway, if adding an island drops any pathway below that, the room will feel worse, not better. A useful test in a tight kitchen is to open every appliance and cabinet door at once with the taped-out island in place; if the dishwasher door hits the island or the oven cannot swing open, the island is too big for the room. In the smallest kitchens, a mobile island on locking casters gives you the best of both worlds, roll it to the center to prep, then tuck it against a wall when you need the floor clear for a crowd.
Adding Function: Sinks, Cooktops, and Appliances
Many of the most-loved islands do more than hold a counter. Dropping a prep sink into the island keeps the water source close to where you chop and lets a second cook work without crowding the main sink. A prep sink runs about 15 to 18 inches wide and needs supply and drain lines routed through the cabinet base, so plan it before construction. If you want the main sink on the island, position it so the person washing faces the room rather than a wall.
A cooktop or full range in the island turns it into the kitchen’s command center, but it demands ventilation. You will need either a downdraft vent that rises behind the burners or an overhead island hood, and the hood must be sized to the cooktop width and ducted to the exterior. That ducting affects your ceiling and pendant layout, so coordinate it early. Building codes also require specific clearances around a cooktop, keep at least 15 inches of landing counter on each side.
Other popular island appliances include a beverage or wine fridge tucked into the base for entertaining, a microwave drawer, and a dishwasher placed near the island sink. Every appliance you add means electrical, and often plumbing or ductwork, so the more you load into the island, the more the layout must be locked in before the cabinets go in. Decide your appliance wish list at the design stage, not after.
Pulling Your Island Design Together
The best kitchen island inspiration is the kind you can actually build in your room, with your budget, for the way you cook. Start with the clearances and the dimensions, decide whether the island is primarily for prep, seating, storage, or a mix, and then layer on the finishes that make it beautiful. Nail the function first and almost any style, farmhouse, modern, transitional, will look right on top of it. Get the numbers wrong and no amount of pretty stone will fix the daily frustration.
If you take one thing from all these ideas, let it be this: measure your actual kitchen and tape out the island footprint on the floor before you commit to anything. Walk the paths, open the imaginary appliance doors, and sit at the pretend seating for a few days. That simple exercise reveals whether an island genuinely improves the room or just chokes the traffic, and it costs nothing but painter’s tape. Pair that real-world check with the dimensions and features covered here, and your island will be the piece the whole kitchen orbits around, beautiful, yes, but above all a joy to use every single day.