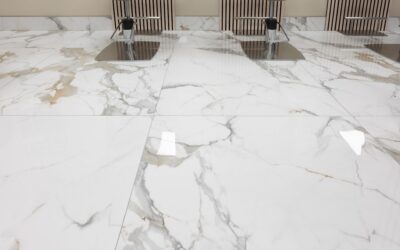
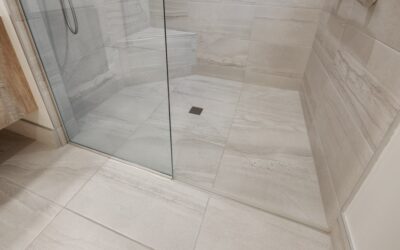
Walk into any newly renovated kitchen or hotel lobby lately and you have probably noticed floors with almost no grout lines, wide expanses of stone-look surface that read as one continuous slab. That look comes from large format porcelain tile, generally defined as any tile with at least one side measuring 15 inches or longer. These oversized formats have taken over high-end residential design because they make small rooms feel bigger, cut grout maintenance to a minimum, and mimic natural marble or concrete convincingly. But they also demand a level of subfloor precision that standard 12-inch tiles forgive, and that is exactly where DIY installs go wrong.
Part of our Tile & Grout guide — explore the full guide →
What Counts as Large Format
The industry threshold is any tile with an edge of 15 inches or more, though in practice the term usually refers to sizes like 18×36, 24×24, 24×48, and the truly dramatic gauged porcelain panels that reach 5 feet by 10 feet. Common residential choices land at 12×24 (technically the entry point) up through 24×48. The larger the tile, the fewer grout joints, and the more seamless the finished floor or wall appears.
Porcelain is the material of choice here because it is dense, fires at high temperatures, and absorbs less than 0.5 percent water. That density lets manufacturers produce big, flat, rigid sheets that hold their shape, something a softer ceramic body cannot do reliably at these dimensions.
Why Homeowners Love It
The visual payoff is the main draw. Fewer grout lines mean a cleaner, more expansive look, and grout is the part of any tile floor that stains, cracks, and demands scrubbing. Cut the joint count by two-thirds and you cut cleaning time to match. Beyond looks, porcelain is nearly impervious to water, scratch-resistant, and rated for high traffic, making it a smart pick for kitchens, bathrooms, entryways, and open-concept main floors.
Modern printing technology also means a single large format porcelain tile can carry a high-resolution image of Carrara marble, weathered concrete, or oak planking, with surface texture to match. You get the appearance of natural stone without the sealing, etching, and fragility that come with real marble.
The Subfloor Is Everything
Here is the hard truth that separates a flawless install from a lippage nightmare. Large tiles are unforgiving of an uneven substrate. The Tile Council of North America tightens its flatness standard for tiles with edges 15 inches or longer: the floor must be flat to within 1/8 inch over 10 feet and 1/16 inch over 2 feet. A dip that a 12-inch tile would bridge invisibly will leave a big tile rocking or its edge standing proud of its neighbor.
Before any tile goes down, check the floor with a long straightedge and mark the highs and lows. Grind down high spots and fill lows with a self-leveling underlayment. On wood subfloors, you need adequate stiffness, typically a deflection rating of L/360 or better, plus an uncoupling or backer membrane. Skipping this prep is the single most common reason big-tile floors fail.
Controlling Lippage
Lippage is the height difference between two adjacent tile edges, and it is the enemy of large format work. Three tools keep it in check:
- Tile leveling systems: Clips and wedges (or caps) that clamp adjacent tiles to the same plane while the mortar cures. Non-negotiable for tiles over 15 inches.
- The offset rule: Never lay large planks in a running bond with a 50 percent offset. Most tiles have a slight bow, and a half offset places the highest point of one tile against the lowest edge of the next. Keep offsets at 33 percent or less.
- Back-buttering: Trowel mortar onto the floor and skim a thin coat onto the back of each tile to guarantee full coverage. Large format demands at least 90 percent mortar contact, and back-buttering is how you hit it.
The Right Mortar and Trowel
Standard thinset is not built for this. Use a mortar labeled for large and heavy tile, sometimes called LHT or medium-bed mortar, which resists slumping and supports the tile’s weight without letting it sink unevenly. Pair it with a large-notch trowel, typically a 1/2-inch by 1/2-inch square notch, and comb the mortar in straight lines rather than swirls so air can escape as you set the tile. After bedding, pull one tile up occasionally to confirm you are getting full coverage across the back.
Working time matters too. In a warm room, thinset skins over fast, so mix smaller batches and only spread what you can set in ten minutes. A skinned-over ridge will not bond, and with a heavy tile that means a hollow spot that eventually cracks.
Cost Breakdown
Large format porcelain tile itself runs $3 to $12 per square foot for common residential looks, with premium marble-look and gauged panels reaching $15 to $25. Because installation is more demanding, labor costs more than standard tile, generally $8 to $15 per square foot installed, and gauged panels can push $20 or more. A typical 200-square-foot kitchen floor, materials and professional labor combined, lands between $2,600 and $5,000. Budget extra for self-leveling compound, a leveling clip system (around $60 to $120 for a room), and diamond blades rated for porcelain if you are cutting yourself.
Cutting and Handling
Big tiles are heavy and brittle, and a 24×48 panel can crack under its own weight if you carry it flat. Move tiles vertically, on edge, and always with two people for the larger sizes. Cutting requires a rail-guided wet saw or a large scoring rail with a running pliers; a small handheld snap cutter simply will not span the tile. For sink and outlet cutouts, use a diamond hole saw and go slow with water cooling. Rushing a cut is how you turn a $40 tile into scrap.
Is It Right for Your Project?
Choose large format porcelain when you want a modern, seamless look and are willing to invest in subfloor prep, or hire a pro who will. It shines in open floor plans, walk-in showers with fewer joints to seal, and feature walls. It is a tougher DIY than standard tile, so honestly assess your comfort with leveling systems and floor flattening before committing. For homeowners who want the beauty of stone with the durability of porcelain and minimal grout upkeep, few materials deliver more.
Grout and Joint Width
Even though large format tile minimizes grout, the joints you do have deserve attention. Industry guidance calls for a grout joint of at least 1/16 inch, and for rectified tiles, edges precisely cut to a uniform size, many installers run a 1/8-inch joint. Do not be tempted to butt the tiles together with no joint at all; grout absorbs the small dimensional variations between tiles and gives the floor room to move without cracking. For the modern seamless look, choose a grout color that closely matches the tile so the joints visually disappear. Use a high-quality grout, and consider an epoxy or a premium cement grout with built-in stain resistance, since the whole point of large format is low maintenance. Seal cement-based grout after it cures to keep it from staining, and your floor will stay looking clean with minimal effort.
Where Large Format Works Best
Some rooms are practically made for oversized porcelain. Open-concept main floors benefit enormously, because running the same large tile continuously across a kitchen, dining, and living area makes the whole space read as one expansive room rather than a series of small ones. Walk-in showers are another standout application: fewer grout joints mean fewer places for mold to grow and less sealing to maintain, and large tiles on a shower wall create a spa-like, monolithic look. Entryways and mudrooms gain durability and easy cleaning. The one place to be cautious is a small, choppy room full of angles and obstructions, where large tiles require many cuts and lose their seamless advantage. In those spaces, a medium format often looks better and wastes less material.
Common Mistakes to Avoid
A few errors show up again and again on failed large-format jobs. Laying tiles in a 50 percent brick-lay offset is the most damaging, because tile bow places high points against low points and guarantees lippage; keep offsets at a third or less, or run a straight grid. Skipping the flatness check on the subfloor is a close second, and it is not optional at these sizes. Using standard thinset instead of a large-and-heavy-tile mortar leads to slumping and hollow spots. And rushing the cure by walking on or grouting the floor too soon can shift tiles that have not fully set. Slow down, prep the substrate, use the right products, and the job goes smoothly.
Done right, a large format porcelain tile floor looks like poured stone and lasts for decades with almost no maintenance beyond a damp mop. Nail the substrate, respect the offset rule, and use a real leveling system, and you will end up with the kind of floor that makes an entire room feel custom-built.
Prefer to explore on your own?
See how new flooring looks in your actual room in seconds — free, no signup.
Try the free Floor Studio →