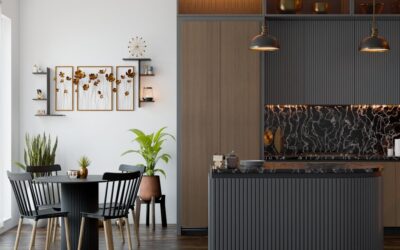
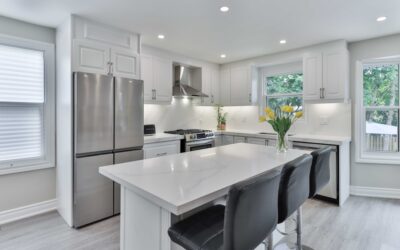
The kitchen island stopped being just a slab of counter years ago. A large kitchen island table now serves as prep station, breakfast bar, homework desk, buffet line, and the spot where everyone gathers no matter how many rooms the house has. Get the dimensions right and it becomes the hardest-working surface in the home; get them wrong and it either crowds the walkways or floats uselessly in the middle of the floor. Planning a large kitchen island table is mostly a matter of geometry, clearances, and knowing how you actually cook and eat.
Part of our Kitchen Remodeling guide — explore the full guide →
Here’s how to size, build, and outfit an island that earns its footprint.
- What Makes an Island "Large" and When You Need One
- Ideal Dimensions and Clearances
- The Table-Style Extension
- Choosing the Countertop Material
- Storage, Power, and Function
- Lighting the Island
- Seating Styles and Stool Selection
- Choosing the Base and Cabinet Layout
- Flooring and Structural Support Underneath
- Budgeting Your Large Island
What Makes an Island “Large” and When You Need One
An island generally crosses into “large” territory once it exceeds about 7 feet in length or roughly 40 square feet of surface. At that scale it can combine two zones, say a working counter and a separate seated dining or table extension, rather than doing one job.
You need a large island when your kitchen has the floor space to support it and your household actually uses the room as a gathering hub. The rule of thumb: your kitchen should be at least 12 by 12 feet, and often larger, before a big island fits without choking traffic. In a smaller room, a big island becomes an obstacle you squeeze around every day.
Ideal Dimensions and Clearances
Clearance is non-negotiable, and it’s where most designs fail. Follow these tested figures:
- Walkway around the island: at least 36 inches on all sides; 42 to 48 inches on the working side where you open the oven and dishwasher and two people pass.
- Island width (depth): 40 to 48 inches is common for a large island, allowing counter on one side and seating overhang on the other.
- Island length: 7 to 10 feet for a large unit; beyond 10 feet, consider a double-island layout instead.
- Counter height: 36 inches standard; a raised bar section runs 42 inches; a lower table-height extension is 30 inches for dining chairs.
For seating, budget 24 inches of linear width per stool and a knee overhang of 12 to 15 inches at counter height, more for the taller bar. Skimp on the overhang and diners bang their knees.
The Table-Style Extension
What distinguishes an island table from a plain island is a dedicated dining surface, often a lower, 30-inch-high section attached to the end or side. This gives you real chair-height seating instead of only tall stools, which older guests and young kids appreciate.
You can execute this two ways: build the extension into the cabinetry as a cantilevered top supported by a leg or bracket, or butt a freestanding table against the island so it reads as one piece. The built-in approach looks seamless; the freestanding table adds flexibility because you can pull it away for a party. Either way, a table extension for four needs about 6 feet of length and 30 inches of depth.
Choosing the Countertop Material
A big island means a lot of square footage, so material choice drives both looks and budget:
- Quartz: Nonporous, scratch- and stain-resistant, no sealing. The go-to for hardworking islands. Roughly $60 to $120 per square foot installed.
- Granite: Natural stone, heat-tolerant, needs periodic sealing. $50 to $100 per square foot installed.
- Butcher block: Warm and great for a table-style section you’ll eat at; needs oiling and isn’t for hot pans. $40 to $100 per square foot.
- Waterfall edge: Running the stone down the sides to the floor adds a dramatic look and $1,000 to $3,000 to the job because of the extra slab and fabrication.
On a large island you may need two slabs, and a big surface almost always requires a seam. Plan the seam location with your fabricator so it lands somewhere inconspicuous, not dead center under the pendant lights.
Storage, Power, and Function
Don’t waste the volume underneath. A large island can hide deep pot drawers, a microwave drawer, a wine fridge, trash and recycling pull-outs, and open shelving for cookbooks on the seating side. If you’re moving the sink or cooktop into the island, you’ll need plumbing or a gas line and ventilation, which adds significant cost and should be planned with a contractor early.
Electrical code requires receptacles for an island of this size, and today’s homeowners want them: plan for at least two GFCI outlets, and consider a pop-up outlet or USB charging station so the surface stays clean. Position outlets where they’re handy for small appliances but not right where diners sit.
Lighting the Island
A large surface needs dedicated light. The standard is a row of pendant lights centered over the island, spaced evenly. For a 7- to 8-foot island, two or three pendants look balanced; for 9 feet or more, use three. Hang them 30 to 36 inches above the countertop so they light the surface without blocking sightlines across the room. Add recessed cans or under-counter lighting on the seating side for tasks and ambiance.
Seating Styles and Stool Selection
How you seat the island shapes both comfort and looks. Counter-height seating (36-inch counter) calls for 24- to 26-inch stools; bar-height seating (42-inch counter) needs 28- to 30-inch stools; and a table-height extension (30-inch surface) uses standard 18-inch dining chairs. Mixing heights within one island looks busy, so pick a plan and stay consistent.
Count the seats realistically. Allow 24 inches of linear counter per person, plus a few inches of breathing room at the ends. A 10-foot island can comfortably seat four to five along one side. Backless stools tuck fully under the overhang and keep sightlines open, while stools with backs are more comfortable for lingering meals but eat into walkway space when pulled out. In a busy family kitchen, swivel stools make getting in and out easier for kids and guests.
Choosing the Base and Cabinet Layout
A large island is essentially a freestanding cabinet run, and how you configure the base drives its usefulness. Orient working storage, pots, utensils, trash pull-outs, toward the cooking side, and reserve the seating side for knee space and perhaps shallow display shelving or a bank of cookbook cubbies.
Decide early whether the island houses a sink, a cooktop, both, or neither. A prep island with a small bar sink needs plumbing; a cooking island with a cooktop needs gas or a heavy electrical circuit plus downdraft or overhead ventilation. Each utility you add raises cost and complicates the cabinet layout, so map the plumbing and electrical before finalizing the cabinet boxes. If you want the cleanest look, keep appliances at the perimeter and let the island stay a pure prep-and-gather surface.
Flooring and Structural Support Underneath
Big islands are heavy, especially with stone counters, so the floor and framing matter. A large quartz or granite top can add several hundred pounds; over a basement or crawlspace, confirm the floor joists can carry the concentrated load, and add blocking or a doubled joist if a contractor flags a concern. On a slab, this is a non-issue.
Also consider the flooring itself. Because the island is fixed in place, the flooring typically runs up to and around its base rather than beneath it. If you’re installing new floors and a new island together, coordinate the sequence with your installer, and keep a few extra boxes of flooring in case the island layout ever changes. A toe kick recessed 3 inches at the base keeps your feet comfortable while you work and gives the whole piece a built-in, finished look.
Budgeting Your Large Island
Costs vary widely with size and features. A basic large island with stock cabinetry and quartz might run $3,000 to $6,000. Add a table extension, waterfall edge, a sink or cooktop with plumbing and gas, custom cabinetry, and premium stone, and you can easily reach $8,000 to $20,000 installed. The single biggest cost drivers are relocating plumbing or gas into the island and choosing a waterfall stone edge.
To keep the project on budget, decide early which features are essential and which are aspirational. Relocating the sink or cooktop into the island is the most expensive single choice because it drags plumbing, gas, and ventilation into the equation; leaving those at the perimeter can save thousands. A waterfall stone edge is beautiful but adds slab and fabrication cost, and a table-height extension adds material and support work. Stock or semi-custom cabinet bases cost far less than full custom and, for a rectangular island, often look just as good once topped with quality stone.
Whatever your budget, spend first on getting the dimensions and clearances right, because a beautifully finished island that blocks the path to the fridge is a daily frustration. Nail the geometry, and a well-planned large kitchen island table will be the surface your household lives around for the next twenty years.