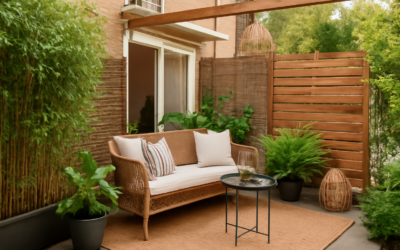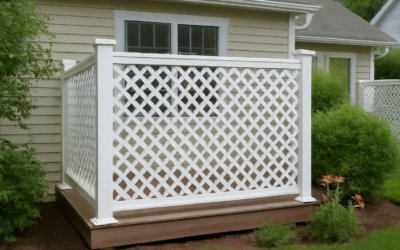
Most homeowners buy standard diamond lattice, stand it up next to the hot tub, and discover the neighbors can still see straight through it. A lattice privacy panel solves that by closing the openings down to roughly an inch or less, so the panel blocks sightlines while still letting air and some light pass. Framed properly between sturdy posts, it becomes a lattice privacy wall that looks built-in rather than propped up.
The short answer: choose privacy-grade lattice (sometimes called closed or tight-weave lattice) with openings of about 1 inch or smaller, frame it inside a rigid border of 2x lumber or vinyl channel, and mount it to posts spaced no more than about 6 to 8 feet apart. On a deck, attach posts to the framing with structural hardware; on a patio or in the yard, set posts in concrete below the local frost line. Vinyl costs a little more up front but needs almost no upkeep, while wood can be stained to match your deck.
- Lattice Privacy Panel vs Standard Lattice: What Changes
- Vinyl vs Wood Lattice for a Privacy Screen
- Tools and Materials
- How to Frame a Lattice Privacy Wall Step by Step
- Adding Vines and Planters for Extra Privacy
- Troubleshooting Common Problems
- Lattice Privacy Screen Cost Ranges
- When to Call a Pro
- Frequently Asked Questions
Below you will find how privacy lattice compares to the standard kind, what to buy, a step-by-step framing method, troubleshooting for sagging and wobbling panels, typical cost ranges, and when a contractor makes sense.
Lattice Privacy Panel vs Standard Lattice: What Changes
Standard garden lattice usually has openings of about 1-5/8 inches to 3 inches between slats. That is fine for a trellis or skirting under a deck, but at eye level it only filters the view. A lattice privacy panel narrows the gap to around 1 inch, and some “closed” styles overlap the slats so the opening shrinks to a sliver. From more than a few feet away, the screen reads as nearly solid.
Pattern matters too. Diagonal (diamond) lattice feels traditional and hides fasteners well. Square lattice looks more modern and pairs nicely with horizontal-board fences. Either works as a privacy lattice for deck railings or freestanding screens, so pick the one that suits the architecture of your house.
- Standard lattice: 1-5/8 to 3 inch openings, light and inexpensive, low privacy.
- Privacy lattice: about 1 inch or smaller openings, heavier, moderate to high privacy.
- Closed or overlapped lattice: minimal gaps, highest privacy, most wind resistance, needs the strongest framing.
Vinyl vs Wood Lattice for a Privacy Screen
Wood lattice is usually pressure-treated pine or cedar. Treated pine is the budget option and takes stain well once it dries out, typically after a few weeks to a couple of months. Cedar weathers to a soft silver gray and resists rot naturally, though thin lattice slats of any wood can split, cup, or pop staples over time. Expect to re-stain or seal every two to three years.
A vinyl privacy lattice panel is thicker, holds its color, and never needs paint. It flexes more in heat, so it must sit in a U-channel or rigid frame that allows a little expansion room rather than being screwed tight at every edge. Vinyl is the choice if you want a lattice privacy screen you can hose off and forget. Composite-look and aluminum lattice exist as well, at a higher price.
| Factor | Wood | Vinyl |
|---|---|---|
| Upfront cost | Lower | Moderate |
| Maintenance | Stain every 2-3 years | Wash occasionally |
| Custom color | Stain or paint | Limited factory colors |
| Lifespan | 10-15 years with care | 20+ years |
Tools and Materials
- Privacy lattice panels (commonly 4×8 feet, also 2×8 and 4×4)
- 4×4 or 6×6 posts (pressure-treated rated for ground contact if buried) or vinyl post sleeves
- 2×4 or 2×6 lumber for top rail, bottom rail and frame
- Lattice molding, U-channel, or 1×2 stop strips to capture the panel edges
- Exterior-rated screws (coated or stainless), structural post brackets or through-bolts for deck mounting
- Concrete mix, gravel, post-hole digger or auger (for in-ground posts)
- Level, speed square, tape measure, string line, circular saw, drill/driver
- Safety glasses, gloves, dust mask for cutting treated lumber
How to Frame a Lattice Privacy Wall Step by Step
Before you start, check local zoning and any HOA covenants. Many communities cap fence and screen height, commonly somewhere around 6 feet in back yards and lower in front yards, and some require a permit for structures attached to a deck. If you will dig, call 811 a few days ahead so buried utilities get marked.
- Lay out the run. Snap a string line where the screen will go and mark post locations. Keep spacing at 8 feet or less for 4×8 panels; 6 feet is stiffer in windy areas, and closed lattice catches more wind than you might expect.
- Set the posts. In the ground, dig holes to the depth your local code requires, below the frost line, and a diameter about three times the post width. Add a few inches of gravel, set the post, brace it plumb, and fill with concrete sloped away from the post. On an existing deck, fasten posts to the rim joist or blocking with through-bolts or engineered post brackets. Never rely on screws into decking boards alone.
- Let concrete cure. Give it at least 24 to 48 hours before loading the posts, longer in cool weather.
- Install rails. Attach a bottom rail a couple of inches above the deck or soil so the lattice stays dry and can drain. Add a top rail at your finished height.
- Add stops or channel. Fasten 1×2 stops or U-channel to the inside faces of posts and rails, creating a pocket for the panel.
- Cut and fit the panel. Measure the opening, subtract about 1/4 inch for wood or the manufacturer’s recommended gap for vinyl, and cut with a fine-tooth blade. Support the panel on both sides of the cut to prevent tear-out.
- Capture it. Set the panel in place and add the second set of stops so the lattice is sandwiched. Fasten the stops, not the lattice slats, wherever possible.
- Cap and finish. Add a cap board or post caps to shed water, then stain or seal wood once it is dry enough to absorb finish.
Adding Vines and Planters for Extra Privacy
Tight lattice already blocks most views, but a climbing plant turns it into a living privacy trellis for deck corners and patio edges. Fast growers such as clematis, climbing roses, star jasmine in warm climates, or annual morning glory can soften the look within a season. Mount the lattice about an inch off any solid wall so air circulates behind the leaves.
If you are building a trellis for patio privacy over concrete, long planter boxes at the base work well. Line them, drill drainage holes, and keep soil from touching the lattice to limit rot. Avoid aggressive woody vines like wisteria on light panels; their weight and twining stems can crush slats over a few years.
Troubleshooting Common Problems
Why is my lattice panel sagging in the middle?
The span is too long or the panel is only supported at the edges. Add a vertical mullion in the center or reduce post spacing. Vinyl panels sag faster in hot sun if the frame is undersized.
Why does the whole screen wobble in wind?
Posts are either too shallow, not concreted, or attached only to decking. Closed lattice behaves almost like a sail, so wind load is real. Add knee braces, deeper footings, or proper structural attachment to deck framing.
Why are the staples popping out?
Wood lattice swells and shrinks with moisture. Capturing the panel in stops instead of nailing through it lets it move without tearing apart.
Lattice Privacy Screen Cost Ranges
Costs vary widely by region and material, but some general ranges help with planning. Treated wood privacy lattice panels are the most affordable per sheet, cedar runs noticeably higher, and heavy-duty vinyl panels usually cost more than either wood option. Posts, rails, concrete and hardware often add as much as the panels themselves. A simple DIY screen for one side of a deck can land in the low hundreds of dollars, while a long freestanding lattice privacy wall with in-ground posts can reach well into four figures. Professional installation typically adds labor charges per linear foot, and deck-mounted work may cost more because of structural attachment.
When to Call a Pro
Hire a contractor if the screen will be taller than about 6 feet, if your deck is elevated more than a few feet off the ground, or if you are unsure whether the deck framing can take the added wind load. A pro can add blocking, specify the right post anchors, and pull any permit your jurisdiction requires. It is also worth calling one if your soil is rocky, your frost line is deep, or the screen sits near property lines where survey accuracy matters.
Frequently Asked Questions
How private is a lattice privacy panel compared to a solid fence?
With openings of about 1 inch, a lattice privacy panel blocks most direct views beyond a few feet, though you may still see movement up close. Adding vines or a planter fills in the rest.
Can I attach a lattice privacy screen directly to my deck railing?
Short panels can be fastened to sturdy railing posts, but tall screens add significant wind load. For anything taller than the railing, install dedicated posts bolted to the deck framing.
What post spacing works best for privacy lattice for a deck?
Keep posts 8 feet apart or less for standard 4×8 panels, and closer to 6 feet in windy locations or with closed lattice.
Is vinyl or wood better for a lattice privacy wall?
Vinyl lasts longer and needs little upkeep, while wood costs less and can be stained to match your deck. Both need a rigid frame.
Do I need a permit for a lattice privacy trellis?
It depends on your jurisdiction, the height, and whether it attaches to a deck. Check with your local building department and HOA before building.