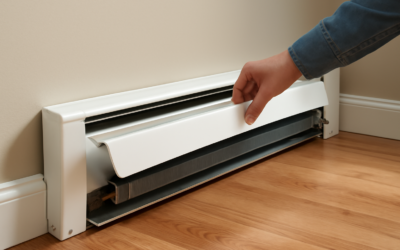
If you have hot-water baseboard heat, you know the weak spot: the metal covers dent, rust, and yellow long before the heating element itself wears out. Replacing the whole baseboard means plumbing work, but that is not your only option. Neat Heat baseboard covers are a snap-together polymer system designed to slip right over your existing hydronic baseboard, hiding the damaged metal without any welding, soldering, or draining of your heating loop. This guide explains how the system works, what it costs, how to install it, and where it shines or falls short, so you can decide if it fits your home.
What Neat Heat Covers Actually Are
Neat Heat is a baseboard heater cover system made from a durable, heat-resistant PVC-style polymer rather than the stamped steel used on traditional units. The key idea is that it is a retrofit cover, not a whole new heater. The components, front panels, end caps, inside and outside corners, and couplers, snap onto a mounting channel that attaches over or in place of your existing baseboard cover, concealing the old, damaged metal underneath while leaving the copper heating element and fins in place.
Because the material is plastic-based, it will not rust or corrode, which is the main failure point of steel covers, especially in bathrooms, kitchens, and coastal or humid homes. It comes in white and can be painted to match your trim, and the surface stays cooler to the touch than bare metal.
How the System Works
The system is modular, which is what makes it DIY-friendly. You measure each run of baseboard, then assemble the pieces like a kit. A back mounting plate or channel goes up first, then the front cover panel snaps into it, and the corners and end caps finish the run. Couplers join panels on longer walls. Everything is designed to click together without fasteners showing on the face, so the finished result looks clean and continuous.
Critically, the covers are engineered to preserve airflow. Hydronic baseboard heat relies on cool air entering at the bottom and warm air rising out the top through the fins. Neat Heat maintains those openings, so your heat output stays effectively the same as it was with the original metal cover, assuming the fins underneath are clean and undamaged.
Why Homeowners Choose Them
The appeal comes down to solving a common, annoying problem cheaply and cleanly. Consider the typical alternatives: living with dented, rusty covers, or paying a contractor to replace entire baseboard sections, which involves plumbing.
- No plumbing required: You never drain the system or touch the copper pipe and element.
- Rust-proof: The polymer will not corrode like steel, a real advantage in bathrooms and humid rooms.
- DIY-friendly: Most homeowners can install a room with basic tools in an afternoon.
- Cleaner look: Fresh, uniform covers instantly modernize a room where the old metal was the eyesore.
- Paintable and durable: Resists dents better than thin stamped steel and takes paint if you want a custom color.
What Neat Heat Covers Cost
Pricing is sold by the component and by the linear foot of cover. As a rough guide, expect roughly $10 to $20 per linear foot for the front cover panels, with end caps, corners, and couplers priced individually, often several dollars each. A single average room with, say, 12 to 16 feet of baseboard commonly lands in the range of $150 to $350 in materials depending on how many corners and end caps it requires.
Compared with hiring a contractor to swap out entire baseboard heating sections, which can run several hundred dollars per room once labor and plumbing are included, the retrofit covers are usually the cheaper path, especially if you do the work yourself. Whole-home coverage adds up, so many people tackle it room by room, starting with the most visible or most rusted areas.
How to Install Neat Heat Covers
Installation is straightforward but rewards careful measuring. Start by measuring each wall run precisely and counting how many corners and end caps you need. Remove the old damaged front cover if the instructions call for it, or confirm the new channel mounts over the existing backplate. Clean the fins underneath while you have access, since dust and bent fins reduce heat output, and straighten any crushed fins with a fin comb.
- Cut the mounting channel and back pieces to length with a fine-tooth saw or PVC cutter.
- Secure the mounting channel to the wall or existing base, checking it is level.
- Cut the front cover panels to length and snap them into the channel.
- Add couplers where panels meet on long walls, and finish the ends with end caps and corners.
- Test that the top damper and bottom intake remain open for proper airflow.
The plastic cuts cleanly with a miter saw or hacksaw, and because nothing is welded or soldered, mistakes are easy to redo. Take your time on corners, since those cuts show most.
Limitations to Keep in Mind
The covers only fix the cover. If the copper element or fins underneath are badly corroded, clogged, or leaking, a cosmetic cover will not restore lost heat output, so inspect the guts first. The polymer, while heat-resistant for the temperatures hydronic baseboard produces, is designed specifically for hot-water systems, not high-temperature electric baseboard, so confirm compatibility with your heat type before buying. Some homeowners also find the plastic look slightly less substantial than metal up close, though paint and clean lines minimize that.
Final Thoughts
Neat Heat baseboard covers solve a very specific, very common headache: ugly, rusted hot-water baseboard covers that would otherwise require plumbing to replace. For a modest per-room cost and an afternoon of DIY, you can restore a clean, rust-proof, paintable finish while keeping your heating element and heat output untouched. Just verify your system is hydronic, check that the fins underneath are in good shape, and measure carefully, and this retrofit is one of the easier upgrades you can make to tired baseboard heat.