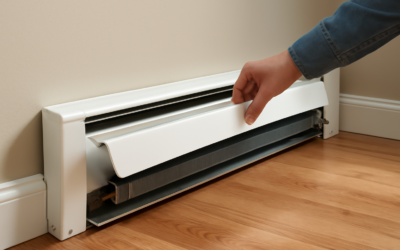

Few things date a room faster than a dented, rust-streaked strip of hydronic baseboard running along the wall. Decorative baseboard heater covers solve that problem cleanly, sliding over or replacing the old sheet-metal shell to hide damage, refresh the look, and in many cases improve heat output. The best part is that decorative baseboard heater covers are one of the cheapest, fastest upgrades in the home, most installs take under an hour per section with basic tools. Here is how to choose the right type, size them correctly, and get a professional-looking result.
Why Replace or Cover Baseboard Heaters at All
The standard hydronic (hot-water) baseboard found in millions of homes ships with a thin, painted-steel enclosure that dents if you look at it wrong, rusts near exterior walls, and yellows with age. The damper flap that controls airflow often seizes or breaks off entirely. Beyond looks, a mangled cover restricts the convection airflow the system depends on, so the room heats less evenly.
Covering or replacing the shell restores clean lines and full airflow. It is purely cosmetic and mechanical, you are not touching the heating element or the water lines, which is why it is a legitimate DIY project rather than a job for a plumber or electrician.
Two Approaches: Slip-On Covers vs Full Replacement
There are two distinct product categories, and choosing correctly saves headaches.
- Slip-on / snap-on covers: a new front panel and top designed to install over your existing back plate and heating element without removing the guts. Fastest option, ideal when the back plate and element are fine but the cover is trashed.
- Full replacement enclosures: a complete new housing (back, front, and end caps) that replaces everything but the element and pipe. Best when the entire shell, including the back plate, is corroded.
Slip-on retrofit covers from brands like Baseboarders and Neatheat are popular because they require no disconnection of plumbing, they simply cap the existing unit. Confirm the product is compatible with standard residential hydronic baseboard, which is the most common type, before ordering.
Materials and Styles Available
Covers come in several materials, each with trade-offs in price, durability, and appearance.
- Powder-coated steel: the most common, durable, comes in white and other colors, and can be repainted; resists dents better than the flimsy originals.
- Aluminum: lightweight, will not rust, good for humid or coastal homes.
- MDF and wood: furniture-grade covers for a built-in, trim-like look; note that they can dry out over hot elements, so proper clearance and heat-tolerant finish matter.
- PVC/polymer: budget-friendly and rust-proof, though it can look less premium up close.
Style choices range from a clean flat-front modern profile to detailed grille patterns and even louvered wood fronts that mimic cabinetry. For the best heat performance, choose a front with generous vent openings; a heavily solid front looks nice but chokes the convection airflow.
Measuring for the Right Fit
Accurate measurement is the whole game with these covers. Measure each run of baseboard individually, because a room often has several sections of different lengths.
- Length: measure end to end; most systems assemble from standard sections (commonly 2, 3, 4, 5, 6, and 7 feet) plus couplers and end caps to make up any length.
- Height: standard residential baseboard covers are about 7 to 8 inches tall; measure yours to confirm.
- Depth/profile: check the projection from the wall so the new cover clears the element and pipe.
- Corners and end conditions: note inside corners, outside corners, and where a run ends against a wall versus turns a corner, and order the matching trim pieces.
Order end caps and corner pieces to match; a run that ends in a raw open cut looks unfinished. Many retrofit systems sell caps, couplers, and corners as separate accessories, so build your parts list per room.
What They Cost
This is an affordable upgrade by any measure.
- Slip-on cover, per linear foot: roughly $10 to $25.
- End caps and corners: $5 to $15 each.
- Full replacement enclosures: $15 to $35 per linear foot.
- Premium wood or custom covers: $30 to $60-plus per linear foot.
A typical bedroom with a single 6-foot run might cost $80 to $150 in parts. Doing the whole main floor of an older home usually lands between $300 and $800, still a fraction of any real heating upgrade, and you do the labor yourself.
Installation Basics
For slip-on covers, the process is refreshingly simple. Turn the heat off and let the element cool, remove the old front panel and damper (usually they lift or unclip from the back plate), clean and inspect the element, then snap or screw the new front and top panels onto the existing back plate. Slide on the end caps and any corner pieces, and you are done.
A few pro tips make it look factory-fresh. Straighten any bent fins on the element with a fin comb before covering, because crushed fins hurt heat transfer. Vacuum out the years of dust hiding inside the housing; that dust noticeably reduces output. Keep the top vent damper, if the new cover includes one, so you can throttle heat in shoulder seasons. And maintain the manufacturer’s clearance if you choose a wood cover near a high-output element. If a run is longer than your longest single cover section, use a coupler to join two pieces; align the seam carefully and, on painted steel, a dab of touch-up paint over the joint makes it disappear. Take a few minutes to check that each section sits level along the top edge before final fastening, because a cover that dips or rises across a wall draws the eye far more than the old dents ever did.
Covers for Electric Baseboard Heaters
Everything above assumes hydronic (hot-water) baseboard, which is the most common type and the easiest to cover. Electric baseboard heaters are different and demand more caution. An electric unit generates heat directly from an energized element inside the housing, so any cover must maintain the manufacturer’s required clearances and must never restrict airflow or trap heat, or you risk overheating and a fire hazard.
Do not simply box in an electric heater with a solid wood cover the way you might dress up a hydronic one. If you want to improve the look of electric baseboard, use a manufacturer-approved replacement front or a metal cover designed specifically for electric units, and keep drapes, furniture, and bedding well clear. When in doubt, replace the entire electric heater with a new unit rather than covering an old one, since modern electric baseboards look cleaner and cost only $30 to $80 for the heater itself.
Painting Versus Replacing
If your budget is truly tight, you have a middle option between living with ugly covers and buying new ones: paint the existing metal. Properly done, a repaint can buy several years. Turn off the heat and let the unit cool completely, remove the front panel if possible, clean off grease and rust with a degreaser and a wire brush, spot-treat bare metal with a rust-inhibiting primer, and finish with a high-heat spray enamel rated for at least 200°F.
Painting works best when the metal is merely faded or discolored but structurally sound. It cannot fix deep dents, a missing damper, or a rusted-through back plate, and cheap spray paint that is not heat-rated will yellow, bubble, or off-gas an odor when the heat comes on. Expect the first firing of a freshly painted cover to release a mild odor as the finish fully cures; run the heat with a window cracked for the first hour or two. For badly damaged covers, a slip-on replacement almost always looks better and lasts longer than paint over ruined metal, and it costs little more once you factor in primer, paint, and your time. A safe rule of thumb: if you would be embarrassed for a guest to see the metal up close after cleaning it, replace rather than paint.
The Bottom Line
Decorative baseboard heater covers are the rare upgrade that improves both looks and function for very little money and effort. Decide whether you need a slip-on cover or a full replacement, measure each run carefully with the right end and corner pieces, choose a vented front so airflow stays strong, and pick a material that suits your room and climate. In a single afternoon you can retire the dented, rusty relics along your walls and make an old heating system look intentional again.