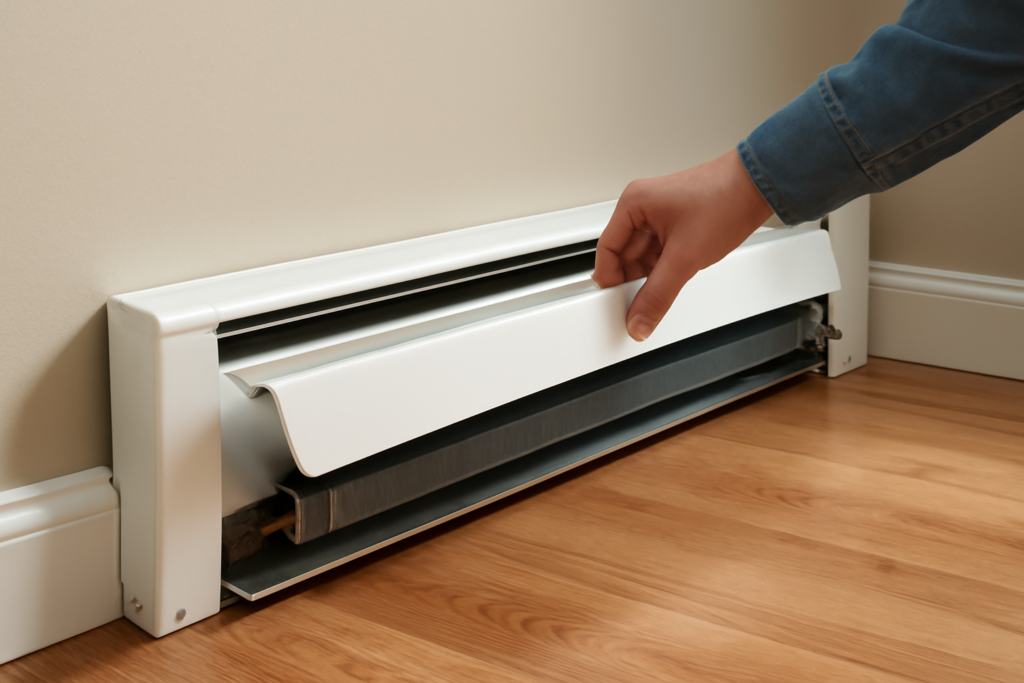
The metal enclosures running along your walls take a beating over the years. Dents, rust, chipped paint, and bent fins make a room look dated even when the heating system works fine. New baseboard heat covers are an inexpensive fix that hides that wear, restores airflow, and gives a tired room a clean, finished edge again, often without touching the heating element underneath.
This guide explains the cover types, how to measure and choose them, the safety clearances that matter, and how a replacement actually goes.
What Baseboard Covers Do
The cover is the visible metal shell around the heating element, whether hydronic copper-fin or electric. It protects the element, channels rising warm air, and provides the trim appearance along the floor. The element and the inner workings usually stay in place; you are replacing only the outer enclosure and end caps. That makes a cover swap a cosmetic and airflow upgrade rather than a heating repair.
Types of Covers
Replacement covers come in a few forms:
- Full replacement enclosures: a complete new metal cover with front panel, top damper, and end caps, sized to your heater length.
- Slip-on or snap-over covers: shells designed to fit over an existing cover for a quick refresh without removing the old one.
- Decorative and designer covers: upgraded profiles in different finishes, including wood and metal styles, for a more custom look.
- End caps and accessory pieces: sold separately to finish corners and ends cleanly.
Slip-on covers are the fastest path; full replacements give the cleanest result when the original is badly rusted or crushed.
Measuring and Choosing
Covers are sized by length and must match the standard profile of your existing units. Before you buy, measure the total length of each run, note the height and depth of the current cover, and confirm whether you have hydronic (fin-tube with a movable damper) or electric heat, since the openings differ. Most residential baseboards follow standard dimensions, and covers come in common lengths that you cut or combine to fit.
If a run is an odd length, buy a slightly longer cover and trim it, or use a connector to join two pieces. Buy matching end caps and corner pieces at the same time so the finish is consistent.
Safety and Clearances
Heat and the wrong material are a dangerous combination, so respect the basics:
- Use covers made of metal rated for baseboard heat; never box a heater in with wood or fabric that can scorch.
- Keep drapes, bedding, and furniture clear of the unit so air flows and nothing rests against a hot surface.
- Do not block the top damper opening, which is how warm air escapes; a covered damper traps heat and stresses the element.
- For electric units, cut power at the breaker before removing or installing any cover.
If you find scorching, exposed wiring, or a unit that overheats, stop and call a licensed electrician or HVAC technician before doing anything else.
How to Replace a Cover
Replacing a cover is a manageable afternoon project for most homeowners:
- Turn off the heat and, for electric units, switch off the breaker. Let everything cool completely.
- Remove the old front panel and end caps, usually held by clips or screws, exposing the element and back plate.
- Vacuum the fins and straighten any bent ones with a fin comb to restore airflow.
- Mount the new back channel if included, then snap or screw the new front cover into place and add end caps.
- Confirm the damper opens and closes freely, restore power, and test the heat.
Work gently; old metal can be sharp, so wear gloves and avoid forcing pieces that resist.
Signs It Is Time to Replace
Knowing when to swap covers saves you from chasing problems with paint that should have been a replacement. Heavy rust that has eaten through the metal, deep dents that block airflow, and covers that no longer clip securely are all good reasons to replace rather than refinish. A damper that will not open or close, or end caps that have gone missing and left sharp edges exposed, also point to new covers. If the front panel rattles or the cover has separated from its mounting, replacement gives a more durable, better-looking result than patching.
On the other hand, covers that are merely faded, lightly scuffed, or off-color but otherwise solid are perfect candidates for a fresh coat of high-heat paint. Assess the metal honestly: structure problems call for replacement, while cosmetic problems can be painted away for far less money.
Decorative and Designer Upgrades
Beyond plain white metal, the cover category has grown to include designer options that turn a utilitarian heater into a finished architectural element. Some homeowners choose covers with cleaner, flatter profiles for a modern look, finishes in deeper colors or metallics, or even wood-fronted enclosures rated and built to handle the heat safely. These upgrades cost more than basic replacements but can make baseboard heat look like an intentional design choice rather than something to hide.
If you go this route, confirm that any decorative cover is specifically designed and rated for baseboard heat so it does not trap heat or use unsafe materials. The damper must still operate and air must still flow freely, no matter how attractive the cover looks.
Refinishing Instead of Replacing
If your covers are structurally sound but just look tired, repainting is even cheaper. Clean and lightly sand the metal, apply a metal primer, and finish with a high-heat spray paint rated for the temperatures baseboard units reach. Standard wall paint can yellow, bubble, or smell when heated, so use a product made for radiators and metal heat surfaces. Let it cure fully before turning the heat back on.
Final Thoughts
Baseboard heat covers are a low-cost way to erase years of dents and rust and make a room look maintained again. Measure carefully, match the cover to your heater type, keep the damper and clearances clear for safety, and either swap or repaint depending on the condition. With an afternoon of work you get crisp lines along the floor and better airflow, while leaving any real electrical or plumbing repair to the pros.