When water keeps finding its way into your basement, outside basement waterproofing is the most thorough and permanent solution, because it stops moisture at the foundation wall before it ever gets inside. Unlike interior sealers that merely manage water that’s already entered, outside basement waterproofing excavates around the foundation to install membranes and drainage that keep the soil’s moisture away for good. It’s a bigger project than interior fixes, but for chronic leaks it’s often the only real cure. Here’s how exterior waterproofing works and what to expect.
Part of our Roofing guide — explore the full guide →
- Why Water Gets Into Basements
- Interior Versus Exterior Waterproofing
- The Exterior Waterproofing Process
- Waterproofing Membranes and Coatings
- Drainage Is Half the Battle
- Managing Surface Water Too
- What It Costs
- DIY Versus Professional
- How Long It Lasts
- Warning Signs You Need It
- Choosing a Contractor
- What the Excavation Involves
- Final Thoughts
Why Water Gets Into Basements
Understanding the cause guides the fix. Basements leak because hydrostatic pressure from water-saturated soil pushes moisture through cracks, joints, and porous concrete. Poor grading that slopes toward the house, clogged or missing gutters, and a high water table all worsen the problem. Over time, foundation walls develop hairline cracks, and the joint where the wall meets the footing is a common entry point. Exterior waterproofing addresses all of these by creating a barrier and a drainage path on the soil side of the wall.
Interior Versus Exterior Waterproofing
Homeowners often weigh these two approaches. Interior methods, like a perimeter drain tile and sump pump inside the basement, manage water after it enters and are less expensive and disruptive. Exterior waterproofing costs more and requires excavation, but it stops water before it reaches the wall, protecting the foundation itself from long-term water damage. For serious, recurring leaks or when you want to finish the basement, exterior waterproofing is the gold standard. Many severe cases benefit from a combination of both.
The Exterior Waterproofing Process
A full exterior job follows a clear sequence, and knowing it helps you evaluate contractors.
- Excavation: The soil is dug away from the foundation down to the footing, often 6 to 8 feet deep.
- Cleaning and repair: The exposed wall is cleaned, and cracks are patched with hydraulic cement.
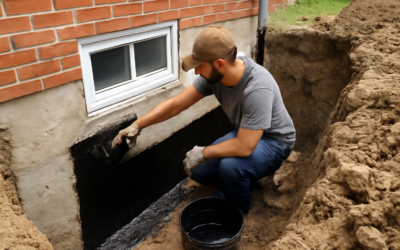
- Membrane application: A waterproof coating or membrane is applied to the entire wall surface.
- Drainage board and pipe: A dimpled drainage board and a new footing drain (French drain) are installed.
- Backfill: The trench is refilled, ideally with gravel near the pipe, and the grade is sloped away from the house.
Waterproofing Membranes and Coatings
The barrier applied to the wall is the heart of the system. Several products are used depending on the situation. Rubberized asphalt (bituminous) coatings are common and flexible, bridging small cracks. Sheet membranes offer a thick, consistent barrier. Elastomeric and polymer-modified coatings flex with the foundation and resist cracking. For the best protection, contractors often pair a membrane with a dimpled drainage mat that channels water down to the footing drain while relieving pressure against the wall.
Drainage Is Half the Battle
Even the best membrane needs somewhere for water to go. A properly installed exterior French drain, a perforated pipe surrounded by gravel and wrapped in filter fabric, runs along the footing and carries water away from the foundation to a sump or daylight outlet. Without this drainage, water simply pools against the wall and eventually finds a weak spot. Combined with the membrane, the drain relieves hydrostatic pressure so water never builds up against the foundation in the first place.
Managing Surface Water Too
Exterior waterproofing works best alongside good surface water management, and some of these steps you can do yourself for little money. Extend downspouts at least 4 to 6 feet from the foundation, clean gutters regularly, and regrade the soil so it slopes away from the house at least 6 inches over the first 10 feet. These simple measures reduce the water load on your foundation dramatically and protect your waterproofing investment. In many mild cases, fixing grading and gutters alone solves the problem.
What It Costs
Exterior waterproofing is a significant investment because of the excavation involved. Costs typically run $80 to $200 per linear foot of foundation wall, meaning a full perimeter job on an average home can total $10,000 to $30,000 or more, depending on depth, access, and soil conditions. Landscaping, decks, and driveways near the foundation add to the cost since they may need removal and replacement. While steep, this cost buys a permanent fix and protects the structural integrity of your foundation.
DIY Versus Professional
Full exterior waterproofing is not a typical DIY project, since it requires heavy excavation equipment, knowledge of foundation drainage, and safety precautions for deep trenches, which can collapse dangerously. That said, homeowners can handle the surface-water improvements, gutter extensions, regrading, and minor crack sealing on their own. For the excavation and membrane work, hire a reputable foundation contractor with references and a solid warranty. Always confirm they’ll properly compact the backfill and restore the grade to slope away.
How Long It Lasts
Done correctly, exterior waterproofing is a long-term solution. Quality membranes and drainage systems can last 20 to 30 years or more, and many contractors offer transferable warranties. The key is proper installation, especially the drainage component and the backfill grading. A membrane alone without drainage will eventually be overwhelmed, while a complete system that manages both surface and subsurface water keeps a basement dry for decades.
Warning Signs You Need It
Certain symptoms point toward serious water intrusion that interior fixes won’t cure. Watch for water actively seeping through wall cracks rather than just pooling on the floor, efflorescence (a white chalky mineral deposit) spreading across foundation walls, and bowing or leaning walls, which signal hydrostatic pressure pushing hard from outside. Persistent musty odors, mold growth, and peeling paint on basement walls also indicate moisture moving through the concrete. If you’ve tried interior sealers and a sump pump but water keeps returning, or if cracks are widening over time, exterior waterproofing that addresses the source is likely your best long-term answer. A foundation specialist can assess whether the problem is cosmetic or structural.
Choosing a Contractor
Because exterior waterproofing is expensive and largely buried once complete, choosing the right contractor is critical. Get at least three detailed written estimates that specify the membrane product, the type of drainage installed, the excavation depth, and the backfill and grading plan. Verify the company is licensed, bonded, and insured, and ask for references from jobs at least five years old so you can confirm the work held up. Read the warranty carefully, noting whether it’s transferable and what conditions void it. Be wary of any contractor who diagnoses a major problem without a thorough inspection or who pressures you into signing immediately, since reputable foundation specialists take the time to explain the cause and the fix.
What the Excavation Involves
Exterior waterproofing is invasive by nature, and knowing the sequence helps you plan for the disruption. Crews dig down along the foundation to the footing—often 7 or 8 feet—using a machine where access allows or hand-digging in tight spots near utilities. Once the wall is exposed, they clean and repair the concrete, patch cracks, and let it cure before troweling or spraying on a waterproof membrane, frequently topped with a dimpled drainage board that channels water down and away. A perforated drain tile is bedded in gravel at the footing to carry water to a sump or a daylight outlet. Finally the trench is backfilled and the grade sloped away from the house. Expect landscaping, walkways, or a deck near the work zone to be temporarily removed, and plan for several days of heavy equipment and open trenches on the property.
Final Thoughts
Outside basement waterproofing tackles moisture problems at their source, making it the most effective option for chronic leaks and the best way to protect your foundation itself. It’s a substantial investment, but for a persistently wet basement, especially one you want to finish, it pays off in a permanently dry, usable space and preserved structural value. Start with the free and cheap fixes like grading and gutters, and if leaks persist, invest in a complete exterior membrane and drainage system installed by a trusted professional.