Concrete block looks solid, but it behaves like a rigid sponge — a standard CMU wall can absorb water through its face, wick it through mortar joints, and channel it straight down its hollow cores into your basement. That is why waterproofing concrete block walls outside beats every interior fix: you stop water before it enters the wall instead of managing it after the damage starts. Done right, an exterior system combines a surface barrier, a drainage path, and grading that moves water away from the foundation. Here is how the pros build that system, what each method costs, and where DIYers usually go wrong.
Part of our Roofing guide — explore the full guide →
- Why Block Walls Leak in the First Place
- Damp-Proofing vs. True Waterproofing
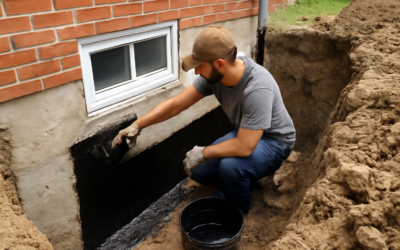
- Exterior Membrane Systems: The Gold Standard
- Step-by-Step: Coating an Exposed Block Wall
- Drainage: The Half of the System People Skip
- What Exterior Waterproofing Costs
- Mistakes That Cause Callbacks
- How to Verify the Job Worked
Why Block Walls Leak in the First Place
A typical 8-inch concrete block is roughly 50 percent hollow, and the concrete itself has a porosity that lets moisture migrate through capillary action. Water rarely blasts through a block wall; it seeps. Hydrostatic pressure from saturated soil pushes moisture through the block face and through mortar joints, which are usually the weakest link. Once water reaches the hollow cores, it runs down inside the wall and appears at the floor line, often several feet from where it actually entered.
Compounding the problem, many older homes have block foundations that received only a sprayed coat of asphalt damp-proofing at construction — a 10- to 15-year product at best. Damp-proofing slows vapor; it does not resist standing water under pressure. If your wall shows efflorescence (white mineral crust), dark staining after rain, or musty smells in the basement, the original coating has failed and water is moving through the assembly.
Damp-Proofing vs. True Waterproofing
These terms get used interchangeably at the store, and the confusion costs homeowners real money. Damp-proofing is a thin asphalt-based coating, sprayed or rolled at about 10 mils thick, that retards vapor transmission. Waterproofing is a thicker elastomeric membrane — typically 40 to 60 mils — that bridges cracks up to 1/16 inch and holds back liquid water under hydrostatic pressure.
Code in most jurisdictions only requires damp-proofing unless the site has a known high water table. If you are excavating anyway, the cost difference is modest — roughly $0.50 to $1.50 per square foot for damp-proofing versus $2 to $4 for a real membrane — and the performance gap is enormous. Never pay for a full excavation and then apply a bargain coating.
Exterior Membrane Systems: The Gold Standard
Full exterior waterproofing means excavating to the footing, cleaning the wall, repairing mortar, and applying a continuous membrane. The main options:
- Liquid-applied elastomeric asphalt: Products like Tremco Tuff-N-Dri or Rub-R-Wall spray on and cure to a seamless rubber membrane, 40-plus mils thick. Excellent crack-bridging. Typically contractor-applied, $3 to $6 per square foot installed.
- Self-adhered sheet membrane: Peel-and-stick modified bitumen such as Grace Bituthene or CCW MiraDRI, about 60 mils. Consistent thickness with no spray equipment needed, but seams and primer work demand care. Materials run $1.50 to $2.50 per square foot.
- Cementitious coatings: Trowel- or brush-applied products like Thoroseal or Xypex bond into the block and resist positive pressure well. Rigid, so they will not bridge new cracks. Good for above-grade block and as a base layer, at $40 to $70 per 50-pound bag covering 100 square feet per coat.
Over any membrane, add a dimple drainage board (Delta-MS, Platon) or rigid insulation. The dimple mat relieves hydrostatic pressure by giving water a free path down to the footing drain, and it protects the membrane from backfill stones. Skipping this layer is the most common cause of premature membrane failure.
Step-by-Step: Coating an Exposed Block Wall
For above-grade block walls — garden walls, garages, crawl space stem walls, walkout basement sections — you can do professional-quality work in a weekend.
Preparation Makes or Breaks It
Pressure-wash the wall at 2,500 to 3,000 PSI to strip dirt, loose paint, and efflorescence. Treat remaining efflorescence with a masonry cleaner or diluted muriatic acid (1:10), then rinse thoroughly. Rake out crumbling mortar joints and repoint with Type S mortar. Fill cracks and voids with hydraulic cement such as DRYLOK Fast Plug, which sets in 3 to 5 minutes even against active seepage. Let repairs cure 24 hours.
Application
For a paint-on approach, DRYLOK Extreme is the standard consumer product, rated to hold back 15 PSI of hydrostatic pressure — about a 33-foot water column. Work it into the block pores with a 3/4-inch nap roller or masonry brush; do not just lay it on the surface. Coverage is roughly 90 to 100 square feet per gallon, and two coats are mandatory for the warranty. Apply the second coat perpendicular to the first, minimum 3 hours between coats at 70°F. A 5-gallon bucket runs about $150 and handles 450 square feet at two coats.
Drainage: The Half of the System People Skip
No coating survives permanent immersion in saturated soil. Waterproofing keeps water out of the wall; drainage keeps water away from the wall. If you have excavated, inspect the footing drain. Many homes from the 1960s through 1980s have clay tile or corrugated pipe that silted shut decades ago. Replace it with 4-inch perforated PVC set beside the footing, holes down, wrapped in filter fabric, bedded in 12 inches of 3/4-inch washed gravel, and daylighted downslope or run to a sump.
Above grade, fix the cheap stuff first. Extend downspouts at least 6 feet from the foundation — a single downspout can dump 600 gallons off a roof in a 1-inch rain. Regrade soil to fall 6 inches over the first 10 feet away from the wall. These two corrections alone resolve a surprising share of “leaky wall” complaints for under $100 in materials.
What Exterior Waterproofing Costs
Budget realistically before deciding between DIY and hiring out. Excavation is the dominant cost: machine digging to a 7-foot footing runs $50 to $150 per linear foot depending on access, soil, and obstructions like decks, AC condensers, and gas lines. A full professional exterior system — dig, clean, membrane, dimple board, new footing drain, gravel, backfill — typically lands between $8,000 and $15,000 for an average house, or $100 to $250 per linear foot.
By contrast, coating an already-exposed above-grade wall yourself costs $0.35 to $0.80 per square foot in materials. A hybrid strategy many homeowners use: hire excavation only for the one or two walls that actually leak (most water problems are directional, usually the uphill side), and handle surface prep and coating labor yourself with the contractor applying the membrane.
Mistakes That Cause Callbacks
Watch for these failure points, because each one can undo the entire job. Coating a damp or dirty wall — most membranes need a dry, dust-free surface to bond, so plan around weather. Stopping the membrane at grade line instead of carrying it from footing to 6 inches above grade, which leaves a seepage gap right where splashback hits. Backfilling with excavated clay instead of free-draining gravel, which re-creates the hydrostatic pressure you just paid to eliminate. And bridging the termite inspection gap: in termite country, leave the top few inches of foundation visible rather than burying coating and insulation to the siding.
Finally, be patient with cure times. Elastomeric membranes typically need 24 to 48 hours before backfill, and backfilling early is the fastest way to gouge a brand-new membrane. A block wall waterproofed correctly on the outside, with working drainage below and sensible grading above, should stay dry for 25 years or more — which is why it remains the fix that ends the problem instead of postponing it.
How to Verify the Job Worked
Do not wait for the next storm to find out. After the coating cures and before backfill, run a hose against the wall for 20 to 30 minutes and check the interior with a flashlight — any darkening at mortar joints means a missed spot that costs five minutes to fix now and thousands later. Once backfilled, monitor through the first two heavy rain events: tape a 12-inch square of clear plastic sheeting to the interior block face, sealed on all four edges, and check it after 48 hours. Condensation on the wall side of the plastic indicates moisture still migrating through; a dry square confirms the exterior system is doing its job. Keep a simple maintenance rhythm afterward — clean gutters twice a year, walk the foundation each spring to confirm grading has not settled toward the house, and flush the footing drain cleanouts every few years if your system includes them. Exterior waterproofing fails slowly and loudly when it fails at all, and ten minutes of seasonal attention keeps a 25-year system on schedule for its full service life.