Few upgrades deliver as much visual payoff for as little money as a paneled feature wall. A blank, boring wall becomes an architectural focal point over a single weekend, and visitors assume you paid a carpenter thousands. A well-executed panel accent wall uses inexpensive trim and paint to fake the look of custom millwork, and the techniques are genuinely beginner-friendly. This guide covers the popular panel styles, the materials that hold up, the layout math that keeps everything symmetrical, and a step-by-step install so your first wall looks intentional rather than improvised.
Why Paneled Walls Are So Popular
Paneling adds depth, texture, and a sense of craftsmanship that flat drywall cannot match. It draws the eye, defines a space in an open floor plan, and gives a room the layered, finished feel of an older, well-built home. Best of all, the effect comes from cheap materials: primed pine lattice, MDF strips, and paint. The cost of a feature wall often lands between $100 and $300 in materials, versus the far higher price of hiring a finish carpenter. That value ratio is exactly why paneled walls have become one of the most requested weekend projects.
Popular Panel Wall Styles
Several distinct looks fall under the paneling umbrella, and each suits a different room and taste.
- Board and batten: Vertical battens over a base, creating tall rectangular sections. Clean, timeless, and great for entryways and dining rooms.
- Picture frame molding: Rectangular or square frames applied to the wall in a grid, giving an elegant, traditional look with minimal material.
- Shiplap: Horizontal boards with a slight gap between them for that casual, coastal-farmhouse feel.
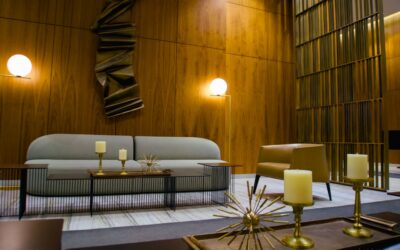
- Slat wall: Evenly spaced vertical wood slats, often over a dark backing, for a warm, modern, mid-century vibe.
- Wainscoting: Paneling on the lower third of the wall, a classic look for hallways and bathrooms.
Choosing Your Materials
The material you pick affects both the look and the difficulty. Primed MDF trim is the most popular choice because it is inexpensive, dead straight, takes paint beautifully, and cuts cleanly. Solid pine or poplar costs a bit more but resists dents and handles moisture better, making it the safer pick for bathrooms and high-traffic areas. Real wood slats in oak or walnut suit a stained, natural slat wall. For the backing on a painted design, your existing drywall usually works fine. Round out your shopping list with construction adhesive, a brad nailer or finish nails, paintable caulk, wood filler, and primer plus paint in your chosen color.
The Layout Math That Makes It Look Right
Nothing separates a professional-looking panel accent wall from an amateur one like symmetry. Before you cut a single piece, measure the wall’s full width and height and sketch your grid on paper. Decide how many sections you want, then calculate the spacing so the border margins on all sides are equal and the frames themselves are consistent. A common approach is to keep the gap between frames and the outer margins the same dimension, often 3 to 6 inches, for a balanced look. Account for outlets, switches, and windows in your plan; a frame that awkwardly clips an outlet reads as a mistake. Time spent on graph paper here saves hours of frustration on the wall.
Tools You’ll Need
- Tape measure, level, and a pencil
- Miter saw for clean 45- or 90-degree cuts
- Brad nailer or hammer and finish nails
- Construction adhesive and caulk gun
- Wood filler, sandpaper, and paintable caulk
- Stud finder and primer plus paint
Step-by-Step Installation
With your layout drawn and materials cut, the install goes quickly. Work methodically and the result will look seamless.
- Prep the wall: Clean it, fill any holes, and lightly sand glossy paint so adhesive grips.
- Mark your grid: Transfer your paper plan to the wall using a level and pencil, double-checking that lines are plumb and level.
- Cut your pieces: Miter the corners for picture-frame designs, or cut square butt joints for board and batten.
- Attach the trim: Run a bead of construction adhesive on the back, press each piece to the wall, and secure with brad nails into studs where possible.
- Fill and caulk: Fill nail holes with wood filler, sand smooth, then caulk every seam and edge where trim meets the wall for that gap-free, built-in look.
- Prime and paint: Prime bare wood, then apply two coats of paint over both the trim and the wall between for a cohesive finish.
Color and Finish Choices
The paint color transforms the whole effect. Painting the trim and wall the same color creates a subtle, sophisticated tone-on-tone look that lets the shadow lines do the talking. A bold, moody color like deep navy, charcoal, or forest green makes a dramatic statement and hides minor imperfections. For a slat wall, a natural wood stain against a dark painted backing delivers striking contrast. Sheen matters too: a satin or eggshell finish highlights the paneling’s dimension while staying easy to wipe clean, which is why it is the go-to for most feature walls.
Choosing the Right Wall and Room
Not every wall deserves paneling, and picking the wrong one wastes the effort. The best candidate is a wall that naturally draws the eye and anchors the room. In a living room, that is often the wall behind the sofa or the one holding the television or fireplace. In a bedroom, the wall behind the headboard is the classic choice. Entryways, dining rooms, and stair landings also reward a paneled treatment because they are transition spaces where a little architectural detail makes a strong first impression.
Consider the wall’s condition and features before committing. A wall broken up by lots of windows, doors, and vents is harder to panel cleanly than a large uninterrupted surface. Rooms with good natural light show off the shadow lines that give paneling its depth, while a very dark room may swallow the effect unless you use a contrasting color. Match the panel style to the home’s character too; a sleek slat wall suits a modern space, while picture-frame molding feels right in a traditional room. Choosing the appropriate wall and style up front ensures the finished panel accent wall enhances the room rather than fighting it.
Estimating Materials and Budget
Knowing roughly what a project needs keeps you from over- or under-buying at the store. For a typical picture-frame or board-and-batten wall, your material list and rough costs are easy to plan once you have your layout drawn.
- Trim or molding: The main expense; primed MDF strips are the budget-friendly workhorse at a few dollars per eight-foot length.
- Construction adhesive and caulk: A tube or two of each, inexpensive but essential for a seamless look.
- Wood filler and sandpaper: To hide nail holes and smooth cuts.
- Primer and paint: A quart or gallon depending on wall size, in your chosen color and a satin or eggshell sheen.
- Fasteners: Brad nails for the nailer, plus a small supply of finish nails.
Most single-wall projects land in the $100 to $300 range for materials, which is remarkable value for the visual impact. If you already own a miter saw and a brad nailer, your only cost is the materials themselves. Renting or borrowing those two tools for a weekend still keeps the whole project far below what hiring a finish carpenter would run, which is a big part of the appeal.
Avoiding Common Mistakes
A few missteps trip up first-timers. Skipping the caulk leaves visible gaps that instantly betray the DIY origin, so never rush that step. Failing to account for an uneven floor or ceiling can throw off vertical pieces, so scribe or adjust rather than forcing a piece to fit. Uneven spacing is the most common flaw, which loops back to careful layout math. And resist overloading a small room; a single panel accent wall as the focal point looks far better than paneling every surface. Nail those details and your wall will look like the work of a seasoned carpenter, at a fraction of the cost and in a fraction of the time.