Picking a paver size by looks alone is how many patios end up with wobbly corners and a pile of leftover cuts. 16×16 patio pavers are one of the most popular square formats because they cover ground quickly, lay out on a simple grid and still feel manageable to carry. Each one covers about 1.78 square feet, so a 10 by 10 foot patio needs roughly 57 pieces before waste.
The other standard sizes each fill a different role. Small 4×8 brick-style units suit curves, driveways and herringbone patterns. 12×12 paving stones are the classic budget square for walkways and shed pads. 18×18 patio pavers and 24×24 slabs give a modern, open look with fewer joints, but they demand a flatter base and more muscle. Size changes how many pieces you buy, how much cutting you do and how forgiving the base has to be.
- 16×16 Patio Pavers Compared With Other Common Sizes
- Small Paver Stones: 4×8 and 12×12 Options
- Large Formats: 16×16, 18×18 and 24×24
- Pattern Options by Paver Size
- Tools and Materials for a Paver Patio
- Step-by-Step: Base and Installation
- Cutting Safety and Silica Dust
- Troubleshooting Common Paver Problems
- General Cost Ranges
- When to Call a Pro
- Frequently Asked Questions
Every size shares one rule: the paver is only as good as the compacted gravel under it. A thick, well-tamped base matters more than the face size you choose.
16×16 Patio Pavers Compared With Other Common Sizes
Nominal sizes are rounded. A “16×16” concrete paver often measures 15.75 inches square so the joint lands on a clean 16 inch grid, and thickness usually runs 1.5 to 2 inches for patio slabs. Interlocking pavers rated for driveways are thicker, typically 2.375 inches (60 mm) or 3.125 inches (80 mm).
| Nominal Size | Sq Ft per Piece | Pieces per 100 Sq Ft | Best Uses |
|---|---|---|---|
| 4 x 8 | 0.22 | About 450 | Herringbone, driveways, curves, borders |
| 12 x 12 | 1.0 | 100 | Walkways, shed pads, budget patios |
| 16 x 16 | 1.78 | About 57 | Patios, grill pads, stepping paths |
| 18 x 18 | 2.25 | About 45 | Larger patios, pool surrounds |
| 24 x 24 | 4.0 | 25 | Modern patios, large open areas |
Add 5 percent for waste on straight grid layouts with few cuts, 10 percent for running bond or patios with several edges, and 15 percent for herringbone or curved designs with small units.
Coverage per Pallet
Pallet counts vary by thickness and plant, so always check the tag, but some patterns hold across most suppliers. A pallet of 4×8 pavers usually covers somewhere around 100 to 120 square feet. Pallets of 12×12 squares often hold 100 to 150 pieces. A pallet of 16×16 patio pavers commonly carries 80 to 120 slabs, enough for roughly 140 to 210 square feet. Larger 24×24 slabs ship in smaller counts because each one can weigh 60 to 90 pounds.
Weight is the hidden limit. A full pallet often lands between 2,500 and 3,500 pounds, which exceeds the payload of most half-ton pickups. Plan on delivery, and ask the driver to drop pallets close to the work area on firm ground.
Small Paver Stones: 4×8 and 12×12 Options
Small paver stones and small square pavers have one big advantage: they flex with the ground. Each unit is short enough that minor settlement or frost movement shows up as a slightly uneven joint instead of a cracked slab. That is why 4×8 interlocking units dominate driveways and why many installers favor them in cold climates.
12×12 brick pavers and plain 12×12 paving stones sit in the middle. They are light (often 20 to 25 pounds each at 2 inches thick), simple to cut and inexpensive, which makes them popular for shed aprons, side-yard paths and AC pads. Their downside is a slightly dated look in a large field, and on a big patio the grid of joints can feel busy.
- Pick 4×8 when you want herringbone, a curved walkway or a surface that will see car traffic.
- Pick 12×12 when budget and easy handling matter more than a modern look.
- Mix small and large by bordering a field of large squares with a soldier course of 4×8 units for a finished edge.
Large Formats: 16×16, 18×18 and 24×24
Larger squares read as cleaner and more contemporary because the eye sees fewer joints. 16×16 red pavers are a familiar sight on older patios, and today the same size comes in charcoal, tan and blended tones. Stepping up to 18×18 patio pavers or 24×24 slabs pushes the look further toward a terrace or courtyard feel.
The tradeoff is tolerance. A big slab bridges any soft spot in the base, so it rocks or cracks where a small paver would simply settle. Large formats also show lippage, the height difference between neighboring edges, much more than small units. If your yard has clay soil, frost heave or poor drainage, consider 16×16 the practical upper limit unless you are willing to build a thicker base.
Handling and Cutting
A 2 inch thick 16×16 slab weighs roughly 35 to 45 pounds, which one person can manage all day. A 24×24 slab at the same thickness can approach 80 pounds, and you will want a helper or a slab-lifting clamp. Cutting large squares with a wet saw or a walk-behind masonry saw goes faster than scoring and snapping, and it gives a cleaner edge along borders.
Pattern Options by Paver Size
The size you choose limits which patterns make sense. Squares are the most flexible for simple layouts, while rectangles open the door to interlocking designs.
- Jack-on-jack (stack bond): Squares in straight rows. Easiest to lay with 12×12, 16×16 or 18×18, but any base flaw shows along the long joint lines.
- Running bond: Each row offset by half a paver. Works with squares or rectangles and hides small layout errors better.
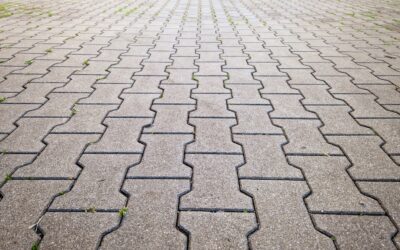
- Herringbone: 4×8 units at 45 or 90 degrees. The strongest interlock, best for driveways, but it creates more edge cuts.
- Basketweave: Pairs of 4×8 units alternating direction. A traditional brick look for patios and paths.
- Ashlar or random mix: Combines 8×8, 8×16, 16×16 and 16×24 pieces from a matched system for a natural stone feel.
Before you buy, lay a dry row of 6 to 8 pavers on the driveway and look at the joints. A layout that looks great in a catalog can feel too busy or too stark at full scale.
Tools and Materials for a Paver Patio
- Pavers plus 5 to 15 percent extra for cuts and breakage
- Crushed stone base (3/4 inch minus or similar dense-graded aggregate)
- Coarse concrete sand or bedding aggregate for a 1 inch setting bed
- Geotextile fabric for soft or clay soils
- Edge restraint (plastic, aluminum or concrete) with spikes
- Polymeric sand or regular joint sand
- Plate compactor (rent one if you do not own one), shovels, rake, screed rails and a straight 2×4
- Stakes, string line, line level and a 4 foot level
- Wet saw or masonry saw with a diamond blade, rubber mallet
- Safety glasses, hearing protection, work gloves and an N95 or P100 respirator
Step-by-Step: Base and Installation
- Call 811 and mark the area. Have underground utilities located a few days before digging, then outline the patio with paint or string.
- Plan the slope. Pitch the surface away from the house about 1/4 inch per foot (roughly 1 inch every 4 feet) so water drains.
- Excavate. For a walk-on patio, dig about 7 to 9 inches deep: 4 to 6 inches of base, 1 inch of sand and the paver thickness. Go deeper (8 to 12 inches of base) for driveways, clay soil or cold climates.
- Compact the subgrade. Run the plate compactor over the bare soil, and lay geotextile fabric if the soil is soft.
- Add base in lifts. Spread gravel 2 inches at a time, dampen it and compact each layer. Thin lifts are what make a base solid.
- Screed the sand. Set 1 inch pipes as rails, spread sand and pull a straight board across them. Do not compact the sand bed before laying pavers.
- Lay the pavers. Start at a straight edge or the house and work outward, setting each paver straight down. Keep joints consistent, usually 1/8 to 3/16 inch.
- Cut edges and install restraint. Make cuts last, then spike edge restraint tight against the perimeter.
- Compact and sand. Run the plate compactor over the pavers (use a pad on large or textured slabs to prevent chipping), sweep in joint sand, and compact again until joints are full.
- Activate polymeric sand. Blow off every grain from the paver faces, then mist according to the bag instructions.
Cutting Safety and Silica Dust
Concrete and clay pavers contain crystalline silica, and dry cutting throws a fine dust that can scar the lungs over time. Use a wet saw or a cut-off saw with water feed whenever possible. Wear an N95 respirator at minimum, or a P100 half mask for extended cutting, along with eye and hearing protection. Cut downwind of the house and away from open windows, and keep children and pets clear of the cutting zone.
Clean up with water or a HEPA-filtered vacuum rather than dry sweeping, which simply puts the dust back in the air. Polymeric sand also creates dust when poured, so wear your mask during that step too.
Troubleshooting Common Paver Problems
- Rocking slabs: Usually a low spot or a thin, uncompacted base. Lift the paver, add bedding sand, reset and compact.
- Uneven edges (lippage): Common with large formats on an imperfect screed. Pull and reset the high or low pieces.
- Sinking along the perimeter: Missing or loose edge restraint lets pavers creep outward. Reinstall restraint on compacted base.
- Weeds and ants in joints: Joints were underfilled. Clean them out and refill with polymeric sand.
- White haze: Efflorescence from minerals in the concrete. It often fades on its own within a season; a masonry cleaner made for efflorescence speeds it up.
- Puddling: Inadequate slope. Small areas can be lifted and regraded; large ones may need a full rebuild.
General Cost Ranges
Material prices vary by region and finish, but plain concrete squares are typically the least expensive per square foot, with 12×12 paving stones often costing a few dollars or less per piece. 16×16 patio pavers and 18×18 slabs fall in a moderate range per square foot, while textured, tumbled or architectural slabs and large 24×24 formats sit at the higher end. Clay brick pavers usually cost more than plain concrete squares.
Base materials, sand, edging and equipment rental often add a meaningful share to a DIY budget. Professional installation commonly runs several times the material cost because labor, excavation and haul-off are the bulk of the work. Getting two or three written quotes is the most reliable way to set expectations for your area.
When to Call a Pro
A small patio or walkway on stable soil is a realistic weekend project for a careful DIYer. Bring in a hardscape contractor if you are building a driveway, working on a slope that needs retaining walls, dealing with standing water or heavy clay, or laying large 24×24 slabs over a big area where flatness is critical. A pro is also worth the cost when the patio connects to steps, a pool deck or a structure that requires a permit.
Frequently Asked Questions
How many 16×16 patio pavers do I need for a 10×10 patio?
A 10×10 patio is 100 square feet, and each 16×16 paver covers about 1.78 square feet, so you need about 57 pavers. Add 5 to 10 percent for cuts and breakage, which brings the order to roughly 60 to 63 pieces.
Are 18×18 patio pavers harder to install than smaller sizes?
They install faster per square foot, but they are less forgiving. Large slabs need a flatter, better compacted base and show height differences more clearly, so take extra care when screeding the sand bed.
What size paver is best for a driveway?
Small interlocking units such as 4×8 rectangles at 2.375 inches or thicker, laid in herringbone, handle vehicle loads best. Large thin patio slabs are not designed for car traffic.
Can I lay 12×12 paving stones directly on dirt?
You can set a few stepping stones in soil, but a patio or walkway laid on dirt will shift, sink and grow weeds. A compacted gravel base with a thin sand bed gives a much longer-lasting result.
Do 16×16 red pavers fade over time?
Colored concrete pavers do lighten somewhat as the surface wears and sun exposure takes its toll. A breathable paver sealer applied every few years helps slow fading and keeps the color richer.