The hardest part of adding a pot filler is not mounting the faucet. It is everything hidden behind the backsplash: a new cold-water line, a stub-out placed at the right height, solid blocking for the arm to pull against, and a shutoff you can actually reach. Successful pot filler installation happens during rough-in, when the wall is open and the plumbing can be run, anchored and pressure-tested before tile goes up.
If you are remodeling and the wall behind the range is already open, plumbing a pot filler is a very manageable addition. If the kitchen is finished, it means opening drywall and removing backsplash, which changes the scope considerably. Either way, understanding the rough-in details helps you plan the project, talk to your plumber, and avoid the common mistake of a faucet that sits too low to clear your tallest stockpot.
Local plumbing codes and permit rules govern new supply lines in most jurisdictions, so treat this as a planning and process guide. When in doubt, a licensed plumber should make the connection.
Pot Filler Installation Basics: What You Are Actually Building
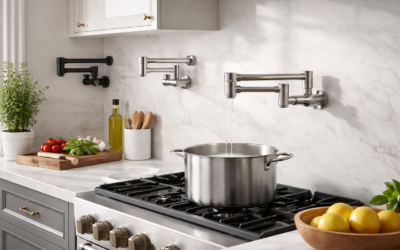
A pot filler is a wall-mounted, cold-water-only faucet with an articulating arm that swings over the cooktop. It has one supply line, no drain, and usually two valves: one at the wall and one at the spout end, so you can shut it off at either point. Deck-mounted versions exist, but the wall-mounted type is far more common and is what this guide covers.
The plumbing work breaks into four parts:
- Supply tap: connecting a new branch line to an existing cold-water supply, often from the kitchen sink line, a basement main, or an adjacent bathroom wall.
- Line route: running 1/2-inch PEX or copper through studs, joists or the ceiling to the wall behind the range.
- Stub-out: terminating the line at the correct height and horizontal position with the fitting your faucet requires.
- Support and access: adding blocking for the mounting flange and an accessible shutoff valve for service.
Tools and Materials
- Pot filler faucet with its rough-in specifications sheet
- 1/2-inch PEX tubing with crimp or expansion fittings, or type L copper with solder or press fittings
- Tee fitting sized to the tap location
- Quarter-turn shutoff valve (in-line or at the tap)
- Drop-ear elbow or threaded adapter matching the faucet inlet, usually 1/2-inch NPT
- 2-by-6 or 2-by-8 lumber for blocking
- Drill with auger bits or a right-angle drill, stud finder, level, tape measure
- Nail plates to protect lines passing through studs
- Pipe insulation for lines in exterior walls
- Pressure gauge or test cap for a pressure test
Choosing the Stub-Out Height Above the Range
Height is the decision most people get wrong. Check the faucet maker’s specs first, because each model has its own arm reach and spout drop. As a general starting point, many designers place the stub-out roughly 18 to 24 inches above the cooktop surface. That usually allows a tall stockpot to slide under the spout while keeping the arm low enough to reach comfortably.
Measure your tallest pot and add a few inches for clearance and lifting. If the range hood is low, confirm the extended arm will not hit the hood body. Also consider where the arm will rest when folded: most pot fillers fold flat against the wall and should not block hood controls or backsplash outlets.
Horizontally, the stub-out is usually centered over the cooktop, or offset to sit above the back burner you use most. Centering looks tidy; offsetting can shorten the reach to your largest burner. Pick one, mark it on the wall, and measure from the finished floor so the height stays correct after tile is installed.
Step-by-Step Rough-In
- Plan the route and permits. Identify the nearest cold-water line and the shortest path to the range wall. Check whether your jurisdiction requires a permit for new supply lines. Many do.
- Shut off water and relieve pressure. Close the main or the relevant branch valve, then open the lowest faucet in the house to drain the line and relieve pressure before cutting anything.
- Tap the cold supply. Cut in a tee on the cold line and add a quarter-turn shutoff on the new branch right at the tee. This gives you a service point even if the wall valve fails.
- Run the line. Drill through the center of studs and joists, keeping holes within the sizes allowed for framing. Protect lines within 1-1/4 inches of stud faces with steel nail plates. Avoid exterior walls if possible; if not, insulate the line and keep it on the warm side of the insulation to prevent freezing.
- Install blocking. Add a horizontal 2-by-6 or 2-by-8 between studs at the stub-out height. The arm acts as a lever and will pull on the flange every time it swings out, so the mounting screws need solid wood.
- Terminate the stub-out. Secure a drop-ear elbow to the blocking so the fitting sits at the depth the faucet specs call for, usually a set distance behind the finished wall surface. Account for drywall plus backsplash tile thickness.
- Pressure test. Cap the stub-out, open the water or apply test pressure, and leave it for the duration your inspector or plumber recommends. Look for drips at every joint before closing the wall.
- Inspection and close-up. If a permit applies, get the rough-in inspected. Then hang drywall and tile, leaving the stub-out accessible.
Finishing: Mounting the Pot Filler Faucet
After tile cures, remove the test cap, wrap the threads with PTFE tape or apply thread sealant per the maker’s instructions, and thread on the wall flange. Tighten until the flange is snug to the finished wall and the valve body sits level. Attach the articulating arm, check that both valves close fully, and open the supply slowly.
Run water for a minute to flush debris, then check for leaks at the wall connection and each swivel joint. Tighten swivel packing nuts slightly if they weep. Finally, fold and extend the arm several times to confirm it clears the hood and backsplash outlets and does not drift under its own weight.
Choosing a quality pot filler faucet with solid brass construction and replaceable cartridges makes long-term maintenance much simpler, since swivel joints eventually need new seals.
Troubleshooting
- Arm droops or drifts: tighten the joint tension screws if the model has them, or replace worn swivel O-rings.
- Drip from spout: one of the two valves is not fully closing; replace the cartridge or washer.
- Low flow: the aerator or a debris screen is clogged from line construction. Remove and rinse it.
- Flange loose on the wall: blocking was missed or the screws are in drywall only. Open the wall behind or beside the range to add blocking.
- Water hammer when closing: add a water hammer arrestor on the branch line or secure loose pipes with straps.
Cost Ranges
For a typical pot filler installation, faucets range from a few hundred dollars for basic models to well over a thousand for designer finishes. Rough-in materials are inexpensive: PEX, fittings and blocking typically total a small fraction of the faucet price. Labor is the swing factor. When walls are already open during a remodel, a plumber can often add the line in a few hours. In a finished kitchen, total cost climbs because it may include opening walls, patching drywall, and replacing backsplash tile.
When to Call a Licensed Professional
Tapping into a pressurized water system and running new supply lines is regulated plumbing work in many areas, and a permit and inspection are often required. A licensed plumber knows the local rules on pipe materials, fitting types and allowable drilling through framing. They also carry insurance if a joint fails behind a finished wall, which matters because a hidden slow leak behind a range can rot framing for months before it shows.
Bring in a pro if you are uncomfortable soldering or crimping, if the route passes through a load-bearing wall or engineered joists, if your home has older galvanized piping, or if the nearest cold line is far from the range. If the range is gas, keep new water lines well clear of the gas supply and never disturb gas piping yourself; any work on or near gas connections belongs to a licensed professional. Also call an electrician rather than relocating any outlets on the range wall yourself.
Frequently Asked Questions
Does a pot filler need hot water?
No. Pot fillers are designed for cold water only. Cold water is preferred for cooking and heats quickly on a burner, and a single line keeps the rough-in simple.
How high should a pot filler be above the stove?
Many installations place the stub-out about 18 to 24 inches above the cooktop, but follow your faucet’s specs and measure your tallest pot to confirm clearance.
Can I install a pot filler without opening the wall?
Rarely. A new supply line has to reach the range wall, so some drywall or backsplash usually must come off. The easiest time to install one is during a remodel.
Do I need a permit to install a pot filler faucet?
Many jurisdictions require a plumbing permit for new supply lines. Check with your local building department before starting the pot filler rough in.
Does a pot filler need a drain?
No. You fill the pot at the stove and carry it to the sink to empty. The faucet has two shutoffs, so it should not drip when closed.