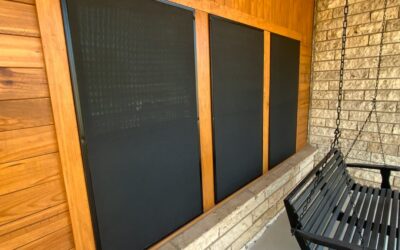
Most patio owners fight the same two problems: the neighbor’s kitchen window that looks straight onto the table, and the late-afternoon wind or low sun that comes in sideways where an overhead cover does nothing. A retractable side awning solves both by pulling a fabric panel horizontally out of a wall-mounted cassette and hooking it to a post, creating an instant screen that rolls away again in seconds. It is not an overhead awning and it is not a rigid privacy panel. Think of it as a window shade turned on its side and stretched across your patio.
The short answer for most homes: pick a unit 5 to 6.5 feet tall, plan the pull-out length to the space you actually want screened (usually 10 to 16 feet), anchor the receiving post into concrete or a solid deck frame, and retract it whenever gusts pick up. Get those four things right and a side screen will last many seasons. Get the anchoring wrong and it becomes a sail.
- What a Retractable Side Awning Is and How It Works
- Where a Side Screen Makes the Most Sense
- Sizing: Height, Pull-Out Length and Clearance
- Fabric, Frame and Hardware Choices
- How to Install a Retractable Side Awning Securely
- Wind Limits and Weather Use
- Care, Troubleshooting and Lifespan
- Cost Ranges and When to Call a Pro
- Frequently Asked Questions
What a Retractable Side Awning Is and How It Works
A retractable side awning has three main parts. The cassette is an aluminum housing, typically 6 to 8 inches in diameter, that mounts vertically to a wall, a column or a freestanding post. Inside it, a spring-loaded roller holds the fabric. The pull bar is a rigid aluminum profile sewn into the leading edge; you grab its handle and walk the fabric out. Finally, the receiving post or wall bracket catches the pull bar and holds the fabric taut.
When you unhook the pull bar, the spring rewinds the fabric back into the cassette. Good units include a speed brake so the bar does not whip back and dent the housing. Some models add a rotating cassette mount so one screen can be pulled in several directions from a corner, and a few offer a double-sided version that extends in two directions from a single center post, which is handy for splitting a shared patio between two units.
Because the fabric runs vertically rather than overhead, a side screen blocks views and horizontal wind or sun rather than midday rain. Pair it with an overhead cover if you need both.
Where a Side Screen Makes the Most Sense
- Townhouse and duplex patios where the neighboring yard is only a few feet away and a permanent fence would need HOA approval.
- Balconies and rooftop terraces that take strong crosswinds or late sun from one side.
- Pool decks where you want a changing or lounging area screened only part of the day.
- Hot tub corners that need privacy without blocking the view when you are not using them.
- Dog runs and play areas as a soft temporary barrier, though a side screen is not a pet fence and should not be climbed or pushed against.
- Rentals where freestanding post versions avoid drilling into the main structure.
If you only need privacy in one fixed spot all the time, a fixed slatted screen or planted hedge may be cheaper over the long run. The retractable version earns its keep when you want the space open most of the time and closed on demand.
Sizing: Height, Pull-Out Length and Clearance
Standard heights run from about 4.9 feet to 6.6 feet, with some units reaching 7 feet or more. Seated privacy usually only needs 5 feet; standing privacy near a walkway wants 6 feet or more. Keep in mind that taller fabric catches more wind, so do not oversize for its own sake.
Pull-out lengths commonly range from 9 feet to about 20 feet. Longer runs sag more at the midpoint, especially with the lighter springs in budget models. As a rule of thumb, if you need more than 16 feet of coverage, consider two shorter units meeting at a shared center post rather than one long one. That also lets you open half the screen.
Before buying, measure these points:
- The distance from the cassette mounting point to where the receiving post will stand.
- The ground clearance you need under the fabric. Most screens leave 2 to 4 inches, but uneven pavers may need more.
- Any obstructions along the path such as planters, grill lids, door swings or downspouts.
- The slope of the patio. A screen pulled across a sloped surface will leave a wedge-shaped gap at one end.
Fabric, Frame and Hardware Choices
Fabric is where cheap and good units separate. Solution-dyed acrylic holds color and resists mildew well but is slightly less wind-stiff. Coated polyester is common on budget models; it is lighter and cheaper but fades faster in strong sun. PVC-coated mesh lets air pass through, which reduces wind load significantly and still blocks most views, a strong choice for balconies above the second floor. Look for UV-stabilized fabric of at least 280 grams per square meter for solid panels.
For the cassette and posts, powder-coated aluminum is standard. Stainless fasteners are worth paying for near salt air or pool chemicals. A quality spring roller and a soft-close or braked retraction extend the life of the fabric edge and the pull bar.
When comparing products, check whether the receiving post comes with a surface-mount base plate, an in-ground sleeve or both, and whether the post can double as a mount for a second screen. A post with a removable sleeve lets you lift it out of the ground in winter so you have a clear yard.
How to Install a Retractable Side Awning Securely
Installation is a moderate DIY project for two people with basic tools: a drill-driver, masonry bit if mounting to brick or concrete, level, tape measure, socket set and appropriate anchors. Here is the typical sequence.
- Mark the cassette line. Use a level to mark a true vertical line on the wall or column. A cassette that is even slightly out of plumb makes the fabric track unevenly and wrinkle.
- Find solid framing or masonry. On wood-framed walls, locate studs or add blocking behind siding. Fastening only into siding or vinyl cladding will pull out. On brick, drill into the brick itself rather than mortar joints and use sleeve or wedge anchors rated for the load.
- Mount the cassette brackets. Fasten the top and bottom brackets, then hang the cassette and confirm it is plumb before final tightening.
- Set the receiving post. This is the part that gets underbuilt. For a surface mount on a concrete patio, use the supplied base plate with concrete anchors at least 3 to 4 inches embedment into sound concrete. For soil, set a ground sleeve in a concrete footing, typically 10 to 12 inches in diameter and 24 inches deep or below your local frost line if the maker calls for it. Call 811 before digging to have buried utilities marked.
- Check alignment. Pull the fabric out and hook it to the post. The pull bar should sit parallel to the cassette with even tension top to bottom. Adjust post height or shim as needed.
- Test retraction. Unhook and let the brake guide the bar home slowly. If it slams, adjust the brake per the instructions before regular use.
On a wood deck, bolt the post base through the decking into a joist or added blocking, never into deck boards alone. Deck boards will split under repeated wind loading.
Wind Limits and Weather Use
Every side screen has a wind rating, and most residential units are rated only for moderate breezes, often in the range of Beaufort 4 to 5, roughly 13 to 24 mph. Above that, retract it. A 6-foot by 13-foot solid panel presents almost 80 square feet of surface, and in a gust the forces on the post and wall brackets climb quickly.
- Retract the screen overnight and whenever you leave the house.
- Do not leave it extended in storms, heavy rain or snow.
- Choose mesh fabric in windy exposures; it can cut wind load substantially compared with solid fabric.
- If the fabric is wet when you retract it, extend it again to dry within a day or two to prevent mildew.
Structural and Permit Considerations
Because a side screen transfers wind loads into your wall and footing, secure anchoring into framing, masonry or proper footings is not optional. Check with your HOA before installing, since many associations treat any visible exterior screen as an architectural change. Most jurisdictions do not require a permit for a small retractable screen, but freestanding post installations near property lines can trigger setback rules, so check locally. On condo balconies, drilling into the building envelope usually needs board approval, and a freestanding weighted base may be the only option.
Care, Troubleshooting and Lifespan
Rinse the fabric with a hose and mild soap twice a season, let it dry fully extended, and wipe grit from the cassette mouth so it does not scratch the fabric on retraction. Lubricate the pull bar handle and post latch with a dry silicone spray once a year.
Common Problems and Fixes
- Fabric rolls up crooked: the cassette is not plumb or the post is leaning. Re-level both.
- Retracts too slowly or not fully: spring tension has dropped or grit is binding the fabric. Clean first, then adjust tension per the manual.
- Sagging in the middle: the run is too long for the spring. Shorten the pull distance or add an intermediate post.
- Post wobbles: the anchors are loosening or the footing was too shallow. Re-anchor or pour a larger footing.
- Mildew spots: the fabric was rolled up wet. Clean with a diluted fabric-safe cleaner and dry fully.
With regular retraction in bad weather, a decent unit lasts 5 to 10 years, and replacement fabric rolls are available for many models, which is far cheaper than replacing the whole cassette.
Cost Ranges and When to Call a Pro
Budget side screens with polyester fabric generally run in the low hundreds of dollars. Mid-range units with acrylic or mesh fabric, better springs and rotating mounts commonly fall in the several-hundred-dollar range, and premium or double-sided systems can exceed a thousand dollars before installation. Professional installation typically adds a few hundred dollars depending on footing work and wall type.
Hire a contractor if you need to mount on stucco or EIFS, which is easy to crack and hard to seal; if the post must go into a structural slab over a garage or living space; if the balcony is above the second story; or if you want the screen integrated into an existing pergola or fence frame. A pro can also add blocking behind finished walls so fasteners hit real framing.
Frequently Asked Questions
How high should a retractable side awning be for privacy?
For seated privacy around a table or lounge chairs, about 5 feet is usually enough. If people walk past or you want standing privacy, choose 6 feet or more, keeping in mind that taller fabric catches more wind.
Can a side awning stay out in the wind?
Only in light to moderate breezes. Most residential models should be retracted once winds reach roughly 20 mph or when gusts are forecast, and they should never be left out overnight or during storms.
Do I need to drill into my house to install one?
Not always. Freestanding versions mount the cassette on its own post, and some use weighted bases for balconies or rentals. Wall mounting is sturdier, but the fasteners must reach studs, blocking or solid masonry.
Is mesh or solid fabric better?
Solid fabric gives full privacy and blocks more sun. Mesh lets air through, reduces wind load and still blocks most views, which makes it the better pick for windy yards, balconies and rooftop terraces.
How long does a retractable side screen last?
A mid-range unit that is retracted in bad weather and cleaned regularly typically lasts 5 to 10 years. Fabric usually wears out before the aluminum cassette, and replacement fabric is available for many models.