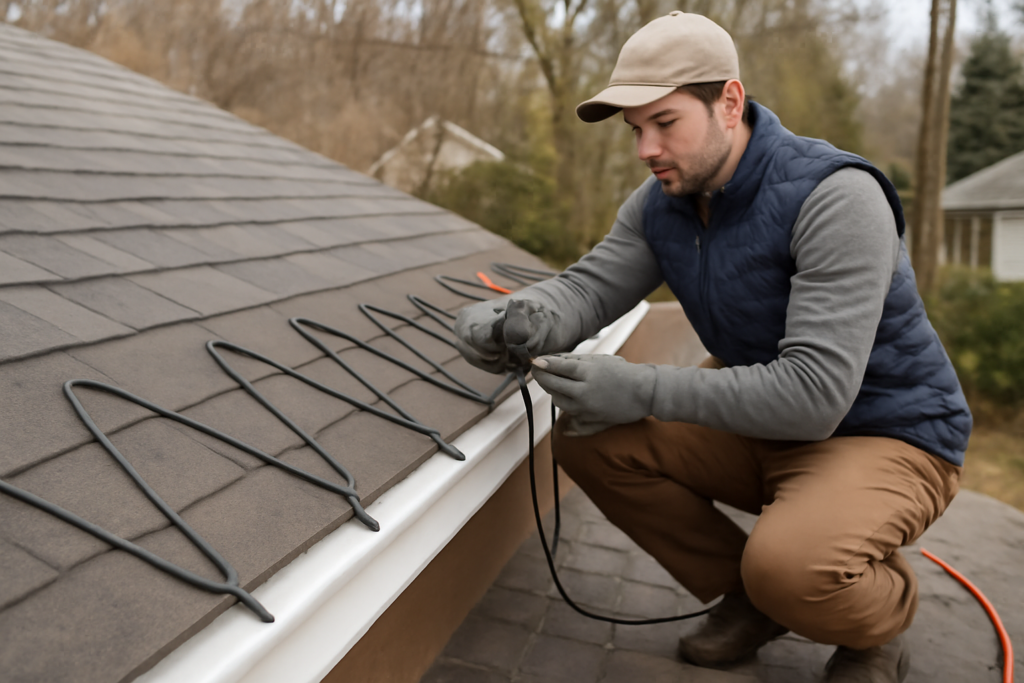
Heat cable does not melt your roof clear of snow — it melts drainage channels through the ice so meltwater escapes instead of backing up under the shingles. Getting roof heat cable installation right is mostly math and layout: the correct cable type, the correct length for your eave geometry, and a zigzag pattern that actually reaches past the exterior wall line. Done properly, a $300 weekend project prevents the ice-dam leaks that ruin ceilings every February. Done sloppily — too short, wrong cable, no controller — it burns electricity all winter and still lets the dam form above it.
Part of our Roofing guide — explore the full guide →
Self-Regulating vs Constant-Wattage Cable
Two technologies share the shelf, and the difference matters more than any other decision you will make:
- Constant-wattage cable is the $60-to-$120 hardware-store roll (Frost King, Easy Heat ADKS class): a fixed-resistance element putting out about 5 watts per foot no matter the conditions. It is cheap, but it cannot be cut to length, overlapping it on itself can overheat and fail, and it draws full power whether it is 30°F and snowing or 50°F and sunny. Typical service life: 3 to 5 seasons.
- Self-regulating cable (Raychem WinterGard, Warmup, King Electric, Heat Trace brands; $3 to $8 per foot, or $250 to $500 for a typical run with accessories) uses a conductive polymer core whose resistance rises with temperature — each inch of cable independently throttles from ~12 watts per foot in ice water down to 3 or fewer when warm. It can be cut to exact length, safely crosses itself, lasts 10 to 20 years, and cuts operating cost dramatically. It requires a plug/end kit (about $30 to $60) or hardwiring.
Buy self-regulating. For any roof you plan to own more than three winters, the operating savings and lifespan settle the argument, and the fire risk profile is meaningfully better.
Sizing: The Eave-Depth Formula
Cable length is not eave length — the zigzag consumes far more than the straight run. The standard sizing method:
- Measure the eave length to be protected (say 40 feet).
- Measure the eave overhang depth — soffit face to fascia, horizontally.
- Apply the multiplier: for a 12-inch overhang, multiply eave length by roughly 2.0 (loop height ~18 inches, reaching a foot past the wall line); for a 24-inch overhang, multiply by about 2.7 (loop height ~30 inches); for a 36-inch overhang, multiply by 3.4 or more.
- Add the gutter run: one full eave length again if cable will lie in the gutter (it should).
- Add each downspout: full downspout height, plus 2 to 3 feet if the downspout discharges into a freeze-prone splash zone — loop the cable down and back if the spout is short, or run single-pass to a lower drain.
- Add 5 to 10% for valleys, dormers, and routing slack.
Worked example: 40-foot eave, 18-inch overhang (multiplier ~2.3), gutter, two 12-foot downspouts: 40 × 2.3 = 92 ft roof zigzag + 40 ft gutter + 24 ft downspouts + slack ≈ 165 feet of cable. This is why “100-foot roll for a 100-foot house” installs fail — they protect less than half of what the owner thinks.
Layout Specification
The zigzag pattern has real specs, not vibes:
- Triangle width: peaks spaced 15 to 24 inches apart along the eave (check your cable’s listing; 24 inches on center is typical for self-regulating).
- Loop height: the apex of each triangle must extend 6 to 12 inches above the exterior wall line — the whole point is keeping the melt channel open where the roof transitions from cold overhang to warm attic. On a 24-inch overhang, that means 30-to-36-inch loops. Loops that stop at the fascia are decorative.
- Bottom of each loop drops to the shingle edge or into the gutter, so channels connect to drainage.
- Clips: use the manufacturer’s shingle clips at every peak and every valley of the zigzag — they slip under shingle tabs or bond with adhesive; never nail or staple through cable. Spacing per instructions, typically one clip per direction change plus mid-span support.
- Valleys: run cable up-and-back 2 to 6 feet in each problem valley, forming a long narrow U.
- Gutters and downspouts: lay cable along the gutter bottom (loose, not zip-tied to hangers) and drop a loop down each downspout to grade level; ice-blocked downspouts are the most common reason “the cables didn’t work.”
Power: GFCI Is Not Optional
Heat cable must run on a GFCI-protected circuit — NEC 426.28 requires ground-fault equipment protection for fixed deicing, and plug-in installs need a GFCI outdoor receptacle with an in-use (bubble) cover. Practical points: a typical 165-foot self-regulating run can draw 8 to 16 amps at startup in cold conditions (self-regulating cable has an inrush surge — check the spec sheet’s startup table), so dedicate a 20-amp circuit rather than sharing the holiday-lights outlet. Position the receptacle near the eave end; extension cords are a code violation for fixed heating and a real fire path. Hardwired installs with a weatherproof junction box and a dedicated breaker are cleaner for permanent systems — that portion is electrician work, $150 to $400.
Controllers: The Difference Between $50 and $400 Winters
Cable left switched on from November to March wastes most of what it draws. Options, in ascending intelligence:
- Manual switch: free, and you will forget it — both on and off.
- Plug-in thermostat cube (Easy Heat RS-2, ~$40): energizes below ~38°F. Better, but runs during cold dry weeks with nothing to melt.
- Temperature + moisture controller (WeatherPorter, Raychem/EasyHeat sensor controllers, $120 to $400): powers cable only when it is both near freezing and wet/snowing — typically cuts runtime 60 to 80%.
- Smart plug + weather automation: a capable middle path if you will actually maintain the automation.
Operating cost math: 165 feet of self-regulating cable averaging ~6 W/ft draws about 1 kW; at $0.16/kWh, a controller-managed 300 hours per winter costs roughly $50, while an always-on December-through-March habit approaches $450. The controller pays for itself the first season.
Installation Steps, Start to Finish
- Install in fall, dry and above 40°F — cable jacket and clips handle better, shingles do not crack.
- Sweep the eave and gutter clear of debris.
- Lay out the zigzag on the roof loosely first, confirming your length math before clipping anything.
- Clip peaks (under shingle tabs, 6 to 12 inches past the wall line) working one direction; clip the lower bends at the drip edge.
- Run the gutter leg, then downspout loops to grade.
- Attach the end seal and plug kit per the manufacturer’s torque and heat-shrink instructions — most cable failures are botched terminations.
- Route the cold lead to the receptacle, secure with UV-rated clips, plug into GFCI through the controller.
- Test: energize for 15 minutes and feel for uniform slight warmth; a dead section means a bad splice or termination — fix now, not in January.
Professional installation, if you would rather not walk the eaves, runs $400 to $1,200 for a typical single-eave system including a controller — more with hardwiring or steep-roof staging.
The Honest Paragraph: Cables Are a Symptom Treatment
Ice dams form because attic heat melts roof snow that refreezes over the cold eaves — the disease is heat loss, and heat cable is the fever reducer. The cure is air-sealing attic bypasses (top plates, can lights, chases), insulating to R-49+, and balancing soffit-to-ridge ventilation so the whole roof deck stays cold; do that and most homes never dam again, cables or no cables. Cable earns a permanent role where architecture defeats insulation — vaulted ceilings with no vent path, low-slope dormer eaves, dead valleys over unheated porches, and complex rooflines in heavy-snow climates. Treat it as targeted armor for those spots, run it through a smart controller, and it will quietly pay for itself in every hard winter. Treat it as a substitute for insulation and you will fund the utility company while your attic keeps making the ice you are melting.