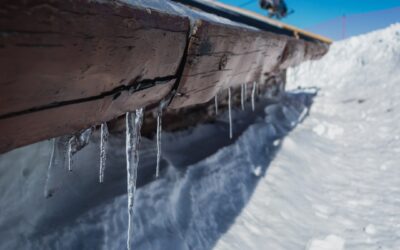
An ice dam does not damage your roof by being heavy — it damages it by being a dam. Meltwater from the warm upper roof runs down, hits the frozen ridge of ice at the cold eave, pools behind it, and then wicks backward under the shingles and into your ceilings. Heat tape for gutters, more accurately called a roof and gutter de-icing cable, does not melt the whole ice sheet. It carves a continuous drainage channel through the ice so that trapped meltwater always has an open path down through the gutter and out the downspout, instead of backing up under the roofing. Understanding that distinction is the difference between a system that works and a strip of expensive wire that just glows uselessly.
Part of our Roofing guide — explore the full guide →
If you live where winters bring freeze-thaw cycles — snow melting by day and refreezing at night — heat cable is a legitimate defense for problem eaves. Here is how it works, how to lay it out, and how to run it without wasting electricity or creating a hazard.
- What Heat Tape Actually Does
- The Zigzag Roof-Edge Pattern
- Carrying the Heat Through Gutter and Downspout
- Sizing and Buying the Right Cable
- Power, Controls, and Running Costs
- Self-Regulating vs. Constant-Wattage in Depth
- Installation and Safety Cautions
- Installing Downspout Heat Tape So Water Actually Drains
What Heat Tape Actually Does
Roof de-icing cable is a resistance heating wire, typically drawing 5 to 9 watts per linear foot, that warms just enough to keep a narrow path above freezing. It cannot and should not try to keep the whole roof snow-free. Its job is targeted: maintain open channels at the eave, in the gutter, and down the downspout so that whenever ice or snow melts, the water finds a clear route off the roof rather than damming and refreezing.
That is why layout is everything. A cable running straight along the gutter alone does little, because the water melting up on the roof edge still has nowhere to go. The cable has to bridge the entire vulnerable zone — up onto the roof edge, into the gutter, and all the way down the downspout to the ground.
The Zigzag Roof-Edge Pattern
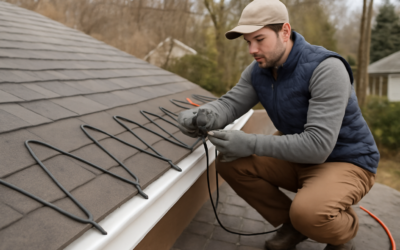
The classic and correct installation runs the cable in a zigzag or triangular pattern along the roof eave. You clip it to the shingles so it forms a series of loops that reach from the very edge up the roof past the point where the warm and cold zones meet — usually 12 to 24 inches up, far enough to sit above the exterior wall line where ice dams form.
Each triangle of the zigzag creates a warm vertical path. When snow melts, water follows these warm paths straight down through the eave ice and into the gutter. The spacing of the zigzag peaks is typically 12 to 15 inches apart, and the vertical reach is set by how far up the roof your ice dams historically form. Where you have had bad dams, reach higher.
Carrying the Heat Through Gutter and Downspout
Melting a channel at the roof edge is pointless if the gutter and downspout are frozen solid, because the water just refreezes the moment it lands. So the cable must continue off the roof edge, run the length of the gutter, and drop down inside every downspout to the bottom.
- In the gutter: lay a run of cable along the trough so meltwater stays liquid all the way to the outlet.
- Down the downspout: feed cable down the full length of each downspout. This is the most-forgotten step and the most common failure point — a frozen downspout backs the whole system up.
- At the bottom: the cable should reach the discharge point so water exits rather than freezing at the outlet.
Think of it as one continuous warm channel from the roof edge all the way to the ground. Break the chain anywhere and ice reforms at the gap.
Sizing and Buying the Right Cable
Measure carefully, because the zigzag pattern uses far more cable than the length of your eave. A common rule: for every 1 foot of roof edge you want to protect, budget roughly 2 to 3 feet of cable to account for the up-and-back triangles, then add the full gutter length and twice the downspout length (down and the loop back up where required by the product).
You have two cable types to choose from. Constant-wattage (self-terminating) cable puts out a fixed watt-per-foot and is cheaper, running maybe $1 to $3 per foot. Self-regulating cable, at $3 to $8 per foot, varies its output with temperature — warmer where it is coldest, backing off where it is warmer — which uses less electricity and resists burnout if sections overlap. For most homes self-regulating cable is worth the premium in both efficiency and safety.
Power, Controls, and Running Costs
De-icing cable plugs into or hardwires to a dedicated GFCI-protected exterior circuit — the GFCI is non-negotiable for a wet outdoor heating element. Do not run it off an ordinary indoor outlet through a cracked window; get a proper weatherproof outdoor receptacle.
Because the cable draws real power — a 100-foot run at 6 watts per foot pulls about 600 watts, similar to a small space heater — do not leave it running all winter. Control it. The cheapest approach is to plug it in manually only when a storm and a thaw are both in the forecast. Better is a thermostatic controller that energizes the cable only between roughly 38°F and freezing, exactly the window when ice dams form, and shuts it off when it is too cold to melt or warm enough to drain naturally. The smartest controllers add a moisture sensor so the cable runs only when it is both cold and wet. Any of these cuts running cost dramatically versus a season of nonstop operation.
Self-Regulating vs. Constant-Wattage in Depth
The cable type you choose affects safety, efficiency, and how forgiving the installation is, so it deserves a closer look. Constant-wattage cable outputs the same heat per foot no matter the temperature, which means it runs at full draw whenever it is energized and can overheat if it crosses over itself or if a section gets buried. It is cheaper, but you must follow the layout precisely and never overlap it.
Self-regulating cable contains a conductive polymer core that changes resistance with temperature — as any point on the cable gets colder, it puts out more heat there; as it warms, it throttles back. This does three helpful things: it saves electricity by not heating where heat is not needed, it will not burn itself out if sections touch or overlap, and it responds automatically to the actual conditions along the run. For a homeowner installing this once and wanting it to be safe and efficient, self-regulating cable is the better buy despite costing $3 to $8 per foot versus $1 to $3 for constant-wattage. Over a decade of winters, the electricity savings and the reduced failure risk usually justify the difference.
Installation and Safety Cautions
Use the manufacturer’s roof clips and downspout hangers, never staples or nails through the cable jacket, and never let the cable cross over itself unless the product specifically allows it — overlapping constant-wattage cable can overheat and fail. Keep it clear of anything flammable and off of surfaces the product is not rated for. Inspect the cable and its jacket each fall before energizing, and replace any run with cracked or nicked insulation.
One honest caveat: heat cable treats the symptom, not the cause. Ice dams form because heat escapes from the living space into the attic and warms the roof deck. The permanent fix is attic air sealing and insulation to keep the roof deck cold, plus good ventilation. Heat tape for gutters is the right call for a chronic problem eave, a complicated roof valley, or a north-facing overhang you cannot easily fix otherwise — but if you are getting dams across the whole house, address the attic first and let the cable handle the stubborn spots that remain.
Installing Downspout Heat Tape So Water Actually Drains
Downspout heat tape is the part of a de-icing system most likely to be skipped or installed halfway, and a half-heated downspout is one of the fastest ways to create an ice plug. The goal is simple: warm cable from the gutter outlet all the way to the point where water leaves the downspout, so there is no cold gap for meltwater to refreeze in.
Before You Run the Cable
Check that each downspout is clear. A downspout already packed with ice or leaves will not thaw evenly around a new cable, so wait for a mild day, flush it with a hose, and confirm water runs freely. Look at the bottom as well. If the downspout ties into a buried drain line, ask the cable manufacturer how far it can extend into that line, because some products are not meant to run underground.
- Use the right product. Only UL-listed cable that is rated for roofs, gutters, and downspouts belongs here. Pipe heat tape is a different product and should not be used outdoors in a gutter.
- Run it to the bottom and out. Drop the cable down the inside of the downspout and let it reach the discharge point, or loop it back up if the product instructions call for a doubled run. It should not stop partway down.
- Protect the entry point. Where the cable leaves the gutter and enters the outlet, use the manufacturer’s downspout hanger so the jacket is not rubbed or pinched by a sharp metal edge.
- Do not overlap constant-wattage cable. A doubled run of constant-wattage cable inside a tight downspout can overheat. If you need a loop, use a cable that allows it, which is usually self-regulating.
Power and Ladder Safety
Plug-in cable goes straight into a weatherproof, GFCI-protected outdoor outlet with an in-use cover, never through an extension cord. Test the GFCI before each season. If the system is hardwired, switch off the breaker and confirm the circuit is dead with a non-contact voltage tester before touching any connection, and have a licensed electrician make the connections and add the circuit.
Work on a dry day, set the ladder on firm, level ground, keep three points of contact, and have a helper hold the base. Never climb onto an icy roof edge or into a frozen gutter to install or adjust cable. Put the system in place in the fall, before the first freeze.