A well-chosen rustic kitchen backsplash does more than protect your wall from splatters and steam. It anchors the whole room in warmth, texture, and a sense of age that brand-new finishes can struggle to fake. Whether your kitchen leans farmhouse, cottage, lodge, or industrial-rustic, the backsplash is the easiest single feature to swap that completely changes the mood between the counters and the cabinets.
Part of our Kitchen Remodeling guide — explore the full guide →
This guide breaks down the materials worth considering, what each one realistically costs, how installation differs by surface, and how to keep a textured backsplash clean in a working kitchen. The goal is character that holds up to grease, heat, and daily cooking, not just a pretty photo.
What Makes a Backsplash Look Rustic
Rustic style is built on natural materials, visible texture, and finishes that look lived-in rather than machine-perfect. Think rough-hewn surfaces, earthy and muted colors, irregular shapes, and the kind of subtle imperfection that signals something was made by hand or weathered over time.
The most successful rustic kitchens pair that texture with restraint. A heavily textured stone wall reads beautifully against simple Shaker cabinets and a warm wood countertop, but it can feel busy next to glossy modern slab doors. Choose one or two strong rustic elements and let the rest of the kitchen stay calm.
Popular Rustic Backsplash Materials
Several materials deliver that aged, natural feel, and each behaves differently in a kitchen environment. Here are the most common choices and what to expect from them.
- Brick or brick veneer: Reclaimed-look thin brick brings instant farmhouse warmth. Real thin-brick veneer is durable but porous, so it needs sealing near a cooktop.
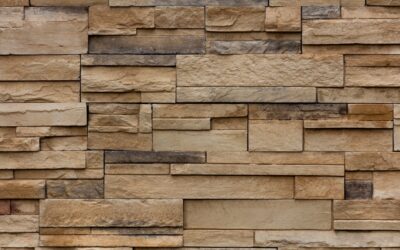
- Natural stone: Tumbled travertine, slate, and split-face stone offer rich texture and color variation. Stone is highly durable but absorbs oil and water if left unsealed.
- Reclaimed or shiplap wood: Wood reads warm and cabin-like, but it is the riskiest choice directly behind a range. Keep wood away from open flame and seal it well, or reserve it for low-splash zones.
- Handmade and zellige tile: Irregular, slightly wavy ceramic tiles with uneven glaze catch light beautifully and give a crafted, old-world look that is easy to clean.
- Subway tile with dark grout: A budget-friendly nod to rustic when paired with a matte finish and contrasting grout that highlights the brick-like layout.
Realistic Cost Ranges
Costs swing widely based on material, kitchen size, and whether you hire a pro. As a planning estimate for a typical backsplash run, ceramic and porcelain tile materials often land in the range of about 5 to 25 dollars per square foot, while natural stone and quality handmade tile can climb to 25 to 50 dollars or more per square foot. Thin-brick veneer and reclaimed wood vary depending on whether the material is genuinely salvaged.
Professional installation commonly adds roughly 10 to 25 dollars per square foot in labor, with intricate patterns, stone, and tricky cuts pushing that higher. These figures are general estimates; always get itemized quotes from local installers, because regional pricing and material availability differ significantly.
DIY Versus Hiring a Pro
A motivated homeowner can install a straightforward tile backsplash over a weekend, and peel-and-stick or panelized brick veneer products lower the barrier even further. If you are comfortable measuring carefully, mixing thinset, and using a wet saw or tile nippers, a simple layout is well within reach.
Some situations call for a professional. Natural stone, heavy materials, complex herringbone or mixed-size patterns, and any backsplash that must integrate with outlets, range hoods, or uneven walls all benefit from experienced hands. A licensed installer also ensures the substrate is sound and that waterproofing is handled correctly where it matters.
Installation Tips for a Lasting Result
Preparation determines how a textured backsplash holds up. Start with a clean, dry, flat wall and confirm your substrate is appropriate; cement backer board is the standard behind tile in wet zones. Dry-lay your material first to plan cuts and balance the pattern before any adhesive goes on.
- Turn off power to outlets in the work area and remove cover plates before you begin.
- Mark a level reference line; do not trust the countertop or cabinets to be perfectly straight.
- Work in small sections so adhesive does not skin over before you set your pieces.
- Use spacers for consistent joints, then let everything cure before grouting per the manufacturer’s timeline.
- Wear safety glasses when cutting tile or stone, and follow the directions on every adhesive, grout, and sealer you use.
Sealing and Maintaining Natural Materials
Porous rustic materials are the ones that demand attention. Brick, stone, unglazed tile, grout, and wood all absorb cooking oils, water, and stains unless they are sealed. A penetrating sealer applied per the manufacturer’s instructions keeps grease from soaking in and makes routine cleaning far easier.
For everyday upkeep, wipe spatters promptly with a soft cloth and a mild, pH-neutral cleaner. Avoid harsh acids and abrasive pads on stone and grout, never mix cleaning chemicals, and reseal porous surfaces on the schedule the product recommends, often every one to three years in a busy kitchen. Glazed and handmade ceramic tiles are the lowest-maintenance option since their surface naturally resists stains.
Designing Around Your Rustic Backsplash
Color and lighting pull the whole look together. Warm undertones in tile, wood, and stone pair naturally with brass or oil-rubbed-bronze hardware, while cooler slate and gray stone suit black or pewter accents. Under-cabinet lighting raked across a textured surface emphasizes the depth that makes rustic materials so appealing.
Ultimately, a rustic kitchen backsplash should feel like it belongs to the bones of the house. Match the material to how hard your kitchen works, seal anything porous, and keep the surrounding finishes simple so the texture you chose gets to be the star. Done thoughtfully, it is the kind of detail that makes a kitchen feel timeless rather than trendy.
Common Mistakes to Avoid
A few missteps show up again and again in rustic kitchens. The biggest is choosing a heavily textured material without thinking through cleaning; deep grout lines and rough stone behind a cooktop collect grease that is genuinely hard to scrub out. If you love a textured look near the range, plan on sealing it well and wiping it often, or shift the rough material to the perimeter and use a smoother, easy-clean tile directly behind the burners.
Another frequent error is forgetting that rustic does not mean unfinished. Sloppy grout lines, uneven spacing, and exposed cut edges read as careless rather than charming. Genuine rustic charm comes from quality materials installed with care, not from low effort. Take time to plan the layout, finish exposed edges with trim pieces or careful cuts, and your backsplash will look intentional rather than improvised. Lighting choices matter too, since the wrong color temperature can wash out the warm tones that make natural materials feel inviting in the first place.