Picking the right saw for cutting laminate flooring shapes how fast your install goes and how clean the finished edges look. There is no single perfect tool. A good laminate job usually leans on two or three cutters working together, because crosscuts, rip cuts, and notches each favor a different machine. After outfitting plenty of jobs, I can tell you where each option shines, what it costs, and which blade turns a chip-prone board into a crisp cut.
Before naming picks, understand the cuts you will make. Crosscuts across the plank width happen at the end of every row. Rip cuts down the length handle the final row and boards beside cabinets. Notches and curves wrap around door casings, pipes, and vents. The tool that flies through one of those can be clumsy at another, so match the saw to the cut.
- Miter Saw: The Crosscut Workhorse
- Table Saw: The Rip-Cut Champion
- Circular Saw: The Budget All-Rounder
- Jigsaw: For Notches and Curves
- Manual Laminate Cutter: Quiet and Dust-Free
- Blades Matter More Than the Saw
- My Recommended Setup by Budget
- Corded vs. Cordless
- Dust Control and Safety
- The Bottom Line
Miter Saw: The Crosscut Workhorse
A sliding compound miter saw is the tool I reach for most on a laminate install. It makes fast, square, repeatable crosscuts, which is 80 percent of the cutting on a typical floor. Set up a stop block and you can trim a whole stack of boards to identical lengths in minutes.
- Best for: Crosscuts, angled cuts at doorways, high-volume repetitive trimming.
- Weakness: Cannot rip a board lengthwise.
- Cost: $150 to $600 depending on slide capacity and brand.
- Blade tip: Swap the framing blade for an 80-tooth fine-finish blade to kill chipping.
Solid picks include the DeWalt DWS779 sliding miter saw and the Bosch GCM12SD for larger jobs. For a smaller budget, a basic 10-inch Ryobi or Metabo HPT miter saw handles standard plank widths just fine.
Table Saw: The Rip-Cut Champion
When you need a straight rip down the length of a plank, nothing beats a table saw with a rip fence. That final row against the wall almost always needs a lengthwise cut, and the fence keeps the width dead consistent across a full 48-inch board, which is nearly impossible to match freehand.
- Best for: Lengthwise rip cuts, consistent-width final rows.
- Weakness: Bulky, and overkill if you only have a few rips.
- Cost: $300 to $700 for a capable jobsite saw.
- Blade tip: A 60- to 80-tooth carbide blade rated for laminate or plywood cuts cleanest.
The DeWalt DWE7491RS jobsite table saw with its rolling stand is a reliable favorite. Remember to feed the plank face up, since a table saw’s teeth exit through the bottom and tearout lands on the hidden side.
Circular Saw: The Budget All-Rounder
If you want one powered saw to do most of the work on a budget, a circular saw with a clamped straightedge is remarkably capable. It handles both crosscuts and rip cuts, though slower and with more setup than dedicated tools.
- Best for: Budget installs, both cut types with one tool, working on the floor.
- Weakness: Slower, needs a guide clamped for every straight cut.
- Cost: $50 to $200.
- Blade tip: Use a 40-plus-tooth fine blade and cut boards face down to hide tearout.
A track saw such as the Makita SP6000 or Festool TS 55 is the upgrade version, adding a guide rail, dust collection, and a chip-free splinter guard. If your budget allows, it is the cleanest guided cut you can get.
Jigsaw: For Notches and Curves
No install is complete without a jigsaw. It is the go-to for the fiddly cuts a straight saw cannot make: notching around door casings, cutting a hole for a floor vent, or scribing a curve to fit an odd wall. You would never rip a whole floor with one, but skipping it means fighting every obstacle.
- Best for: Notches, curves, holes for pipes and vents, tight corners.
- Weakness: Wanders on long straight cuts, rougher edge.
- Cost: $40 to $150.
- Blade tip: Use a fine, reverse-tooth (down-cut) laminate blade so the finish side stays chip-free when cutting face up.
The Bosch JS470E and DeWalt DCS334 cordless jigsaws both track well and take standard T-shank blades.
Manual Laminate Cutter: Quiet and Dust-Free
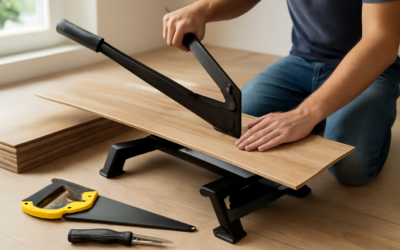
Do not overlook the hand-lever laminate cutter, which works like a giant paper guillotine. Press the handle and it shears the plank clean across with zero dust and zero noise. For crosscuts it is fast, quiet enough for apartment work, and never throws a chip.
- Best for: Clean, dust-free crosscuts; indoor work; noise-sensitive jobs.
- Weakness: Crosscuts only, struggles with the thickest 12mm boards, cannot notch or rip.
- Cost: $80 to $200.
The Roberts 10-64 and Bullet Tools EZ Shear are the two I see most on jobsites. Pair one with a jigsaw and a table saw and you have a nearly dust-free cutting kit.
Blades Matter More Than the Saw
Whatever powered saw for cutting laminate flooring you land on, the blade decides your edge quality. Laminate’s aluminum-oxide wear layer is abrasive and brittle, so a coarse framing blade burns and chips within a few boards. Reach for a fine-tooth carbide blade, 40-plus teeth on a 7-1/4-inch circular blade or 60 to 80 on a 10-inch miter or table saw, ideally one labeled for laminate, melamine, or plywood. Replace it the moment cuts turn fuzzy. A worn blade is the number one cause of chipped edges, not the saw itself.
My Recommended Setup by Budget
- Tight budget (under $150): One quality circular saw with a fine blade and a clamped straightedge, plus a cheap jigsaw for notches.
- Mid-range (the sweet spot): A sliding miter saw for crosscuts and a jigsaw for notches. Rent or borrow a table saw for the handful of rip cuts.
- Full kit: Miter saw, table saw, and jigsaw, or a track saw in place of the table saw for cleaner rips and dust control.
For most homeowners doing a room or two, the mid-range setup hits the best balance of speed, cut quality, and cost. The miter saw earns its keep on every row, the jigsaw handles the obstacles, and a borrowed table saw covers the final rip.
Corded vs. Cordless
Battery tools have come a long way, and for laminate work they are genuinely viable. A cordless circular saw or jigsaw lets you cut right on the floor next to where the plank goes, with no cord to drag across finished rows. The trade-off is runtime and, on heavier cuts, a little less sustained power. For a full-house install I still like a corded miter saw or table saw at a stationary cutting station, since they never slow down and never need a battery swap mid-cut. For notches and one-off trims, cordless wins on convenience every time.
A practical middle ground many installers use: a corded miter saw as the fixed crosscut station and a cordless jigsaw plus cordless circular saw for the mobile cuts around the room. That mix keeps the high-volume work fast and the fiddly work flexible.
Dust Control and Safety
Cutting laminate produces fine, abrasive dust that irritates lungs and clouds the air fast, so treat dust control as part of the tool choice, not an afterthought.
- Cut outdoors or near an open door whenever weather allows, and set up a fan to push dust away from you.
- Hook a shop vac to any saw with a dust port. Track saws and many miter saws collect dust well; bare circular saws do not.
- Wear a respirator and safety glasses every time. The gritty dust is rough on eyes and airways.
- Use push sticks on the table saw and keep the blade guard in place. Never freehand a rip.
The quietest, cleanest option remains the manual laminate cutter, which shears boards with no dust and no noise at all. On apartment jobs or late-evening work, that alone can justify keeping one in the kit.
The Bottom Line
There is no single best saw for cutting laminate flooring, only the best tool for each cut. A miter saw or manual cutter owns the crosscuts, a table saw or track saw owns the rips, and a jigsaw handles everything curved or notched. Fit each with a fine-tooth blade, keep those blades sharp, and orient every plank so tearout lands on the hidden face. Combine two or three of these tools and your laminate floor will look like a pro laid it, right down to the last edge tucked under the trim.
Prefer to explore on your own?
See how new flooring looks in your actual room in seconds — free, no signup.
Try the free Floor Studio →