Chipped edges, blown-out laminate faces, and gaps under door casings almost always trace back to one decision: the wrong cut. Picking the right flooring cutting tool for the material and the cut type does more for a clean, professional result than any amount of careful measuring. There is no single best tool, only the best tool for a given job, and most installs need two or three. This guide breaks down the main options, what each cuts well, where it struggles, and how to build a sensible kit without overspending.
- Manual Laminate and Vinyl Cutters
- Jigsaw: The Versatility Champion
- Track Saw and Circular Saw: Long, Clean Rips
- Miter Saw: Speed for Repetitive Crosscuts
- Oscillating Multi-Tool: Undercutting and Tight Spots
- Tile Wet Saw and Snap Cutters
- Buy or Rent: Making the Cost Call
- Building the Right Kit for Your Job
Manual Laminate and Vinyl Cutters
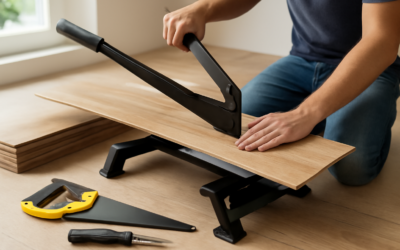
A guillotine-style laminate cutter is the quiet hero of plank floors. It works like a heavy paper trimmer: you slide a plank under the blade and press the handle to shear it. No dust, no noise, no cord. For straight crosscuts on laminate, luxury vinyl plank, and engineered boards up to roughly 8 mm thick, it is faster than any saw and produces zero airborne particles, which makes it ideal for indoor work.
The limits are real, though. Manual cutters handle straight crosscuts only, not rip cuts down the length of a board, and they can struggle with very dense SPC vinyl or thick hardwood. Expect to pay $40 to $120 for a homeowner-grade unit. If your job is mostly straight cuts in a single room, this one tool covers the bulk of the work.


Jigsaw: The Versatility Champion
When you need to cut a curve, notch around a pipe, or trim a doorway profile, the jigsaw earns its keep. Fit it with a fine-tooth, reverse-cut (down-cutting) blade to keep the finished face from chipping, since standard blades cut on the upstroke and tear the top layer. A jigsaw handles laminate, vinyl, plywood, and engineered wood, and it is the go-to for any irregular shape.
- Best for: curves, notches, pipe cutouts, register openings.
- Blade tip: use a down-cut or fine-tooth blade and let the tool do the work; forcing it causes chipping.
- Cost: $40 to $150 corded; quality cordless models run higher.
Track Saw and Circular Saw: Long, Clean Rips
For ripping planks lengthwise, scribing a row to a wall, or cutting sheet goods, a track saw delivers the cleanest result. The saw rides on a guide rail clamped to the board, giving a dead-straight, splinter-free edge that a freehand circular saw cannot match. A standard circular saw does the same cuts more cheaply but demands a clamped straightedge and a steady hand.
Either way, run the finished side down so any tear-out lands on the hidden face, and use a blade with a high tooth count (40 to 60 teeth on a 7-1/4 inch blade) for laminate and vinyl. Track saws start around $200 and climb fast; a solid circular saw can be had for under $80.
Miter Saw: Speed for Repetitive Crosscuts
If you are cutting hundreds of boards to length, a sliding compound miter saw turns a tedious task into a rhythm. It excels at square crosscuts and precise angles for transitions, stair nosing, and trim. Pair it with a fine-finish blade to minimize chipping on the show face. The downside is dust and noise, so most installers set it up outside or in a garage with the floor material staged nearby.
- Best for: high-volume straight and angled crosscuts, quarter round, baseboard.
- Watch out for: dust; cut outdoors or use a vacuum-attached hood.
- Cost: $120 for a basic 10-inch saw to $400-plus for a sliding model.
Oscillating Multi-Tool: Undercutting and Tight Spots
The oscillating multi-tool solves a problem no saw can: cutting the bottom of a door jamb or casing so flooring slides underneath for a finished look. Lay a scrap of flooring on the subfloor as a height guide, rest the flush-cut blade on top, and trim the jamb in place. It also rescues you in corners and tight notches where a jigsaw will not fit. It is slow for production cutting, but indispensable for the finish details that make an install look pro. Budget $50 to $200.
Tile Wet Saw and Snap Cutters
Hard surfaces need their own tools. For ceramic, porcelain, and natural stone, a wet saw with a diamond blade gives clean, chip-free cuts and keeps dust down by running water over the cut. A manual snap cutter (score-and-snap) is faster and cheaper for straight cuts on softer ceramic, while the wet saw handles dense porcelain, notches, and L-cuts. Entry wet saws start near $90; renting one for a single bathroom often makes more sense than buying.
Buy or Rent: Making the Cost Call
Not every tool earns a place in your garage. For a one-time install, renting often beats buying, especially for expensive specialty tools you will rarely touch again. A tile wet saw is the classic rental: a single bathroom does not justify a $90-to-$300 purchase when a day rental runs a fraction of that. Track saws and high-end miter saws are also strong rental candidates for a single project. On the other hand, a manual laminate cutter, a jigsaw, and an oscillating multi-tool are inexpensive enough and useful enough around the house that buying makes sense even for one job. Weigh the rental cost against the purchase price and how often you will realistically reach for the tool again before deciding.
Building the Right Kit for Your Job
You rarely need everything. Match the tools to the floor and the room.
- Laminate or LVP, one or two rooms: a manual cutter plus a jigsaw covers nearly all cuts.
- Whole-house plank install: add a miter saw for speed and an oscillating tool for jambs.
- Engineered or solid hardwood with long rips: a track saw or circular saw with a straightedge.
- Tile floors: a wet saw, plus a snap cutter for quick straight cuts.
A few habits protect your edges no matter which flooring cutting tool you reach for. Always test your blade and cut direction on a scrap first. Keep blades sharp, since dull teeth cause more chipping than any other factor. Mark cut lines with painter’s tape over the cut path to reduce splintering on glossy finishes. And cut a hair long, then dry-fit, rather than trimming short and ruining a board.
The cheapest mistake is buying one expensive saw and forcing it to do everything. The smart move is a small, deliberate kit: a manual cutter or miter saw for the straights, a jigsaw for the curves, and an oscillating tool for the jambs. With that trio plus a wet saw rental when tile enters the picture, you can install almost any floor cleanly without renting a contractor’s entire trailer.
Prefer to explore on your own?
See how new flooring looks in your actual room in seconds — free, no signup.
Try the free Floor Studio →