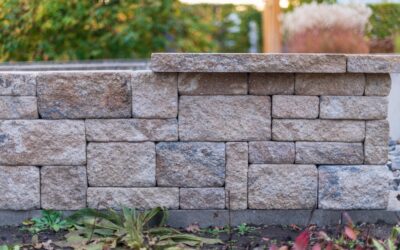
A well-built segmental retaining wall can hold back tons of soil for decades without a drop of mortar, which is exactly why these interlocking concrete-block systems dominate residential landscaping today. Unlike a poured concrete or mortared stone wall, a segmental system relies on the weight and geometry of the blocks, plus proper drainage and sometimes buried reinforcement, to resist the relentless push of the earth behind it. Build one correctly and it looks great and stays put; skip the base or the drainage and it bulges, leans, and eventually fails. Here is how these walls work and what it takes to get one right.
- What Makes a Wall "Segmental"
- The Base Is Everything
- Drainage: The Silent Killer
- Batter, Setback, and Wall Geometry
- When You Need Geogrid and an Engineer
- Building the Wall: The Basic Sequence
- What It Costs
- Common Mistakes That Cause Failure
- Capping and Finishing the Top
- Curves, Corners, and Terracing
- Final Thoughts
What Makes a Wall “Segmental”
Segmental retaining wall (SRW) systems are built from precast concrete blocks designed to lock together, usually with a lip, pin, or ridge on the back that automatically sets the correct backward lean, called batter, as you stack them. There is no mortar and no footing poured below the frost line. Instead, the wall is a gravity or reinforced structure: the mass of the blocks and, on taller walls, layers of soil reinforcement called geogrid, do the holding.
Popular block systems from brands like Allan Block, Versa-Lok, and Belgard all share this logic. Because they go up dry-stacked, a competent homeowner can build a modest wall without special masonry skills, which is a big part of their appeal.
The Base Is Everything
Ninety percent of failed retaining walls fail because of a bad base. The wall is only as good as the trench it sits in, so this is where your time and effort belong.
A proper base means excavating a level trench, then filling it with 4 to 6 inches of compacted crushed stone, often called road base or 3/4-inch minus gravel. This layer must be dead level side to side and compacted firmly with a plate compactor, not just tamped by foot. The first course of block gets set into this base, and every block in that first row must be level in both directions, because every course above it inherits any error in the first.
Spend extra time on that first row. Setting it perfectly level takes patience, and it is the single best predictor of whether the finished wall will look straight and stand for 30 years.
Drainage: The Silent Killer
Water is the enemy of every retaining wall. When soil behind a wall gets saturated, it swells and pushes with enormous force, called hydrostatic pressure, that no dry-stacked block can resist. A segmental wall handles this by draining that water away before it builds up.
A correctly drained wall includes:
- Free-draining backfill: A zone of clean crushed stone directly behind the blocks, usually 12 inches deep, that lets water fall straight down instead of pressing on the wall.
- A drain pipe: A perforated 4-inch pipe at the base of the gravel, sloped to daylight or a drain, that carries collected water away.
- Separation fabric: Landscape fabric between the gravel and the native soil so silt does not migrate in and clog the drainage over time.
Leave any of these out and the wall may look fine for a year or two, then bulge after a wet spring. Drainage is not optional; it is the whole reason a mortarless wall survives.
Batter, Setback, and Wall Geometry
A retaining wall does not go straight up. It leans slightly back into the hill, and this backward tilt, the batter, is what gives it strength against the soil pushing out. Most block systems build in the batter automatically through their lip or pin design, typically setting each course back about 1/8 inch per course, or roughly a 6 to 12 degree lean.
That lean matters more than it looks. A wall built plumb, straight up and down, is fighting the soil at a disadvantage, while a properly battered wall uses geometry in its favor. Follow the block manufacturer’s setback and never try to build a segmental wall vertical to save space.
When You Need Geogrid and an Engineer
Here is the line that separates a DIY project from a professional one. Short walls stand on their own weight, but taller walls need buried reinforcement, and at some height they need an engineer and a permit.
- Under 3 to 4 feet: Generally a gravity wall a homeowner can build, holding on block weight and good drainage alone.
- 4 feet and taller: Most jurisdictions require a building permit and an engineered design, and the wall almost always needs geogrid.
- Geogrid is a synthetic mesh laid in horizontal layers between courses and extending back into the retained soil, tying the soil mass and the wall together into one reinforced block far stronger than the wall alone.
Check your local code before you dig. Many areas set the permit threshold at 3 or 4 feet measured from the bottom of the buried base, and building over that height without engineering is both unsafe and a liability if it fails onto a neighbor’s property.
Building the Wall: The Basic Sequence
For a modest gravity wall within DIY range, the process follows a clear order.
- Lay out the wall and call 811 to have underground utilities marked before digging.
- Excavate the trench, then add and compact the crushed-stone base.
- Set the first course of block dead level, checking every block front to back and side to side.
- Backfill behind the first course with drainage gravel and set the perforated pipe.
- Stack the following courses, staggering the joints like brickwork and letting the block system set the batter.
- Fill the hollow cores and the drainage zone with clean stone as you go, and add geogrid layers if the design calls for them.
- Cap the top course with capstones, usually secured with construction adhesive.
Stagger the vertical joints so no seam runs straight up two courses; a running-bond pattern locks the wall together and prevents cracks from traveling upward.
What It Costs
Segmental walls run $20 to $50 per square face foot for a professional install, and $10 to $25 per square foot in materials if you do it yourself. A 3-foot-tall, 30-foot-long wall covers about 90 face feet, putting a DIY material bill around $900 to $2,000 and a professional job at $1,800 to $4,500. Taller engineered walls with geogrid and permits climb well beyond that. The block itself is only part of the cost; the base stone, drainage gravel, pipe, and fabric add up, so do not underestimate the aggregate.
Common Mistakes That Cause Failure
Nearly every failed segmental wall traces to the same short list of errors. Skimping on base compaction lets the wall settle unevenly. Omitting the drainage gravel and pipe traps water that eventually shoves the wall out of line. Building too tall without geogrid overloads a gravity design. And setting the first course out of level guarantees a wall that leans or waves no matter how carefully the rest is stacked.
Avoid all four and you have a wall that will outlast the landscaping around it. None of them are hard to get right; they just require doing the unglamorous prep work instead of rushing to stack pretty blocks.
Capping and Finishing the Top
The top course of a segmental wall gets capstones, and this final step does more than look tidy. Caps shed water off the top of the wall, protect the cores from filling with debris, and give the wall a finished edge. Most systems use flat capstones set with a bead of flexible construction adhesive rather than mortar, so they stay put but can be reset if the wall ever shifts slightly. Overhang the caps a small amount past the face for a shadow line that reads as intentional design.
Behind the top course, finish the drainage zone properly and cap it with a few inches of topsoil so grass or plantings can grow, while keeping the crushed-stone drainage layer below intact. This transition, gravel below for drainage and soil above for planting, keeps water moving through the wall while letting you landscape right up to the edge.
Curves, Corners, and Terracing
Segmental blocks shine on curves and corners, which is part of why they beat poured walls for landscaping. Most block systems are designed to build gentle curves simply by adjusting the gaps at the back of each block, and many offer dedicated corner units for clean 90-degree turns. For tall slopes, terracing, building two or more shorter walls stepped up the hill rather than one tall wall, is often smarter and may keep each wall under the height that triggers engineering. Just space terraced walls far enough apart that the upper wall’s load does not bear on the lower one, generally a horizontal distance at least twice the lower wall’s height.
Final Thoughts
A segmental retaining wall is one of the best value structures in landscaping, holding back a hillside with nothing but stacked block, good gravel, and smart drainage. Respect the base, never skip the drainage, follow the manufacturer’s batter, and call an engineer once you pass 3 to 4 feet. Do the boring prep well and the wall practically builds itself, standing straight and solid long after the mulch and plantings around it have been replaced twice over.