Most self-leveling products on hardware store shelves are designed for interior subfloors, and using them on a patio can lead to cracking, powdering, and peeling within one winter. Choosing a self leveling concrete outdoor product means picking a mix engineered for UV, water, and freeze-thaw exposure, then preparing the surface carefully. When done right, an exterior self-leveler can smooth an uneven patio, restore a pitted porch, or create a flat base for pavers or tile. This guide explains where these products work, what they cost, and how to pour them successfully.
Part of our Windows & Doors guide — explore the full guide →
- What Self Leveling Concrete Outdoor Products Are
- Where Outdoor Self-Leveler Works Well
- Choosing the Right Product
- Cost to Level an Outdoor Slab
- Surface Preparation Steps
- How to Pour Outdoor Self-Leveling Concrete
- Estimating How Much Material You Need
- Sealing and Finishing
- Common Mistakes to Avoid
- Alternatives to Consider
- Frequently Asked Questions
What Self Leveling Concrete Outdoor Products Are
Self-leveling compounds are flowable cement-based mixes, usually containing Portland cement or calcium aluminate cement, fine aggregates, and polymers. Once mixed with water, they spread and flatten under their own weight. Interior versions are often gypsum-based or formulated only for dry conditions and must be covered by a floor finish.
Exterior-rated self-levelers differ in a few key ways. They contain more polymer modifiers for bonding and flexibility, better freeze-thaw resistance, and the durability to serve as a wear surface. Many are labeled as resurfacers or overlays rather than levelers. Always read the label for words such as exterior use, wear surface, and freeze-thaw resistant.
Where Outdoor Self-Leveler Works Well
- Resurfacing patios: Restoring old slabs with minor pitting or spalling.
- Leveling low spots: Filling shallow depressions where water pools.
- Preparing for tile or pavers: Creating a flat substrate for exterior-rated porcelain or thin pavers.
- Porches and covered areas: Refreshing surfaces protected from direct weather.
- Garage aprons and walkways: Smoothing uneven concrete where traffic is moderate.
It is not a replacement for structural repair. Slabs with active settlement, cracks wider than 1/4 inch that move seasonally, or heaving from frost or tree roots need structural fixes first, often mudjacking, polyurethane foam lifting, or partial replacement.
Choosing the Right Product
Product specs vary widely, so compare these factors before buying:
- Thickness range: Many exterior mixes apply from 1/8 inch up to 1 or 1-1/2 inches in a single pour; some allow deeper fills with pea gravel added.
- Compressive strength: Look for 4,000 to 6,000 psi at 28 days for wear surfaces.
- Working time: Typically 10 to 20 minutes, which affects how large an area you can pour alone.
- Walk-on time: Usually 2 to 6 hours; vehicle traffic often requires 3 to 7 days.
- Coverage: A 50-pound bag commonly covers 40 to 50 square feet at 1/8 inch, or roughly 10 to 12 square feet at 1/2 inch.
Expect to pay $30 to $70 per 50-pound bag for exterior-rated products, compared with $25 to $45 for interior levelers. Primer adds $30 to $80 per gallon, which covers roughly 200 to 300 square feet.
Cost to Level an Outdoor Slab
For a DIY patio resurfacing project, material costs typically run $1.50 to $4 per square foot at 1/4 inch thickness, including primer. A 200-square-foot patio might cost $350 to $800 in materials. Professional installation usually ranges from $4 to $10 per square foot depending on thickness, prep, and access. Heavy prep such as grinding, crack repair, or shot blasting can add $1 to $3 per square foot.
Surface Preparation Steps
Preparation decides whether an overlay lasts 15 years or peels in one season. Most product failures come from poor bonding, not bad material.
- Clean thoroughly: Remove dirt, moss, oil, paint, and sealers. Pressure wash at 3,000 psi or more, and degrease oil stains with a concrete cleaner.
- Profile the surface: Most manufacturers require a concrete surface profile, commonly CSP 2 to 3, similar to medium sandpaper. Achieve this with grinding, shot blasting, or acid etching when allowed.
- Repair cracks and spalls: Fill cracks with a concrete repair mortar. Remove loose material until you reach sound concrete.
- Set perimeter forms: Use foam weatherstripping or wood forms along edges to contain the flow.
- Honor joints: Mark control joints so they can be recut after the pour.
- Prime: Apply the manufacturer’s primer per instructions. Primer improves adhesion and prevents pinholes caused by the slab absorbing water from the mix.
How to Pour Outdoor Self-Leveling Concrete
Plan the pour before you open a bag. Have all materials staged, water measured, and helpers assigned, because once mixing begins there is no time to pause.
- Check weather: Pour when air and surface temperatures are between 50 and 85°F, with no rain forecast for 24 hours. Avoid direct midday sun on hot days.
- Dampen if required: Some products call for a saturated surface dry condition, meaning the slab is damp but without standing water.
- Mix precisely: Use a 1/2-inch drill with a paddle mixer at around 550 rpm. Measure water exactly; adding extra weakens the surface and causes dusting.
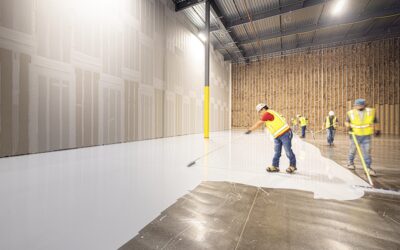
- Pour in ribbons: Start at the far corner and work backward, pouring successive batches so each blends into the last while wet.
- Spread and smooth: Use a gauge rake set to the target depth, then a smoother to push the material into edges. Spiked shoes let you walk through fresh material.
- Maintain slope: Outdoor surfaces should drain. Plan for about 1/8 to 1/4 inch per foot of slope away from your house. Self-leveler follows the slab’s existing slope when applied thin, but thicker pours may need a sloped mix or trowel-grade material.
- Cure properly: Protect from rain, direct sun, and wind for 24 hours. Some products benefit from curing compounds or light misting.
Estimating How Much Material You Need
Running short mid-pour is one of the most common reasons outdoor leveling jobs end with a visible seam, so calculate carefully and buy extra. Start by measuring the area in square feet, then determine the average depth you need to fill. Lay a long straightedge or a taut string across the slab in several directions and measure gaps at regular intervals. Averaging those numbers gives a realistic depth.
Use this quick formula: square feet multiplied by depth in inches, divided by 12, gives cubic feet. Most 50-pound bags of exterior self-leveler yield about 0.45 to 0.5 cubic feet. For example, a 150-square-foot porch at an average of 3/8 inch requires roughly 4.7 cubic feet, or about 10 bags. Add 10 to 15 percent for waste and slab irregularities, bringing the order to 11 or 12 bags.
Plan labor too. One person mixing and one spreading can typically handle 3 to 5 bags every 10 minutes. Larger pours require a third helper or a pump, which contractors can supply for areas over 400 square feet.
Sealing and Finishing
Once cured, usually 24 to 72 hours depending on product, apply a penetrating silane-siloxane sealer or an exterior acrylic sealer to resist water and staining. Sealers cost $0.15 to $0.50 per square foot and should be reapplied every two to five years. For better traction, a light broom texture while the surface is still green or an anti-slip additive in the sealer improves grip when wet.
If tile or pavers will go on top, wait the full time listed by the manufacturer before installing, often 16 to 24 hours for thin-set applications and longer for moisture-sensitive finishes.
Common Mistakes to Avoid
- Using an interior product: Gypsum-based or interior-only levelers deteriorate quickly outdoors.
- Adding extra water: This creates a weak, dusty surface that scales in winter.
- Skipping primer: Without it, the slab pulls water from the mix and bonding fails.
- Ignoring joints: Covering control joints leads to random cracks when the slab moves.
- Pouring in heat: Hot slabs cause flash setting and poor leveling.
- Leveling flat: A dead-level patio holds water; keep drainage slope in mind.
- Using de-icing salts: Rock salt in the first winter can damage new cementitious surfaces.
Alternatives to Consider
If your slab is badly damaged, a traditional concrete overlay or new pour may make more sense. Concrete resurfacer applied with a squeegee is often better for thin 1/16 to 1/4 inch refreshes on sloped patios. Polyurethane foam lifting can raise sunken slabs without new material. Pavers or composite deck tiles over a sound slab provide an easy, drainable surface.
For the right conditions, self leveling concrete outdoor projects can transform a tired slab into a smooth, durable surface for a fraction of replacement cost. Choose an exterior-rated product, prepare the concrete thoroughly, and respect curing time for long-lasting results.
Frequently Asked Questions
Can self-leveling concrete be used outside?
Yes, but only products labeled for exterior use. Interior levelers lack the polymer content and freeze-thaw resistance needed outdoors and will fail quickly.
How thick can outdoor self-leveling concrete be poured?
Most exterior mixes go from about 1/8 inch up to 1 or 1-1/2 inches in one pour. Some allow thicker applications with added aggregate. Check the product data sheet.
Does outdoor self-leveler need to be sealed?
Sealing is highly recommended. A penetrating or acrylic sealer protects against water, stains, and freeze-thaw damage and extends the life of the surface.
How long before I can walk or drive on it?
Foot traffic is usually allowed after 2 to 6 hours. Vehicles typically need 3 to 7 days, depending on the product and temperature.