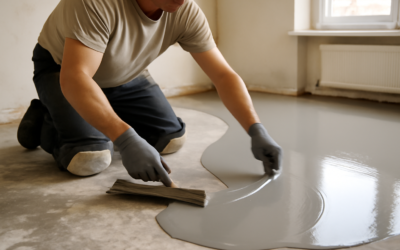
Lay expensive tile or luxury vinyl over a wavy subfloor and every dip telegraphs through as lippage, hollow spots, and eventually cracked grout. Self leveling floor compound is the pourable cement-based product that fixes this by flowing across a floor and settling into a dead-flat plane on its own. It’s the unglamorous prep step that determines whether your finished floor looks professional or amateur, and while it seems intimidating, the process is well within a determined DIYer’s reach if you respect the timing.
What Self Leveling Compound Is
Also called self-leveling underlayment or SLU, it’s a polymer-modified cement that mixes to a thin, pancake-batter consistency and flows out to seek its own level. Unlike a stiff patching mortar you trowel by hand, self-leveler spreads itself, filling low spots and evening out a subfloor. It’s used over concrete slabs and, with the right product, over plywood subfloors to create a flat base for tile, LVP, engineered wood, or sheet goods.
Common brands include Henry 555 LevelPro, Mapei Novoplan, LevelQuik RS from Custom Building Products, and Ardex. Most cure fast, some walkable in a few hours, which is a blessing and a trap, because you have very little working time once mixed.
When You Need It
- Subfloor variation greater than about 3/16 inch over 10 feet, the common flatness spec for tile and LVP.
- Old floors with dips, humps, or trowel ridges from removed adhesive.
- Transitioning between rooms at slightly different heights.
- Concrete slabs with minor pitting or an uneven finish.
- Preparing for large-format tile, which is especially unforgiving of an uneven base.
Check flatness first by sliding a long straightedge or level across the floor and marking the gaps. If your floor is already flat, you don’t need self-leveler, and skipping unnecessary product saves real money.
Prep and Priming
Preparation is where self-leveling jobs succeed or fail. The compound bonds to a clean, primed surface; skip the primer and it can delaminate or flash-dry unevenly, leaving pinholes and weak spots.
- Clean the subfloor thoroughly, removing all dust, grease, paint, and loose material. Grind off adhesive ridges.
- Repair large cracks and fill holes so the leveler doesn’t drain through.
- Dam off doorways and any openings with foam backer rod, wood strips, or expanding foam so the liquid can’t escape.
- On wood subfloors, fasten down any squeaks and consider a lath or mesh reinforcement per the product’s instructions.
- Apply the manufacturer’s primer with a brush and roller, working it into the surface. Let it get tacky per the label, usually 30 minutes to a few hours. Prime again if the surface is very porous.
Prime Concrete Twice If Porous
Dry, thirsty concrete pulls water out of the compound too fast, causing it to set before it flows. A second primer coat seals the surface so the leveler stays liquid long enough to self-level. Don’t skip this on old slabs.
Mixing and Pouring
This is the high-pressure part. Once mixed, you have roughly 10 to 20 minutes before the compound starts to stiffen, so have everything ready and, for larger rooms, a helper.
- Add the powder to the correct amount of clean water, not the other way around, and mix with a paddle on a drill for the full time on the bag, usually 2 to 3 minutes, until smooth with no lumps.
- Don’t overwater to make it easier; too much water weakens the cure and causes cracking.
- Pour it out in ribbons across the low areas, working from the far corner toward the exit.
- Help it spread with a gauge rake or smoother set to your target depth, then let it flow out.
- Roll a spiked porcupine roller across the surface to release trapped air bubbles.
- Move fast between batches so pours blend together before either sets.
Curing and Timing
Most self-levelers are walkable in 2 to 4 hours and ready for tile or flooring in 16 to 24 hours, though full cure for some finishes takes longer, so check the label. Keep the room at a moderate temperature, ideally 65°F to 75°F, and out of direct heat or draft that could dry it unevenly. Don’t rush installing your finish floor before the compound has cured enough for the specific product you’re laying.
Cost
A 50-pound bag of self-leveling compound runs $30 to $50 and covers roughly 40 to 50 square feet at 1/8 inch thick. Primer adds $25 to $50 per project. Figure the depth carefully; deeper pours to correct big dips eat bags fast. For a typical room needing a thin skim, materials often land under $150. Hiring a pro to level a floor runs $2 to $6 per square foot, so DIY saves meaningfully if you’re comfortable with the fast working time.
Bottom Line
Self leveling floor compound is the key to a flat, professional base under tile, LVP, and other finish floors. Success comes down to three things: thorough cleaning, proper priming (twice on porous concrete), and moving fast once it’s mixed. Measure your flatness first so you only use what you need, dam the edges, release air with a spiked roller, and let it cure fully before you install. Get the base flat and the finished floor will look like a pro laid it.
Choosing the Right Product for Your Depth
Not every self-leveler pours the same, and matching the product to your job saves both money and headaches. Feather-finish and skim-coat products are built for shallow work, roughly 1/8 inch and thinner, and they’re what you want for evening out trowel ridges or a slightly wavy slab. For deeper corrections, an inch or more in a single lift, you need a compound rated for that thickness, and some allow aggregate to be added for pours over 2 inches so you’re not burning through straight compound.
Depth also drives cost fast, since coverage is inversely proportional to thickness. A 50-pound bag covering 40 to 50 square feet at 1/8 inch will only stretch to about 12 to 15 square feet at 1/2 inch. Here’s how common products break down:
- Henry 555 LevelPro: around $35 to $45 per 40-pound bag, walkable in a few hours, good for wood or concrete with the right primer.
- Custom Building Products LevelQuik RS: roughly $40 to $50 per 50-pound bag, a fast-setting shop favorite pours up to 1-1/2 inches.
- Mapei Novoplan 2 Plus: about $45 to $55 per 50-pound bag, high-strength, popular under large-format tile.
- Ardex K 15 or Liquid Level: premium pricing, $50 to $70 a bag, known for a smooth, forgiving flow.
Tools You’ll Need
Having the right gear staged before you open a bag isn’t optional with a product that stiffens in 15 minutes. Scrambling for a tool mid-pour is how a floor ends up with a cold joint or a lump. Line all of this up first:
- A 1/2-inch heavy-duty drill, corded, with a mixing paddle rated for the bag weight; a cheap drill will burn out mid-batch.
- Two clean 5-gallon buckets so one is mixing while the other empties, keeping the pour continuous.
- A gauge rake or smoother to spread the compound to your target depth.
- A spiked porcupine roller to pop air bubbles.
- Spiked shoes (cleats) so you can walk through wet compound to reach far corners without leaving footprints.
- Foam backer rod or wood strips to dam doorways and transitions.
Common Mistakes That Ruin a Pour
Overwatering tops the list. Adding extra water to buy working time feels smart in the moment, but it weakens the cured compound, causes surface cracking, and can leave a chalky, dusty top layer that won’t bond to your flooring adhesive. Measure the water to the bag’s spec and don’t cheat.
Skipping or under-priming is the next big one. Bare, thirsty concrete drinks the water right out of the mix, so it seizes before it flows and leaves you with a rough, pinholed surface instead of glass. Working too slowly or mixing batches that don’t blend before setting creates visible cold joints and ridges. And pouring in a room that’s too cold, under about 50°F, drags out the set time unpredictably or stops the cure altogether. Keep the space between 65°F and 75°F, mix fast, prime well, and respect the water ratio, and most first-timers get a floor flat enough to lay tile on the next day.
Frequently Asked Questions
Can I put self-leveler over plywood? Yes, with the right product and prep. Use a compound rated for wood subfloors, fasten down any movement, prime with the manufacturer’s wood primer, and many jobs call for lath or mesh reinforcement so the rigid compound doesn’t crack over a flexing floor.
Does it need to be sealed? Not if you’re covering it with tile, LVP, or flooring adhesive. If a cured self-leveler is your finished floor, that’s a different product and it does want a sealer.
How thick can I pour in one lift? It depends on the product, from about 1/8 inch up to 1 or 1-1/2 inches, and more with aggregate. Never exceed the bag’s max thickness in a single pour or it may crack.
Prefer to explore on your own?
See how new flooring looks in your actual room in seconds — free, no signup.
Try the free Floor Studio →