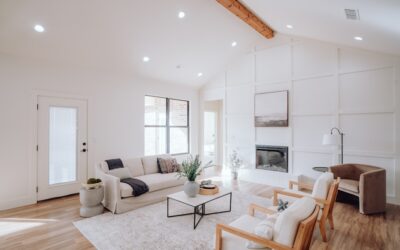
Few weekend projects transform a living room as fast as wrapping the wall around your fireplace in clean horizontal planks. A shiplap fireplace surround turns a plain drywall box into the architectural centerpiece of the room, and it does it for a fraction of the cost of stone or tile. I have built more than a few of these, and the look is forgiving, the materials are cheap, and a motivated DIYer can finish a wall in a weekend. The one thing you cannot skip is the safety planning around clearances, which I will walk through in detail.
Why Shiplap Works So Well Around a Fireplace
Shiplap is paneling made of overlapping rabbeted boards that leave a consistent reveal, that small shadow line, between each plank. Around a fireplace, those horizontal lines draw the eye and make the wall feel intentional and custom. The texture also hides minor wall imperfections, which is handy on older homes where the chimney chase is rarely perfectly flat.
Cost is the other big draw. Where a stone surround can run $2,000 to $5,000 installed, a shiplap surround often costs $300 to $800 in materials for a typical wall. Paint it crisp white for a coastal farmhouse feel, or stain it for warmth, and you have a high-impact focal wall on a tight budget.
Fire Safety and Clearances First
This is the part nobody should rush. Wood paneling is combustible, so it cannot butt right up to the firebox opening. The exact required clearance depends on your fireplace type and the manufacturer’s specifications, so always check the appliance manual and your local building code before you start.
As general guidance, manufacturers commonly require combustible trim and mantels to be held back a minimum of 6 inches from the firebox opening, with greater clearance for any material that projects out from the wall. For a wood-burning fireplace, that buffer matters even more. A safe and common approach is to keep shiplap off the immediate firebox surround entirely and instead frame the opening with a non-combustible material like tile, brick, or stone, then run the shiplap on the surrounding wall outside that fire-rated zone.
- Maintain manufacturer-specified clearance from the firebox, often 6 inches or more.
- Use non-combustible material directly around the opening.
- Keep a mantel’s projection within the clearance limits stated in your manual.
- For gas inserts, confirm clearances in the unit’s installation instructions.
When in doubt, have a licensed contractor or your local building department confirm the spacing. A beautiful wall is not worth a house fire.
Choosing Your Shiplap Material
You have three main options. True nickel-gap shiplap boards have milled rabbets that self-space and give the most authentic reveal. Primed MDF or pine shiplap boards are affordable and paint beautifully. Plywood “faux shiplap,” where you rip a sheet of plywood into strips and space them with washers, is the cheapest route and looks great once painted.
For a fireplace wall I lean toward primed pine or poplar boards over MDF if there is any chance of heat or humidity, since real wood handles temperature swings better. Whatever you choose, let the boards acclimate in the room for 48 hours before installing so they do not shrink or cup after they are on the wall.
Tools and Materials You Will Need
Gather everything before you start so you are not running to the store mid-project:
- Shiplap boards (measure square footage and add 10 percent for waste)
- Miter saw and a brad nailer with 2-inch finish nails
- Stud finder, 4-foot level, and a pencil
- Construction adhesive for extra hold on uneven walls
- Spacers or washers if using plywood strips
- Caulk, wood filler, primer, and paint or stain
Step-by-Step Installation
Once your clearances are planned and your non-combustible border is in place, the shiplap goes up quickly:
- Find and mark every stud across the wall so you can nail into solid framing.
- Start at the bottom with a level reference line; do not trust the floor to be level.
- Dry-fit and cut your first board, accounting for the opening around the firebox.
- Run a bead of construction adhesive and nail each board into the studs, two nails per stud.
- Use the board’s rabbet, or washers for plywood, to set a consistent reveal as you stack upward.
- Stagger seams between rows like brickwork so joints do not line up.
- Notch and trim around the mantel and any outlets as you go.
Work from the bottom up and check level every few rows. Small errors compound, so it is worth pausing to confirm your lines stay true before you reach the ceiling.
Finishing and Adding a Mantel
After the last board is up, fill nail holes with wood filler, caulk the edges where the shiplap meets adjacent walls and the ceiling, and sand smooth. Prime any bare wood, then apply two coats of a durable paint. A satin or semi-gloss finish wipes clean easily, which matters near a fireplace where dust and soot collect.
A mantel finishes the look and gives you a shelf for decor. Mount it on a sturdy cleat lagged into the studs, and remember the clearance rules apply to the mantel too. Keep its projection and distance from the firebox within your fireplace manufacturer’s specs, and never hang a TV so close that heat bakes the electronics.
Common Mistakes to Avoid
A few errors show up again and again on DIY fireplace walls, and all of them are easy to dodge once you know to watch for them. The biggest is ignoring clearances and running combustible boards too close to the firebox, which is both a code violation and a genuine fire hazard. The second most common is skipping board acclimation, which leads to gaps opening up between planks weeks after install as the wood adjusts to the room.
- Trusting the floor or ceiling to be level instead of working off a marked reference line.
- Nailing into drywall only, with no studs behind, so boards work loose over time.
- Forgetting to leave access to gas valves or electrical for the fireplace.
- Lining up seams in a straight vertical column, which looks unfinished; stagger them.
- Mounting a TV directly above without checking the appliance’s heat clearance for electronics.
Slow down on layout and safety, and the cosmetic stuff falls into place. Most regret on these projects traces back to rushing the planning, not the painting.
Final Thoughts
A shiplap fireplace surround is one of the highest-reward projects a homeowner can take on. For a few hundred dollars in lumber and a weekend of work, you get a custom focal wall that looks like it cost thousands. The only rule you cannot bend is fire safety, so confirm your clearances, keep combustible boards back from the firebox, and use a non-combustible border around the opening. Nail that down and the rest is just measuring, cutting, and enjoying a room that finally feels finished.