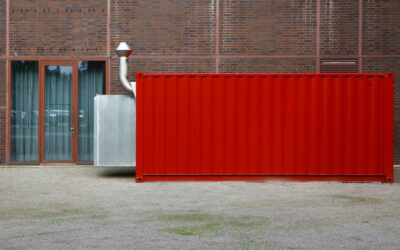
A steel box built to cross oceans sounds like the perfect low-maintenance getaway, and in many ways it is. A shipping container cabin made from a single 20 or 40 foot unit can become a weatherproof, lockable weekend retreat on a small budget. The catch is that containers were designed for cargo, not people, so most of the work goes into the foundation, condensation control, insulation and safe openings.
For a part-time cabin, plan on an engineered pier foundation, permits and zoning approval, plenty of ventilation and the right insulation to stop interior sweating, a simple deck and shade roof to keep the steel cooler, and a heating option such as a ductless mini split or a properly installed wood stove. Cutting doors and windows weakens the box, so any significant opening should be designed by an engineer. Wiring belongs to a licensed electrician.
- Is a Shipping Container Cabin Right for You?
- Choosing a Container
- Permits, Zoning and Site Planning
- Foundations: Piers Done Right
- Cutting Openings Safely
- Stopping Condensation
- Adding a Deck and Shade Roof
- Heat, Cooling and Power
- Securing the Cabin While Vacant
- Tools and Materials
- General Cost Ranges
- When to Call a Licensed Professional
- Frequently Asked Questions
Is a Shipping Container Cabin Right for You?
A 20 foot container gives roughly 160 square feet inside, enough for a bunk room or studio with a small kitchenette. A 40 foot unit gives about 320 square feet, with room for a separate sleeping area and compact bathroom. High-cube containers add about a foot of height, which leaves space for ceiling insulation without feeling cramped.
Good fits for a conex box cabin include hunting and fishing land, rural lots without full utilities, and owners who want a secure structure that can sit unused for weeks. Poor fits include lots with strict design rules, hot humid climates without a plan for cooling, and anyone expecting a turnkey build to cost far less than a small stick-built cabin. Once you add insulation, finishes, windows and systems, costs often land closer than people expect.
Choosing a Container
- One-trip containers have been used once and usually have clean floors and few dents. They cost more but save repair time.
- Used cargo-worthy or wind-and-watertight units are cheaper but may have rust, dents and floors treated with pesticides for overseas shipping.
- Inspect for rust holes in the roof, cracks in the corner castings, door seal condition and floor soundness.
- Ask about the floor treatment. Many builders cover original plywood floors with a sealed subfloor, or replace them, so occupants are not exposed to treatment chemicals.
Permits, Zoning and Site Planning
Many counties treat a storage container cabin used for sleeping as a dwelling, which brings building code, setback, septic and possibly minimum size rules. Some areas restrict containers outright; others allow them on agricultural or recreational land. Call your local planning and building departments before buying, and check deed restrictions or HOA rules. Ask what drawings they need, since many require stamped engineering for the foundation and any structural modifications.
For the site, choose high, well-drained ground with good access for a delivery truck and crane or tilt-bed trailer. Measure clearance for overhead lines and trees. Call 811 before digging footings.
Foundations: Piers Done Right
Containers are strongest at their four corner castings, and most loads should be carried there. Common foundations for a cargo container cabin include:
- Concrete piers at each corner (and sometimes midpoints on 40 foot units), extending below the frost line, with embedded steel plates for welding or bolting the corners.
- Helical piles, screwed in by machine, good for sloped or soft sites.
- Strip footings or a slab for heavier, more permanent installations.
The foundation should be designed by an engineer or follow local prescriptive rules. Anchoring matters: in high wind areas, an unanchored box can shift or overturn. Raising the container 12 to 24 inches off grade improves airflow underneath, reduces rust and makes plumbing access easier.
Cutting Openings Safely
The corrugated walls and roof help carry the container’s load. Every opening removes some of that strength. Small windows may be fine with a welded steel frame, but large openings, multiple openings on the same side, or removing an entire wall require an engineer to design reinforcement such as steel headers and posts.
Cutting and welding steel is a serious fire hazard. Remove or protect any wood floor, insulation or debris near the cut. Keep a charged fire extinguisher and a hose within reach, and assign a fire watch to stay on site and check for smoldering for at least 30 to 60 minutes after the last cut or weld. Wear a welding helmet or face shield, leather gloves, flame-resistant clothing and hearing protection. Never cut through painted or coated steel indoors without ventilation, because coatings can release toxic fumes. If you are not experienced with plasma cutters or welding, hire a certified fabricator.
Stopping Condensation
Condensation is the most common complaint in container cabins. Warm, moist indoor air hits cold steel and turns to water, which drips, rusts and grows mold. Control it on several fronts:
- Insulation that blocks air: closed-cell spray foam applied directly to the steel creates an air and vapor barrier. Rigid foam boards with taped seams are another option. Avoid fiberglass against bare steel without a careful vapor barrier.
- Ventilation: install vents or a small exhaust fan, especially in kitchen and bathroom areas, plus passive vents for while the cabin sits empty.
- Dehumidification: run a dehumidifier when occupied in humid seasons.
- Exterior shade: a separate shade roof reduces summer heat gain and temperature swings.
Adding a Deck and Shade Roof
A simple deck along one long side doubles usable living space and makes the cabin feel like a home instead of a box. Build it freestanding on its own footings so you do not have to fasten into thin container walls. A shed-style or gable shade roof mounted on posts a few inches above the container keeps sun off the steel, sheds rain and snow, and creates a covered porch. Frame it for local wind and snow loads, anchor posts to footings, and get a permit where required.
Heat, Cooling and Power
A ductless mini split is a popular choice: efficient heating and cooling with no combustion inside the cabin. Installation involves refrigerant work and a dedicated circuit, so hire a licensed HVAC tech and electrician.
A small wood stove brings cozy heat off the grid, but in a steel box it needs careful planning: a listed stove, proper floor protection, clearances to combustibles per the manual, a properly flashed chimney through the roof, CO alarms and smoke alarms, and annual chimney inspection. Have it installed by a qualified pro and inspected.
Power can come from a utility service, a solar setup or a generator. For a weekend cabin with light loads, a portable power station can run lights, phone chargers and small fans without fuel. Choose a unit with a recognized safety listing, keep it in a ventilated spot away from heat sources, and avoid charging it unattended overnight. Never run a fuel generator inside or near the cabin.
Any permanent wiring, panel, outlets or lighting circuits should be installed by a licensed electrician. Steel containers must be properly grounded and bonded. Before anyone works on existing circuits, turn off the breaker and confirm power is off with a non-contact voltage tester. Outdoor and kitchen outlets should be GFCI protected, and lighting and power supplies should be rated for the location and load.
Securing the Cabin While Vacant
- Use a lockbox or shrouded padlock over the original cargo doors.
- Add steel shutters or bars over windows.
- Install motion lights and a battery or cellular camera.
- Shut off water and drain lines before freezing weather.
- Leave vents open, crack interior doors and use moisture absorbers to limit mustiness.
- Unplug or switch off battery systems as their maker recommends.
Tools and Materials
- Container, foundation materials, anchors and connection plates
- Steel framing for openings, windows and doors
- Insulation, interior framing, wall and floor finishes
- Vents, fans and a dehumidifier
- Deck lumber, rated fasteners and roofing
- Fire extinguishers, smoke and CO alarms
General Cost Ranges
Used containers often cost a few thousand dollars, with one-trip units costing more. Delivery and crane placement can add significantly depending on distance. A basic finished shipping container cabin commonly ranges from tens of thousands of dollars for a DIY build to considerably more for a turnkey unit with plumbing, power, insulation and finished interiors.
When to Call a Licensed Professional
Bring in an engineer for foundations and any structural modifications, a licensed electrician for all permanent wiring, a licensed plumber for water and waste lines, and an HVAC tech for mini splits. Pull permits for the cabin, deck, roof, electrical and stove. Hiring certified welders for large openings protects both the structure and your safety.
Frequently Asked Questions
Do I need a permit for a shipping container cabin?
Usually yes, especially if people will sleep in it. Zoning rules vary widely, so check with your planning and building departments before buying.
What foundation does a container cabin need?
Most use concrete piers or helical piles at the corners, set below the frost line and designed by an engineer, with secure anchoring.
How do I stop condensation in a container?
Use closed-cell spray foam or sealed rigid foam insulation, add ventilation, run a dehumidifier when needed and shade the roof.
Can I cut windows into a shipping container?
Yes, but openings weaken the structure. Small openings need welded frames, and larger ones should be designed by an engineer.
Is a 20 or 40 foot container better for a cabin?
A 20 foot unit suits a simple bunk room. A 40 foot unit allows separate sleeping and bathroom areas and costs more to deliver.