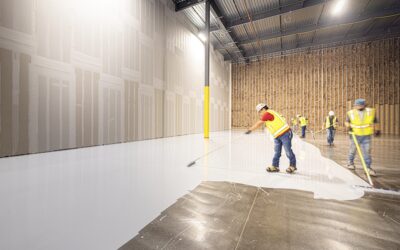
Pinholes, tiny craters, and a faint orange-peel texture are the calling cards of a self-leveling pour that skipped one inexpensive tool. A spiked roller for self leveling concrete releases trapped air and helps the material knit together into a flat, dense surface. It costs $20 to $60, yet many first-time DIYers either leave it out or use it at the wrong moment. This guide explains what the tool does, how to choose one, and exactly how to roll a pour so your new floor is ready for tile, vinyl, or wood.
- What a Spiked Roller for Self Leveling Concrete Actually Does
- Choosing the Right Spike Length and Width
- Other Gear You Need With the Roller
- Step-by-Step: Rolling a Self-Leveling Pour
- Timing Is the Whole Game
- Common Mistakes When Using a Spiked Roller for Self Leveling Concrete
- After the Pour: Curing and Getting Ready for Flooring
- Is the Roller Worth Buying for One Project?
What a Spiked Roller for Self Leveling Concrete Actually Does
Self-leveling underlayment (SLU) is a cement-based compound with a pourable, pancake-batter consistency. When you mix it with a paddle drill, air gets whipped in. More air bubbles up from the primer and the pores of the substrate once the material hits the floor. If that air stays trapped, it rises to the surface as the compound starts to set and leaves pinholes or small blisters.
A spiked roller, sometimes called a porcupine roller or aerator roller, is a plastic drum studded with rigid spikes on an extension pole. As you roll it through the wet compound, the spikes pierce air pockets and let them escape. The action also helps the compound flow into low spots and blends the seams between separate batches, so you get one continuous sheet instead of visible pour lines.
What the roller does not do is level the floor for you. Gravity and correct water ratio do most of that work. The roller refines the surface; it cannot fix a mix that was poured too thick in one area or too thin in another.
Choosing the Right Spike Length and Width
Spike length should roughly match or slightly exceed your pour depth. If the spikes are shorter than the layer, they only aerate the top and leave air lower down. If they are dramatically longer, they drag on the substrate and can scratch the primer.
| Pour Depth | Recommended Spike Length |
|---|---|
| 1/8 to 1/4 inch (skim, feather) | 1/2 inch (about 11 to 13 mm) |
| 1/4 to 1/2 inch (typical underlayment) | 3/4 to 1 inch (about 20 to 25 mm) |
| 1/2 to 1-1/4 inch (deep fills) | 1-1/4 inch (about 31 mm) |
Roller width is a trade-off. A 10-inch roller is easy to control in bathrooms, closets, and hallways. An 18- to 20-inch roller covers a basement or open-plan room much faster and is less likely to leave track marks because it takes fewer passes. Many contractors keep both.
Look for a roller with replaceable spike strips, a solid frame that does not flex, and an extension pole that telescopes to at least 5 feet so you can reach the middle of a room without stepping into the compound. Budget rollers in the $20 to $30 range are fine for a single project; pro-grade models at $50 to $90 last for dozens of pours.
Other Gear You Need With the Roller
The roller works as part of a small kit. Gathering everything before you mix matters, because most self-leveling products give you 10 to 20 minutes of working time before they begin to stiffen.
- Spiked shoes: Strap-on cleats with 1-inch spikes let you walk into the wet pour to spread and roll without leaving footprints.
- Gauge rake or smoother: An adjustable gauge rake sets thickness by riding on pins; a flat smoother or trowel helps push material into corners.
- Mixing drill and paddle: A 1/2-inch drill running 450 to 650 rpm with a spiral paddle keeps air to a minimum.
- Measuring bucket: Exact water measurement is critical; guessing is the fastest route to a weak, dusty surface.
- Primer and roller: The manufacturer’s primer prevents the substrate from sucking water out of the mix and reduces air bubbles rising from below.
- Foam dam or weatherstrip: Blocks doorways and floor openings so the compound stays where you want it.
Step-by-Step: Rolling a Self-Leveling Pour
Good rolling starts with good prep, but here is the sequence once the floor is primed and the primer has dried to a tacky or dry film as the label requires.
- Plan the pour. Start at the wall farthest from the exit and work toward the door. Mark target thickness with laser or grade pins if the floor is badly out of level.
- Mix one batch at a time. Add powder to measured cool water (usually around 5 quarts per 50-lb bag, but follow your product) and mix for about 2 minutes. Do not over-mix.
- Pour in a ribbon. Dump the batch in a band 12 to 24 inches wide, then have a helper start the next batch immediately. Keep a wet edge at all times.
- Spread. Use the gauge rake or smoother to push compound to the right thickness and into corners.
- Roll right away. Within 5 to 10 minutes of placing each section, roll it with the spiked roller. Work in one direction, then make a second pass at 90 degrees.
- Blend seams. Overlap each new batch with the previous one by rolling across the joint while both are still fluid.
- Stop before it stiffens. Once the material starts to set, stop rolling. Late rolling leaves ridges and spike marks that will not flow back.
Speed matters more than force. Light, steady passes are all the spikes need. Pushing hard just digs into the layer and throws the compound around.
Timing Is the Whole Game
Every self-leveling product has a flow time, often printed as 10 to 15 minutes at 70°F. Rolling is only useful during that window. Warm rooms, direct sun, drafty windows, and heated slabs all shorten it; cool, humid rooms lengthen it.
For a room larger than about 200 sq ft, one person rarely keeps up alone. A three-person crew works best: one mixes, one pours and spreads, and one rolls. If you are working alone, pour smaller areas, mix fewer bags at once, and consider a product with extended working time. Close windows and turn off HVAC fans before pouring so air movement does not skin the surface early.
Room temperature between 50°F and 80°F is the usual acceptable range. Below 50°F the compound cures slowly and may not reach full strength; above 85°F it can flash-set before you finish rolling.
Common Mistakes When Using a Spiked Roller for Self Leveling Concrete
Most problems trace back to technique or timing rather than the tool itself.
- Rolling too late: Leaves permanent spike tracks and roller ridges.
- Spikes too short for the depth: Surface looks fine, but hidden air voids weaken the layer and may telegraph through thin vinyl.
- Too much water in the mix: The roller cannot fix segregation; excess water brings fines to the top and creates a soft, dusty skin.
- No primer: Porous concrete or wood pulls air up through the compound faster than you can roll it out, producing pinholes.
- Dirty roller: Chunks of cured compound on the spikes drag grooves through the new pour. Clean the roller in a bucket of water between sessions.
- Walking without spiked shoes: Footprints do not self-heal once the flow window closes.
After the Pour: Curing and Getting Ready for Flooring
Most self-leveling underlayments accept foot traffic within 2 to 4 hours. Ceramic or porcelain tile can often go down in 16 to 24 hours. Moisture-sensitive coverings such as luxury vinyl, glue-down wood, and sheet goods usually need 24 hours to several days depending on thickness, temperature, and humidity. Always check the data sheet and, for wood, run a moisture test before installing.
Once cured, inspect the surface with a 6-foot straightedge. Most floor manufacturers want flatness within 3/16 inch over 10 feet or 1/8 inch over 6 feet. Small pinholes can be filled with a patching compound; a few light ridges can be sanded with a concrete rubbing stone or a pole sander with 36-grit paper.
Clean your roller immediately after the job. Rinse it in a bucket, scrub between the spikes with a stiff brush, and let it dry before storage. A roller with cured compound stuck to it is nearly useless on the next project.
Is the Roller Worth Buying for One Project?
For any pour over 20 or 30 square feet, yes. At $20 to $60, the tool costs less than a single bag of premium leveler, and it is the difference between a surface that needs hours of patching and one that is ready for flooring. Rental stores sometimes include rollers and spiked shoes in a leveling kit for $15 to $25 a day, which is a smart option if you only plan to level one room.
Choose a spike length that matches your depth, prime the floor, mix precisely, and roll early with light, crossing passes. With those habits, a spiked roller turns self-leveling compound from a nerve-racking gamble into a predictable, professional-looking base for your new floor.