
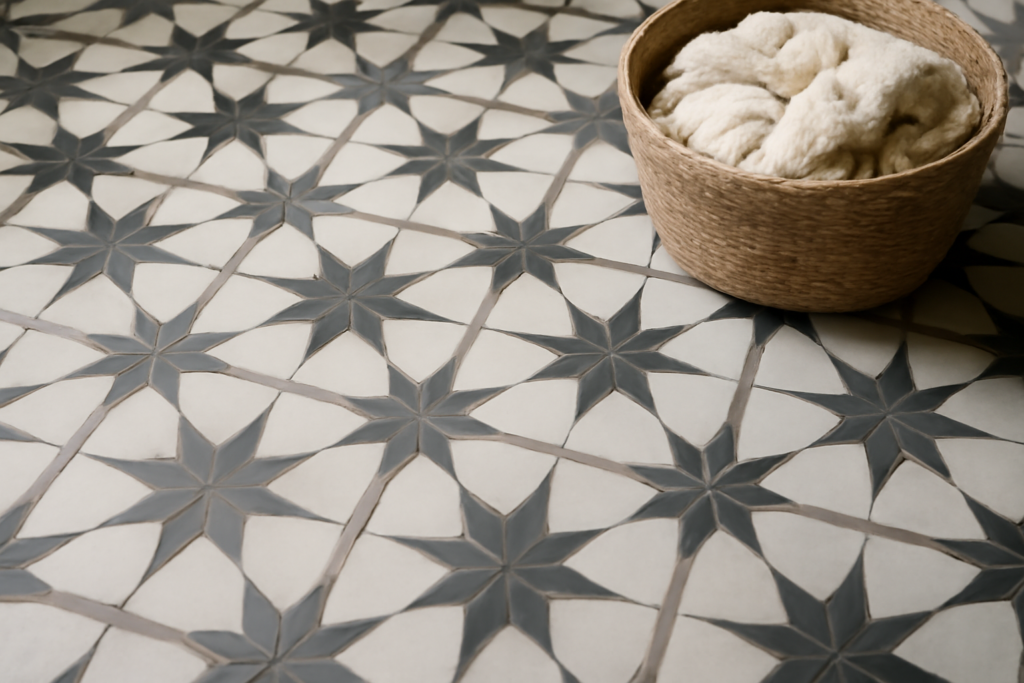
Few tile shapes carry as much history as the star and cross. Star and cross floor tile traces back to 13th-century Persian and Moorish design, where eight-pointed stars interlock with slender crosses to form a continuous, hypnotic field. Today it’s one of the fastest ways to give a mudroom, entry, or powder room the look of a hand-laid heritage floor without hiring an artisan.
Part of our Tile & Grout guide — explore the full guide →
The pattern looks intricate, but the geometry is forgiving once you understand how the two pieces fit. Here’s everything you need to plan, buy, and lay a star and cross floor that looks like it’s been there a century.
The Geometry Behind the Pattern
The system uses exactly two shapes: an eight-pointed star and an elongated cross. Each star nests against four crosses, and each cross links four stars, tiling the plane with zero gaps and no cut fillers. That self-completing geometry is why the pattern reads as so seamless. You aren’t fighting a grid; the pieces guide themselves into place.
Most manufacturers size the star at 6 to 8 inches point-to-point, with the matching cross scaled to fit. Because the two shapes are sold as a coordinated set, you don’t calculate them separately. Order by total square footage and let the star-to-cross ratio, roughly one star per one cross, come out of the box for you.
This two-piece system is worth appreciating because it’s genuinely rare in tile. A hexagon or a standard square tiles the plane too, but neither creates the sense of woven movement that the star-and-cross does, where your eye follows the crosses outward and keeps rediscovering the stars. The pattern reads as far more complex than the simple math behind it, which is exactly why it has survived seven centuries of design trends. You get an intricate, custom-looking result from a repeatable, forgiving layout that a patient homeowner can master in a single room.
Popular Materials and Finishes
The shape shows up in several materials, and each changes the feel of the finished floor:
- Terracotta: The traditional choice, with warm orange-brown tones and a rustic, handmade surface. Best for Mediterranean and Spanish-style homes.
- Cement (encaustic) tile: Bold, saturated color pressed through the tile body, so patterns don’t wear off. Popular for high-contrast black-and-white schemes.
- Porcelain: A durable, low-maintenance modern take that mimics terracotta or cement without sealing headaches.
- Natural stone: Marble or limestone stars paired with contrasting crosses for a high-end, custom look.
Color pairing does the heavy lifting. A classic combination sets terracotta stars against deep cobalt or hunter-green crosses, or crisp white stars against charcoal crosses for a graphic, contemporary edge.
Where Star and Cross Tile Works Best
This pattern rewards smaller, defined spaces where the eye can take in the full repeat. Entryways, powder rooms, mudrooms, laundry rooms, and kitchen alcoves are ideal. In a large open floor the pattern still works, but it can overwhelm, so many designers frame it with a simple border tile to give the eye a resting point.
It also has a natural place in period-appropriate homes. If you own a Spanish Revival, Mediterranean, or Mission-style house, a terracotta star and cross floor is historically accurate and instantly reinforces the architecture. In a new build, the same pattern injects age and character that a plain grid can never fake, which is why designers reach for it when they want a room to feel established rather than freshly finished. Consider laying it in a small kitchen alcove, a butler’s pantry, or beneath a freestanding tub, spots where a jewel-box floor becomes a genuine focal point without the cost of tiling an entire great room.
It also pairs beautifully with a single accent element, like a patterned cross in an otherwise solid star field. Use the crosses to introduce your accent color and keep the stars neutral, and the room stays lively without feeling busy.
How to Lay It Out
Start from the center of the room, not a wall. Snap two perpendicular chalk lines to find the exact center, then dry-lay a few rows of stars and crosses outward before you spread any thin-set. This centers the pattern so your cut pieces land evenly at opposite walls instead of leaving a sliver on one side.
Step-by-Step Basics
- Level the substrate; deviations over 1/8 inch in 10 feet will telegraph through the thin tiles.
- Snap center lines and dry-lay to confirm the pattern balances.
- Set stars first along your reference lines, then drop crosses into the gaps.
- Use 1/16-inch spacers if the tiles aren’t self-spacing; many handmade tiles vary slightly in size.
- Cut edge pieces with a wet saw, keeping the pattern flowing off the visible field.
Because terracotta and cement tiles are porous, seal them before grouting. Skipping that step lets pigment-heavy grout stain the tile face, and there’s no clean fix once it’s set.
Grout Color Makes or Breaks It
Grout is not an afterthought with this pattern. A matching grout, tan against terracotta, lets the shapes blur into a soft, unified field. A contrasting grout, like charcoal against white, draws hard lines around every star and cross, turning the floor graphic and modern. Decide which effect you want before you buy, because it changes the entire personality of the room.
Keep grout lines tight, around 1/16 to 1/8 inch. Wide grout lines fight the delicate geometry and make the floor look clumsy. Use an unsanded grout for those narrow joints.
Cost and What to Budget
Pricing varies sharply by material:
- Porcelain star and cross: $6 to $12 per square foot.
- Handmade terracotta: $10 to $20 per square foot.
- Encaustic cement: $12 to $25 per square foot.
- Natural stone: $15 to $40 per square foot.
Add professional installation at $8 to $15 per square foot, since the pattern takes more layout time than a straight grid. Budget 10 to 15 percent extra tile for cuts and breakage, and factor in sealer for porous materials at roughly $30 per quart.
Caring for a Star and Cross Floor
Maintenance depends entirely on the material you chose. Porcelain is nearly bulletproof, sweep and damp-mop and it stays put for decades. Terracotta and cement tiles are a different story, because they’re porous and need sealing to stay protected. Plan to reseal terracotta every one to two years with a penetrating sealer, and expect cement encaustic tiles to develop a natural patina over time that many owners actually prize.
Avoid acidic cleaners like vinegar on natural materials, they’ll etch the surface and dull the pigment. Stick to a pH-neutral stone cleaner and warm water. For grout, a yearly application of grout sealer keeps oil and grime from settling into the joints, especially important with a light grout that shows every mark. Wipe spills promptly on any porous tile; a glass of red wine left overnight on unsealed terracotta can leave a permanent shadow.
Common Mistakes to Avoid
- Skipping the seal-before-grout step: Grouting porous tile without sealing first stains the tile face permanently.
- Starting from a wall: The pattern will drift out of square and leave uneven cuts. Always start from the center.
- Wide grout lines: Joints over 1/8 inch fight the delicate geometry and look clumsy.
- Ignoring size variation: Handmade tiles vary; dry-lay and sort before setting so the pattern stays consistent.
- Choosing a busy grout color for a large field: High contrast overwhelms in big rooms, save it for small, defined spaces.
Is It Worth the Effort?
A star and cross floor delivers a custom, old-world result that a plain subway or grid layout simply can’t match. It’s a project best suited to a well-defined room where the pattern can breathe, and it rewards patience during layout. If you love timeless, characterful floors and you’re willing to seal, plan, and lay carefully, few patterns give you more visual payoff per square foot. For a first-time DIYer, choose self-spacing porcelain to keep sizing consistent, and you’ll get a heritage look with far less risk.
Prefer to explore on your own?
See how new flooring looks in your actual room in seconds — free, no signup.
Try the free Floor Studio →

