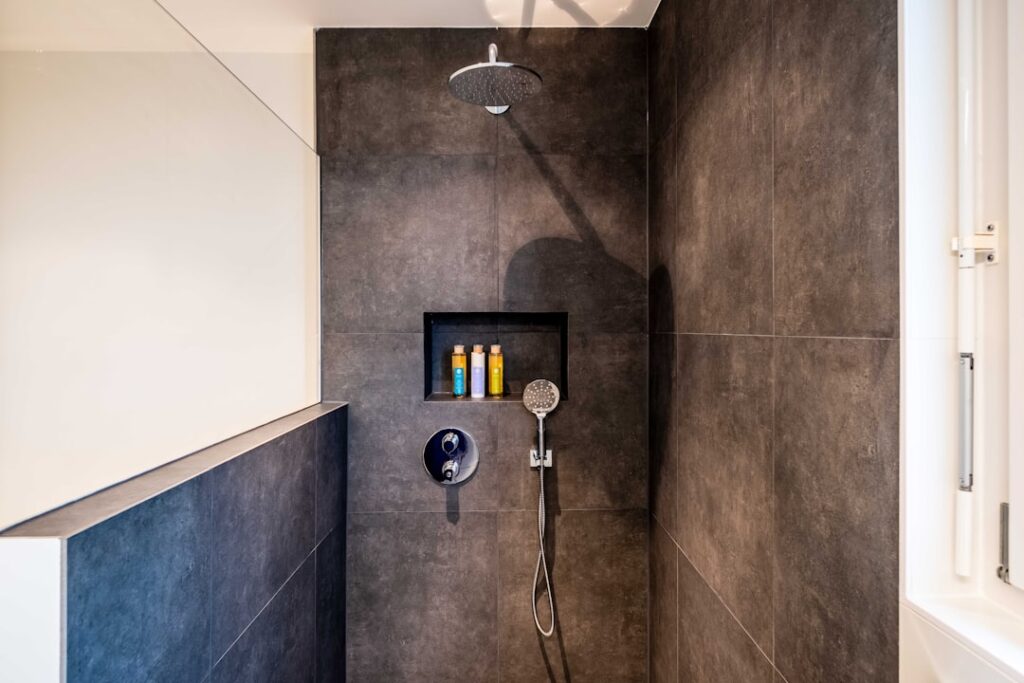
The recessed shelf built into a shower wall for shampoo and soap used to be one of the trickiest parts of a bathroom remodel, because every seam was a chance for water to sneak behind the tile. A prefab tile ready shower niche takes that risk off the table. It’s a factory-made foam or waterproof-board box you set into the wall framing, bond into your waterproofing, and tile right over. No custom blocking, no site-built pan, and far fewer opportunities for a leak.
Part of our Bathroom Remodeling & Flooring guide — explore the full guide →
These niches, sold under names like Kerdi-board niches, Wedi, and various foam-panel brands, have become the standard for a reason. Here’s how they work, how to size one, and how to install it correctly so it lasts.
What “Tile Ready” Actually Means
A tile ready niche ships as a rigid, waterproof recessed box, usually made of extruded polystyrene foam coated in a cementitious or fabric skin, or of a bonded waterproof building panel. The surface is engineered to accept thin-set mortar and tile directly, with no additional prep on the box itself.
That’s the key difference from building a niche from scratch. A site-built niche means framing an opening, adding blocking, installing backer board on all five interior surfaces, waterproofing every seam and corner by hand, and hoping your slope and seals are perfect. The prefab version arrives already waterproof and already shaped, so you skip most of the failure-prone steps.
Sizing Your Niche
Prefab niches come in standard sizes designed to fit between wall studs, which are typically spaced 16 inches on center. That gives you a usable width of roughly 14 inches between studs without cutting into framing.
- Single niches around 12 by 12 inches or 12 by 24 inches fit neatly in a standard stud bay and hold everyday bottles.
- Tall niches in the 12-by-36-inch range give more storage and a clean vertical line, and often include a shelf.
- Double-shelf models split the opening so shampoo and razors have separate spaces.
Plan the height before you tile. A comfortable reach puts the niche opening around 48 to 60 inches off the shower floor, roughly chest height. Keep it clear of the shower valve and the wall’s structural studs, and if the niche is wider than one stud bay you’ll need to cut a stud and add a header, which is more work but doable.
Waterproofing Integration Is Everything
A prefab niche is only as waterproof as its connection to the surrounding wall. The box itself won’t leak, but the flange where it meets your shower’s waterproofing membrane is the critical joint.
Most systems have you install the niche within a matching waterproofing method: a Kerdi-board niche pairs with Kerdi membrane, a Wedi niche with Wedi’s sealant and banding, and foam niches generally get their perimeter flange bonded to your backer board or membrane, then covered with waterproofing tape or fabric banding embedded in thin-set. Do not mix incompatible systems or skip the banding. That taped, embedded seam around the flange is what keeps water in the shower and out of your wall cavity.
Step-by-Step Installation
The niche goes in before you tile, after framing and before or during waterproofing, depending on the system. Here’s the general sequence.
- Locate and cut the opening. Pick a stud bay, mark your height, and cut the backer board or wall panel to the niche’s rough opening dimensions.
- Add blocking. Install horizontal 2x blocking at the top and bottom of the opening between the studs so the niche has something solid to screw and bond to.
- Dry-fit the box. Set the niche in place and confirm it sits flush with the surrounding wall surface. The tile face needs a flat transition, so shim or trim as needed.
- Bond and fasten. Apply thin-set mortar or the manufacturer’s sealant to the flange and back, press the niche into the opening, and screw the flange to the blocking where the system allows.
- Waterproof the seams. Band and seal the entire flange perimeter into your membrane with the compatible tape or fabric, embedded in thin-set or sealant. This is the step you never rush.
- Tile it. Once the waterproofing has cured, tile the shower wall and the niche interior together, wrapping tile into the box for a finished look.
Slope the Bottom Shelf
One detail separates a niche that stays dry from one that pools water: the bottom shelf should pitch slightly forward toward the shower so water drains out instead of sitting on the ledge. Many prefab niches come with a pre-sloped sill, which is a nice time-saver. If yours is flat, build a small slope with thin-set under the sill tile. Even a quarter-inch of fall across the shelf keeps standing water from working into the grout.
Pros and Trade-offs
The upside is clear. A tile ready shower niche installs fast, arrives already waterproof, and dramatically lowers the odds of a hidden leak compared to a hand-built box. The rigid foam versions are also lightweight and easy to cut on site if you need to fine-tune the fit.
The trade-offs are minor. You’re limited to the sizes and shapes the manufacturer offers unless you build custom, and premium branded niches cost more than a pile of backer board would. For most homeowners and remodelers, that’s money well spent, because a leak behind shower tile can mean tearing out the whole wall.
Foam vs. Waterproof Board Niches
Prefab niches come in two broad constructions, and the difference affects how you handle them. Foam-core niches, like the extruded polystyrene models, are extremely light, cut easily with a utility knife, and bond well with thin-set. They’re forgiving for a first-timer and shrug off water completely. Bonded waterproof-panel niches, such as the cement-coated building-board types, feel more rigid and substantial and tie cleanly into matching board wall systems.
Both make excellent, leak-free results when installed correctly. The foam versions win on weight and easy trimming; the board versions appeal to installers already using a matching panel system for the whole shower. Pick whichever pairs with the waterproofing method you’re using elsewhere in the shower, because system compatibility matters far more than the core material.
Finishing the Niche Cleanly
The detail work at the tile stage is what makes a niche look built-in rather than added-on. Decide early whether you’ll frame the opening with a pencil-liner trim, a metal edge profile, or a mitered tile edge, since that choice affects how you cut the surrounding field tile. Line up the grout joints inside the niche with the joints on the surrounding wall wherever possible, because a niche whose lines flow into the wall reads as intentional and custom. Seal the grout inside the niche after it cures, and use a flexible silicone caulk, not grout, in the inside corners where the shelf meets the walls, since those spots flex and grout will crack there over time.
Bottom Line
If you’re building or renovating a shower, a prefab tile ready shower niche is one of the easiest upgrades to get right. Size it to your stud bay, set it at a comfortable height, band the flange into a compatible waterproofing system, and make sure the shelf sheds water. Do those four things and you’ll have a good-looking, leak-free recessed shelf that adds real convenience to the shower for the life of the tile.
Prefer to explore on your own?
See how new flooring looks in your actual room in seconds — free, no signup.
Try the free Floor Studio →