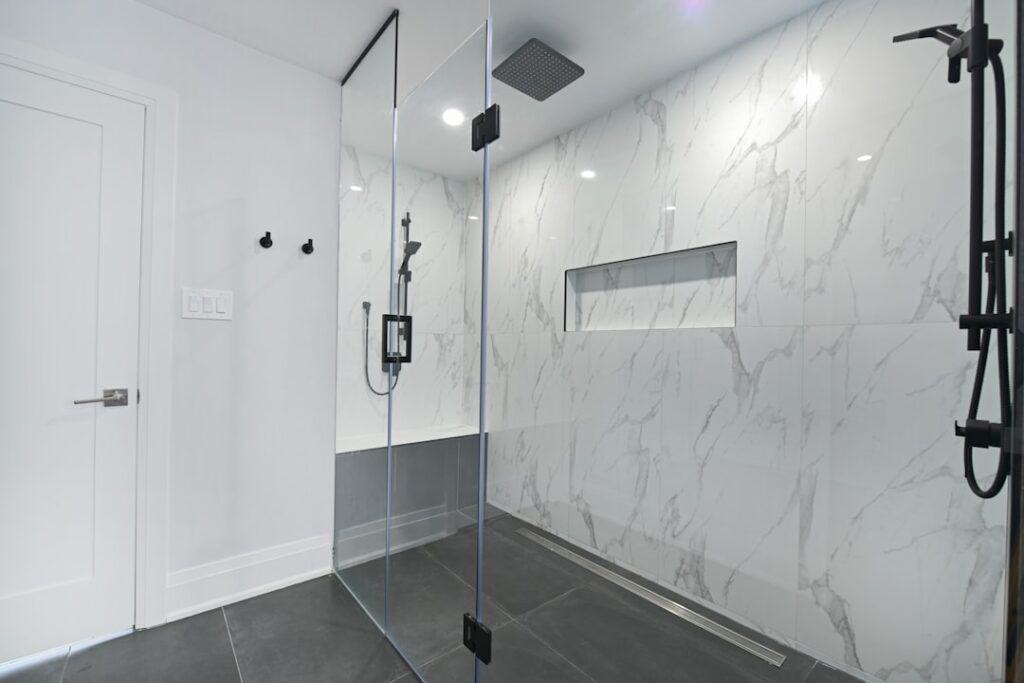
Two small square cubbies scattered across a shower wall look dated the moment they are grouted. A single long shower niche, running horizontally across the wall, looks intentional, modern, and holds everything without clutter. Homeowners who choose a long shower niche get one clean line of storage that reads as a designed feature rather than an afterthought.
Part of our Bathroom Remodeling & Flooring guide — explore the full guide →
The horizontal format has practical and structural implications, though, from how it fits between studs to how you support the shelf. Here is how to size, place, waterproof, and finish a long niche so it looks custom and stays leak-free.
- Why Choose a Long Shower Niche
- Ideal Dimensions for a Long Niche
- Working Around Wall Studs
- Prefab Versus Site-Built Niches
- Waterproofing and Slope
- Tiling and Finishing Options
- Single Shelf vs Multiple Shelves
- Placement Relative to Fixtures
- Design Styles That Suit a Long Niche
- Cost and Final Considerations
Why Choose a Long Shower Niche
The appeal is part looks and part function. A long, horizontal niche creates a strong architectural line that makes a shower feel larger and more deliberate, especially with large-format tile where fewer grout lines mean a cleaner backdrop. It holds all your bottles, razors, and soap in one accessible row rather than forcing you to reach up to a high cubby.
It is also easier to keep tidy. A single continuous shelf means everything sits at a comfortable height and drains toward a subtle slope, so bottles are not perched in separate boxes at odd elevations. For accessibility, a long niche placed at 40 to 48 inches keeps essentials within reach whether you are standing or seated.
Ideal Dimensions for a Long Niche
Length is where these niches earn their name. Common widths run from 24 inches up to 48 inches or more, spanning multiple stud bays. Height is usually modest, around 5 to 8 inches for a slim modern look, though 10 to 14 inches gives room for taller bottles. Depth is typically 3 1/2 inches, matching a standard 2×4 stud wall, or up to 4 inches with furring.
Place the niche at a practical height, generally with the bottom shelf 40 to 52 inches off the floor so it is easy to reach without bending. If you plan a horizontal accent tile band, aligning the niche with it creates a seamless designed line. Keep at least one full tile course between the niche and the ceiling or corners so the layout looks balanced.
Working Around Wall Studs
This is the structural catch of a long niche. Studs sit 16 inches on center, so a niche wider than about 14 inches will cross one or more studs. You cannot simply cut through structural studs without a plan.
The usual solution is to cut the intersecting stud and reframe with horizontal headers above and below the niche opening, transferring the load to the neighboring studs. On a non-load-bearing wet wall this is straightforward for a framer, but confirm the wall is not load-bearing and that no critical plumbing or wiring runs through the bay before cutting. If the wall is load-bearing, keep the niche shallow and reframe carefully, or reposition it to a stud bay where a single opening works. Plan all of this during rough-in.
Prefab Versus Site-Built Niches
You have two ways to build the box. A prefabricated foam or PVC niche, such as those from Schluter or Tile Redi, drops into the framed opening and bonds directly to your waterproofing membrane. Prefab long niches come in set sizes and take the guesswork out of waterproofing, which makes them my default recommendation for most homeowners.
A site-built niche, framed and then waterproofed with backer board and a liquid or sheet membrane, lets you hit any custom length and depth. It costs less in materials but demands meticulous waterproofing at every seam and corner. For a very long or non-standard niche, site-built may be the only option, but only if your installer is disciplined about the membrane work.
Waterproofing and Slope
A long niche has a long bottom shelf, and water will sit on it if the shelf is dead level. Slope the bottom of the niche about 1/8 to 1/4 inch toward the shower so water drains out rather than pooling behind bottles and breeding mildew.
Waterproof the entire niche box with a continuous membrane tied into the surrounding shower waterproofing, sealing every corner and the pipe-free penetrations with banding and sealant. The top edge of the niche especially needs a slight outward pitch so water does not collect on the upper lip. As with any shower, do not skip the membrane on the assumption that tile and grout are waterproof, because they are not.
Tiling and Finishing Options
The finish is where a long niche shines. Popular approaches include:
- Matching the surrounding tile for a subtle, built-in look that lets the shape do the talking.
- A contrasting mosaic or accent tile inside the niche to make it a focal point.
- A slab or large-format back with no grout lines for a clean, high-end appearance.
Finish the front edge with a metal tile trim such as Schluter-Rondec, a mitered tile edge, or a stone pencil trim for a polished perimeter. A metal trim in a finish matching your fixtures gives the crispest modern line. If the niche is very long, consider a slim glass or acrylic shelf mid-height to split tall and short bottles, but slope it too so it drains.
Single Shelf vs Multiple Shelves
A long niche does not have to be one open box. Adding a shelf or two changes how it functions. A single tall opening keeps the sleek horizontal line uninterrupted and suits a minimalist design, holding bottles of varying heights in one row. Splitting the niche with a mid-shelf, often a slab of matching stone or a slim glass panel, doubles your usable storage and lets you separate tall shampoo bottles from short soap bars and razors.
If you add a shelf, slope it too so water drains forward, and support it properly; a glass shelf should sit in a channel or on cleats set into the waterproofed niche, not merely glued to the tile. For a very long niche, a mid-shelf also visually breaks up the span so it does not look like an empty trough. Decide on shelving before tiling, since the support and waterproofing for a shelf must be built in.
Placement Relative to Fixtures
Where you locate a long niche affects both convenience and construction. The ideal spot is on the wall opposite or adjacent to the showerhead, within easy reach but out of the direct spray so bottles are not constantly blasted with water. Avoid placing a niche on the same wall as the valve and showerhead if it means cutting through plumbing; keeping it on a clear wet-wall bay simplifies the framing.
Height should suit the primary users, generally with the shelf 40 to 52 inches off the floor. In a shower with a bench, a lower long niche within reach of a seated bather adds accessibility. Center the niche within the tile field so full tiles frame it on both sides, and align its top or bottom edge with a grout line in the surrounding tile for a clean, deliberate look. These placement choices are easy to plan on paper and impossible to change once the tile is set.
Design Styles That Suit a Long Niche
The horizontal format pairs especially well with contemporary and transitional bathrooms, where clean lines and large-format tile dominate. In a modern shower clad in 24 by 48 inch porcelain slabs, a long niche with a metal trim edge and a slab back reads as a crisp architectural detail. In a transitional space, matching the niche interior to the field tile keeps it subtle and timeless.
For a spa-inspired look, line the niche with a contrasting natural stone mosaic or a warm marble that becomes a focal accent. In a farmhouse or traditional bath, a long niche framed with a pencil-liner trim in a coordinating tile feels intentional without being flashy. Match the trim finish to your fixtures, and the niche becomes part of a cohesive design rather than a random cutout in the wall.
Cost and Final Considerations
A long shower niche costs more than a single small cubby because of the extra framing, waterproofing, and tile work. A prefab long niche unit runs $60 to $200, and the added labor for framing, waterproofing, and tiling typically adds $200 to $600 during a remodel. Site-built custom niches vary widely with length and finish.
Before committing, confirm the wall structure allows the length you want, plan the height for comfortable reach, and insist on a sloped, fully waterproofed shelf. Get those fundamentals right and a long shower niche becomes the feature that makes a simple tiled shower look like it came from a design magazine, while quietly holding everything you need within easy reach.