The difference between a tile job that looks professional and one that looks like a weekend gone wrong often comes down to the edges. Tile strips are the narrow trim, transition, and accent pieces that finish those edges, protect vulnerable corners, and bridge the height change where tile meets carpet, wood, or another room. They are small, inexpensive, and easy to overlook, yet they carry an outsized share of the responsibility for a clean final result.
Part of our Tile & Grout guide — explore the full guide →
Whether you are edging a shower niche, capping the top row of a backsplash, or transitioning from a tiled kitchen into a hardwood living room, this guide covers the types of tile strips, the sizes and materials available, and exactly how to install them.
What Tile Strips Are Used For
At their core, tile strips solve three problems. First, they finish raw tile edges so you never see the unglazed, sometimes sharp side of a cut tile. Second, they protect those edges from chipping, which is especially important on outside corners and countertop fronts that get bumped. Third, they create a safe, gradual transition between two flooring materials of different heights so no one catches a toe on an exposed tile lip.
Because they handle both function and looks, tile strips come in a wide range of profiles. Choosing the right one depends on where the edge lives, how much abuse it will take, and the style you want.
Common Types of Tile Strips
Homeowners run into several distinct categories, and mixing them up leads to ordering the wrong piece. Here are the ones you will see most often.
Edge and Trim Strips
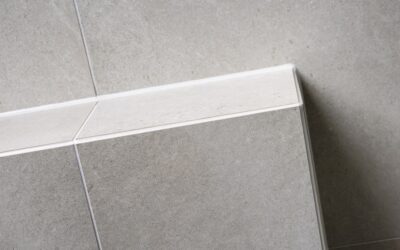
Also called tile edge trim or profiles, these L-shaped or rounded strips cap the exposed edge of a tiled surface. Metal versions, like the widely used Schluter-JOLLY profile, come in brushed nickel, chrome, brass, and matte black to match fixtures. They install with one leg buried under the tile in the thinset and the visible leg sitting flush with the tile face.
Transition Strips
These bridge two floors of different heights or materials, such as tile to carpet, tile to laminate, or tile to hardwood. T-molding, reducers, and end caps all fall in this group. A reducer, for example, ramps down from a taller tile floor to a thinner vinyl one, while a T-bar joins two floors of equal height.
Mosaic and Accent Strips
Purely decorative, these are narrow bands of glass, stone, or metal mosaic used as a border or a listello accent inside a field of larger tile. A common use is a single row of glass mosaic tile strips running through a shower wall at eye level to break up an expanse of plain subway tile.
Sizes and Materials
Tile strips are sized to match tile thickness, so the first measurement you need is the height of your tile plus its thinset bed. Most metal edge profiles come in heights of 3/8, 1/2, and 5/8 inch to match 8, 10, and 12-millimeter tile. Standard lengths run 8 feet for edge trim and 36 to 48 inches for floor transition strips.
- Aluminum: Affordable and available in anodized colors; best for low-traffic edges. Roughly $8 to $20 per 8-foot length.
- Stainless steel and brass: Durable and premium-looking for high-use corners; $20 to $45 per length.
- PVC and plastic: Budget-friendly and easy to cut, but can yellow and dent over time; $5 to $12 per length.
- Natural stone and glass mosaic: Decorative accent bands sold by the linear foot, typically $8 to $30.
For floor transition strips, you will also see wood, laminate-clad, and vinyl options meant to color-match adjacent flooring rather than the tile.
How to Choose the Right Tile Strips
Start with location. Outside corners on a wall or countertop take the most abuse, so choose a sturdy metal profile there rather than plastic. Floor transitions in doorways see heavy foot traffic and should use a screw-down or track-mounted transition strip that will not pop loose.
Next, match the finish to the room’s hardware. If your faucet and cabinet pulls are matte black, a matte black tile edge trim ties the space together far better than a random chrome strip. For transitions between rooms, decide whether you want the strip to disappear by matching the lower floor or to stand out as a deliberate line.
Finally, confirm the height. A profile that is too short leaves the tile edge proud and exposed; one that is too tall creates a lip that collects dirt. Measure your installed tile-plus-thinset stack and buy the matching size.
How to Install Tile Strips
Installing edge trim happens during tiling, not after, so plan ahead. Here is the basic sequence for a metal edge profile.
- Cut the strip to length using a hacksaw or a miter saw with a metal-cutting blade. Miter the ends at 45 degrees where two strips meet at a corner.
- Spread thinset along the edge where the tile will end, using a notched trowel just as you would for the tile itself.
- Press the perforated anchor leg of the strip into the thinset so it sits flat against the substrate, leaving the visible face flush with where the tile surface will land.
- Set the tile up against the vertical face of the strip, keeping a consistent grout-line gap between the tile and the trim.
- Wipe excess thinset from the visible metal before it cures, and let everything set for 24 hours before grouting.
For floor transition strips, most modern systems use a metal track that you screw or glue to the subfloor first; you then snap the finish strip into the track. This lets the strip flex slightly with seasonal floor movement and makes future replacement painless.
Tile Strips for Specific Projects
Different jobs call for different strips, and knowing the common pairings saves trips to the store. On a kitchen backsplash, a metal or bullnose edge strip caps the top row and the outside corner where the tile ends, giving a crisp finish instead of a raw cut edge. In a shower, edge trim protects the exposed sides of a niche and finishes the curb, while a decorative mosaic band adds a design accent partway up the wall.
For floors, the doorway is where transition strips earn their keep. A tile-to-carpet transition uses a strip with a gripper edge that tucks the carpet down, while a tile-to-hardwood run relies on a T-molding or reducer sized to the height difference. On stair treads and step-downs, a bullnose or metal stair-nosing strip protects the leading edge from chipping and adds visible safety definition underfoot.
Common Mistakes to Avoid
The number one error is buying trim after the tile is already set. Because the anchor leg needs to sit under the tile in wet thinset, adding edge strips as an afterthought means messy silicone-only fixes that rarely look clean. Plan your tile strips into the layout from the start.
Another frequent slip is skipping the expansion gap on transitions. Two hard floors butted together with no room to move will buckle or crack when temperature and humidity change. Leave the manufacturer’s recommended gap, usually 1/4 to 3/8 inch, and let the transition strip cover it.
Final Thoughts on Tile Strips
They may be the least glamorous part of any tile project, but tile strips are what separate a crisp, durable installation from one that chips, catches, and looks unfinished. Match the profile and material to where the edge lives, size the strip to your exact tile thickness, and set edge trim into the thinset as you tile rather than after. Get those details right and the small pieces will quietly protect and polish your work for as long as the tile itself lasts.
Prefer to explore on your own?
See how new flooring looks in your actual room in seconds — free, no signup.
Try the free Floor Studio →