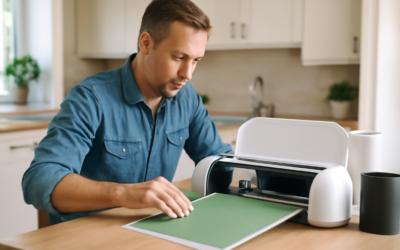
If you have ever admired a custom wall decal, a labeled pantry, or a personalized tumbler, there is a good chance a vinyl plotter made it. Also called a vinyl cutter, this machine uses a small blade to slice precise shapes out of adhesive vinyl, heat-transfer film, and other thin materials. It has become a staple for home crafters, small-business owners, and DIYers who want professional-looking signage and labels without paying a print shop. Understanding how these machines work helps you pick the right one and avoid the common beginner pitfalls.
How a Vinyl Plotter Works
A vinyl plotter holds a roll or sheet of vinyl and moves it back and forth under a tiny, swiveling blade. Software on your computer or tablet sends a cut path, and the machine traces that path, scoring the vinyl without cutting through the paper backing, a technique called “kiss cutting.” You then peel away the unwanted vinyl (a step called “weeding”), apply transfer tape, and stick the design to your surface.
The two broad categories are craft cutters and professional plotters. Craft machines handle materials up to about 12 inches wide and suit decals, shirts, and small projects. Professional roll-fed plotters cut 24 to 54 inches wide and run continuously for signage and vehicle graphics.
Materials You Can Cut
Modern vinyl plotters handle far more than basic stickers.
- Adhesive vinyl: Permanent (outdoor) and removable (indoor) for decals, labels, and wall art.
- Heat-transfer vinyl (HTV): Pressed onto fabric with an iron or heat press for custom apparel.
- Cardstock and paper: For cards, stencils, and paper crafts on craft-grade machines.
- Stencil film: For painting custom designs on walls, wood, and floors.
- Window cling, magnet sheet, and faux leather: On machines with adjustable force.
Key Features to Compare
Not all cutters are equal, and a few specs separate a frustrating purchase from a reliable one.
- Cutting width: 12 inches for crafts, 24 inches or more for signs and large decals.
- Cutting force: Higher force (measured in grams) lets you cut thicker materials like chipboard and faux leather.
- Optical registration: A sensor that reads printed marks for accurate print-then-cut projects.
- Software compatibility: Confirm it works with your computer and preferred design program.
- Servo vs. stepper motor: Servo motors cut more smoothly and quietly, better for fine detail.
Software: The Real Engine
The machine is only as capable as the software driving it. Most craft brands include their own design app, while professional plotters often pair with sign-making programs. Look for software that handles SVG files, lets you weld and offset shapes, and supports print-and-cut workflows. If you already design in vector programs, confirm the plotter accepts standard file formats so you are not locked into one ecosystem.
Setting Up Your First Project
Getting clean cuts comes down to a few setup details that beginners often miss.
- Load the vinyl squarely so it tracks straight through the rollers; misalignment causes skewed cuts on long runs.
- Set the blade depth so it barely protrudes, just enough to cut the vinyl, not the backing.
- Run a small test cut before committing to the full design, then adjust force and speed.
- Weed slowly with a hook tool, removing negative space and leaving your design on the backing.
- Apply transfer tape, burnish well, and peel at a sharp angle to lift the design cleanly.
For wall decals and stencils, surface prep matters as much as the cut. Clean the wall with isopropyl alcohol, let it dry, and apply when the room is room temperature for the best adhesion.
Common Uses Around the Home
A vinyl plotter pays for itself quickly once you start. Homeowners use them for custom pantry and storage labels, switch-plate and address decals, holiday window clings, and personalized gifts. DIYers love cutting reusable stencils for painting accent walls, furniture, and even floor patterns. Small-business owners produce product labels, packaging stickers, and storefront signage in-house, saving the markup of outsourcing every order.
Maintenance and Troubleshooting
Keep your machine cutting cleanly with simple upkeep. Wipe the cutting strip and rollers free of vinyl dust, and replace the blade when cuts start tearing rather than slicing, blades are consumable and dull faster than most people expect. If a cut is incomplete, increase force in small steps; if it cuts through the backing, reduce blade depth. Keep vinyl stored flat or loosely rolled in a cool, dry spot so it feeds smoothly.
Print-and-Cut Workflows Explained
One of the most powerful features on better vinyl plotters is print-and-cut, which lets you produce full-color stickers and labels with precise contour cuts. The process works in two stages: first you print your design, including small registration marks, on a regular printer using printable vinyl or sticker paper. Then you load the printed sheet into the plotter, which uses an optical sensor to read the registration marks and align its blade exactly to the printed artwork. This is how custom logo stickers, product labels, and multicolor decals get clean cut edges. If full-color stickers are a goal, prioritize a machine with reliable optical registration, because cheaper units without it can only cut single-color vinyl.
Comparing Craft and Professional Machines
Choosing the right tier saves money and frustration.
- Craft cutters: Compact, affordable, and beginner-friendly, with 12-inch cutting widths and easy software. Best for hobbyists making shirts, decals, and gifts.
- Mid-range cutters: Stronger motors and registration features for small-scale sticker and label businesses.
- Professional roll plotters: 24 to 54 inches wide, servo motors, and continuous roll feeding for signage, vehicle graphics, and high volume.
Buy for the projects you will realistically make in the next year. Most home users are well served by a craft or mid-range machine, while a sign-making side business justifies a professional plotter.
Is a Vinyl Plotter Worth It?
For anyone who makes signs, apparel, labels, or decor more than occasionally, a vinyl plotter quickly earns its place. Craft-grade machines are affordable enough for casual hobbyists, while professional roll-fed plotters open the door to a side business. Match the cutting width and force to the projects you actually plan to make, invest a little time learning the software, and you will have a versatile tool that turns digital designs into finished, real-world products.
Prefer to explore on your own?
See how new flooring looks in your actual room in seconds — free, no signup.
Try the free Floor Studio →