A staircase is often the first thing people see when they walk in, and a wood stair railing does more to define that first impression than any paint color or light fixture. A well-built wood stair railing is also a life-safety component, held to strict code for height and spacing, so it has to be as sound as it is handsome. Having installed both budget and high-end systems, I’ll walk you through the parts, the wood choices, the code, and what it really costs.
Part of our Stairs & Stair Flooring guide — explore the full guide →
- The Anatomy of a Railing System
- Choosing the Right Wood
- Code Requirements You Cannot Skip
- Installing a Wood Stair Railing
- Finishing for Durability
- What It Costs
- Maintenance and Longevity
- Mixing Wood With Metal Balusters
- Handrail Continuity and Wall-Mounted Sections
- Getting Your Railing Past Inspection
The Anatomy of a Railing System
Before you shop, learn the vocabulary, because suppliers price everything by the piece.
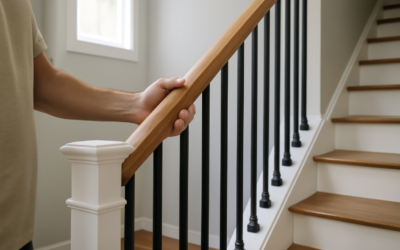
- Handrail: The sloped top rail you grip while climbing.
- Newel post: The heavy anchor post at the bottom, top, and any turn. It carries the structural load.
- Balusters (spindles): The vertical members that fill the space below the handrail.
- Base rail (shoe rail): The lower rail balusters sit in on some systems.
- Rosettes and fittings: Wall mounts, volutes, and turnouts that finish the ends.
The newels do the real work. If they aren’t anchored rock-solid, the whole railing feels loose no matter how well the rest is built.
Choosing the Right Wood
Species affects durability, cost, and how the railing takes stain. Softer woods dent under daily use; dense hardwoods stand up for decades.
- Poplar: Inexpensive and smooth, but soft. Best when you plan to paint, since it doesn’t stain evenly.
- Red oak: The industry standard. Strong, affordable, and its open grain takes stain beautifully. Around $8 to $15 per linear foot for handrail.
- Maple: Very hard and smooth with a tight grain; more expensive and can blotch when stained without conditioner.
- Walnut and cherry: Premium hardwoods with rich color, running $20 to $40 per linear foot for handrail.
For a stained railing that gets heavy daily traffic, red oak remains the best value. If you’re painting, poplar saves money without any visible downside once it’s coated.
Code Requirements You Cannot Skip
Railing dimensions are governed by residential code, and inspectors check them closely. In most jurisdictions following the IRC, the handrail height must sit between 34 and 38 inches measured vertically from the stair nosing. Guardrails on open landings must be at least 36 inches tall.
Baluster spacing is the number people miss. The gap between balusters must be small enough that a 4-inch sphere cannot pass through, which keeps a child’s head from getting caught. That usually means balusters spaced no more than about 4 inches apart on center for standard stock. The handrail itself must be graspable, with a round profile of roughly 1.25 to 2 inches, or a graspable shape on wider profiles. Confirm your local code before cutting anything.
Installing a Wood Stair Railing
A straight-run railing is a solid weekend project for a confident DIYer; complex turns are worth hiring out. Here’s the general sequence.
- Set and anchor the newel posts first. Bolt them through the floor framing or use heavy-duty newel fasteners rated for lateral load; a wobbly newel fails the whole rail.
- Cut the handrail to length with the correct rake angle to match the stair pitch, typically 30 to 42 degrees.
- Dry-fit the handrail between newels and mark the baluster layout, keeping gaps under the 4-inch rule.
- Drill baluster holes in the underside of the handrail and the treads or base rail.
- Epoxy or glue balusters in place, checking each for plumb with a torpedo level.
- Secure the handrail to the newels with rail bolts, then set fittings and rosettes.
Take your time on the newel anchoring. A properly set newel should not budge when you throw your full weight against it, because that post is what a person grabs in a fall.
Finishing for Durability
Sand progressively to 180 grit, then wipe with a tack cloth. On blotch-prone woods like maple or poplar, apply a pre-stain conditioner. Stain to your color, then protect with at least three coats of oil-based polyurethane or a durable water-based finish, sanding lightly with 320 grit between coats. A handrail is touched constantly, so the film finish is what keeps it looking new. Satin sheen hides fingerprints better than gloss.
What It Costs
Materials for a basic straight red oak railing, one handrail run, two newels, and a dozen balusters, typically total $300 to $700. Premium hardwoods, iron-and-wood combinations, or curved runs push materials well past $1,500. Professional installation adds $40 to $70 per linear foot, so a full staircase railing installed commonly lands between $900 and $3,500 depending on complexity and wood choice.
Replacing just the balusters, a popular update, is cheaper. Swapping tired wood spindles for iron balusters or new wood ones runs $1,000 to $2,500 installed for a typical staircase and dramatically modernizes the look.
Maintenance and Longevity
Dust the handrail weekly and wipe it with a barely damp cloth; standing water dulls the finish. Re-coat the top surface of the handrail every 5 to 8 years, since that’s where the finish wears through first from hand oils. Tighten rail bolts if you feel any play, and re-glue a loose baluster before it works itself free.
Built and finished properly, a wood stair railing lasts the life of the house. Choose a species that matches whether you’re staining or painting, anchor the newels like your safety depends on it, because it does, and finish the handrail for the daily abuse it’ll take. Do that, and you’ll have a staircase that’s both safe and a genuine centerpiece.
Mixing Wood With Metal Balusters
One of the most popular updates in recent years keeps the wood handrail and newels but swaps tired wood spindles for iron balusters. The contrast of a warm stained oak or walnut rail against slim black metal balusters looks current and opens up the sightline, since thin iron takes up less visual space than chunky wood. It’s also a manageable retrofit that doesn’t require rebuilding the whole railing.
The conversion is straightforward. Remove the old wood balusters, drill or clear the existing holes in the handrail and treads, then set iron balusters using shoes at the base and either epoxy or set screws to lock them. Iron balusters come in plain square bars, twists, baskets, and scroll patterns, usually $8 to $25 each. Mixing a couple of decorative balusters among plain ones at regular intervals adds interest without looking busy. Keep the same 4-inch maximum spacing rule; code applies equally to metal balusters. Budget $1,000 to $2,500 for a typical staircase conversion done professionally, less if you tackle it yourself over a weekend.
Handrail Continuity and Wall-Mounted Sections
Code and comfort both call for a graspable handrail that runs continuously along the flight, and many staircases combine an open balustrade on one side with a wall-mounted rail on the other. For the wall side, mount the handrail on sturdy brackets anchored into studs or solid blocking, not just drywall anchors, since a handrail must hold a real person’s weight in a fall. Set the rail 34 to 38 inches above the tread nosings to match the open side, and keep at least 1-1/2 inches of clearance between the rail and the wall so your hand can wrap around it.
Where a handrail meets a wall at the top or bottom of the stairs, code generally requires the rail to return to the wall rather than ending in a hazardous open end that could catch a sleeve or bag. Use a return fitting or a graceful volute to terminate the rail cleanly and safely. These transitions are where amateur installs most often look unfinished, so take the time to cut and fit the fittings properly. A continuous, comfortably graspable rail from top to bottom is both a code requirement and the mark of a well-built staircase.
Getting Your Railing Past Inspection
If your project requires a permit, and most new or replacement railings do, plan for the inspection from the start rather than fixing violations afterward. Inspectors check a short list of specifics: handrail height between 34 and 38 inches, guard height at least 36 inches on open landings, baluster spacing that blocks a 4-inch sphere, a graspable handrail profile, and solidly anchored newels that don’t move under load. Build to those numbers and keep your receipts and any manufacturer specs handy. Passing the first time saves you from tearing out and re-spacing balusters, which is tedious once they’re glued. When in doubt about a local amendment, a quick call to your building department before you start cutting is far cheaper than a failed inspection.