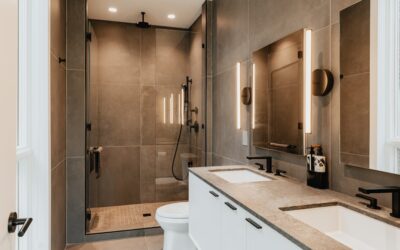
Bathrooms are the hardest room in a house on tile — daily soakings, steam, soap chemistry, temperature swings, and bare feet that will find every cold, slick, or sharp mistake you make. After setting bath tiles professionally for two decades, I can tell you the difference between a bathroom that looks new at year fifteen and one that’s regrouted at year three comes down to a handful of decisions made before the first box is opened: material, format, finish, and where each tile is allowed to go. Here’s how I walk clients through all four.
Part of our Tile & Grout guide — explore the full guide →
- The Materials, Ranked for Bathroom Duty
- Match the Tile to the Surface
- Formats and Sizes: What Works Where
- Grout, Trim, and the Details That Age Well
- Waterproofing: The Part You Can't See but Can't Skip
- What Bath Tile Projects Cost in 2026
- Style Directions That Hold Up
- Ordering and Planning Details That Prevent Headaches
The Materials, Ranked for Bathroom Duty
Porcelain is the default, and for good reason. Fired denser than ceramic, porcelain absorbs less than 0.5 percent of its weight in water — effectively waterproof as a material. It handles floors, walls, showers, and steam rooms, and modern inkjet glazing means it convincingly imitates marble, concrete, terrazzo, and wood. Material cost: $3–$15 per square foot. If you want one answer for the whole bathroom, this is it.
Ceramic is the wall specialist. Softer and more absorbent (up to 3 percent or more), ceramic is cheaper ($2–$8 per square foot), lighter, and far easier to cut — which is why wall tile is so often ceramic. I use it happily on walls and backsplashes and in light-duty powder-room floors, but on a main bathroom floor porcelain’s hardness wins.
Natural stone is beautiful with a maintenance contract attached. Marble, travertine, limestone, and slate run $8–$40 per square foot and bring depth no print matches. But stone is porous: it needs penetrating sealer at install and every 1–2 years after, and marble etches from acidic cleaners forever. Choose it because you love it and will maintain it — never because you assume it’s “upgrade by default.”
Glass belongs in accents. Gorgeous light play on shower walls and niche interiors, but glossy glass on floors is a slip hazard and it scratches. Keep it vertical.
Match the Tile to the Surface
| Location | What I Spec | Key Requirement |
|---|---|---|
| Bathroom floor | Matte porcelain, 12×24 or smaller | DCOF ≥ 0.42 wet |
| Shower floor | 2×2 mosaic porcelain | DCOF 0.50+, small format for slope |
| Shower walls | Porcelain or ceramic, any size | Waterproofing behind, not the tile, does the sealing |
| Tub surround | Ceramic or porcelain | Caulked (not grouted) at tub joint |
| Wainscot/walls | Ceramic, zellige, glass | Style-driven; almost anything works |
The most important idea in that table: on floors, slip resistance is non-negotiable. Look for the wet DCOF rating on the spec sheet — 0.42 is the minimum for bathroom floors, and I want 0.50+ in showers. Polished tile of any material stays off bathroom floors in my jobs, period. Matte, honed, and textured finishes only.
Formats and Sizes: What Works Where
The trend is bigger everywhere, and I like it — fewer grout lines mean less maintenance and a calmer room. Current sweet spots:
- Main floor: 12×24 rectified porcelain is the modern standard. 24×24 and 24×48 work in bigger bathrooms with flat slabs. Small bathrooms actually benefit from larger tile — fewer lines make the room read bigger, not smaller.
- Shower floor: 1×1 to 2×2 mosaics, always, unless you’re building a curbless single-slope pan with a linear drain.
- Shower walls: 12×24 set vertically is the contemporary default; classic 3×6 or 4×12 subway remains timeless; full-height 24×48 panels make small showers feel architectural.
- Accents: kit-kat sticks, hex mosaics, penny rounds in the niche, one wall, or a floor “rug” inlay — one accent per room is my rule. Two is a negotiation. Three is a ransom note.
One technical note on big tile: 50 percent brick-pattern offsets are forbidden by most manufacturers on tiles 15″ and longer because of natural crowning — use a one-third offset or stack bond, and demand a flat substrate (1/8″ in 10 feet).
Grout, Trim, and the Details That Age Well
Grout decides how the bathroom looks at year five. My rules: joints 1/8″ or tighter with rectified tile; mid-tone grout colors (greige, gray, warm sand) that hide soap film and hard-water minerals — bright white grout on a floor is a cleaning subscription you never cancel; and upgraded grout chemistry — urethane or epoxy-based grouts cost $30–$60 more per bathroom and essentially never need sealing, versus cement grout that wants resealing yearly in wet zones.
Trim matters just as much: every exposed tile edge gets a metal profile (about $15–$30 per 8-foot stick) or a manufactured bullnose. Every change of plane — tub-to-tile, floor-to-wall, corners — gets color-matched silicone, never grout. Grouted corners crack; it’s not if, it’s when.
Waterproofing: The Part You Can’t See but Can’t Skip
Repeat after the contractor: tile is not waterproofing. Tile and grout are the decorative wear layer; the waterproofing is the membrane behind them. Showers need a bonded waterproof membrane — liquid-applied or sheet-type — over an appropriate backer, plus a properly sloped pan. Bathroom floors outside the shower benefit from an uncoupling/waterproofing membrane, especially over wood subfloors. If you’re hiring, ask the bidder one question: “What’s your waterproofing system?” A pro answers instantly with a named system and method. A shrug means keep interviewing. The prettiest tile in America is worthless over a failed pan, and pan failures are five-figure repairs.
What Bath Tile Projects Cost in 2026
Material is the small number; labor and prep are the big ones. Realistic all-in ranges I see across US markets:
- Bathroom floor (40–60 sq ft), tiled: $600–$1,800 DIY-material-plus-pro-labor depending on tile and prep
- Tub surround re-tile: $1,500–$4,000 including proper backer and waterproofing
- Full shower rebuild (pan + walls): $3,500–$9,000
- Complete bathroom tile package: $4,000–$12,000+ depending on size and material tier
Labor runs $8–$25 per square foot for straightforward work, more for mosaics, stone, and pattern work. If the budget is tight, here’s the value play: spend on waterproofing and labor, save on tile. A $4 porcelain installed flawlessly over a bulletproof membrane beats a $25 designer tile over a shortcut every single time — and only one of them calls you back in three years.
Style Directions That Hold Up
Trends I’m installing now that I’d also defend in ten years: warm neutrals and cream porcelain replacing stark gray; stone-look porcelain (travertine and tumbled-marble looks especially); fluted and lightly textured wall tile; checkerboard floors in honed finishes for classic bathrooms; and color-drenched small bathrooms — a single saturated green or clay tone wrapping wainscot and floor. What I’d avoid committing a whole bathroom to: aggressive patterned “statement” cement-look tile on the main floor (it dates fast and dominates resale photos) and gloss-black anything on horizontal surfaces (shows every drop and dust mote).
Ordering and Planning Details That Prevent Headaches
A few logistics from the trade that save real money and grief. Order 10 percent overage for straight layouts, 15 for diagonals and patterns, and keep two or three spare tiles boxed in the garage forever — a cracked tile five years from now is a five-minute fix if you have the dye lot and an impossible match if you don’t. Confirm all boxes share the same dye lot and caliber number at pickup, not at install. If your bathroom has in-floor heat in the plan (and if you live anywhere with winter, $10–$20 per square foot for an electric mat under the tile is the most-thanked upgrade I install), the mat goes in with the tile — it cannot be retrofitted without demolition, so decide before, not after. And schedule realistically: a full bathroom tile package is a one-to-two-week job done properly, because waterproofing needs flood testing, thinset needs cure time before grout, and grout needs cure time before silicone. Any bidder promising a complete tiled shower in two days is skipping one of those waits, and the wait they skip is always the one that costs you later.
If you remember five things from a tile setter, make them these: porcelain by default, matte underfoot with a real DCOF number, small tile on the shower floor, silicone at every corner, and waterproofing before beauty. Get those right and the style layer on top — zellige or subway, warm cream or deep green — is pure preference, because the bathroom underneath it is built to shrug off water for as long as you own the house.
Prefer to explore on your own?
See how new flooring looks in your actual room in seconds — free, no signup.
Try the free Floor Studio →