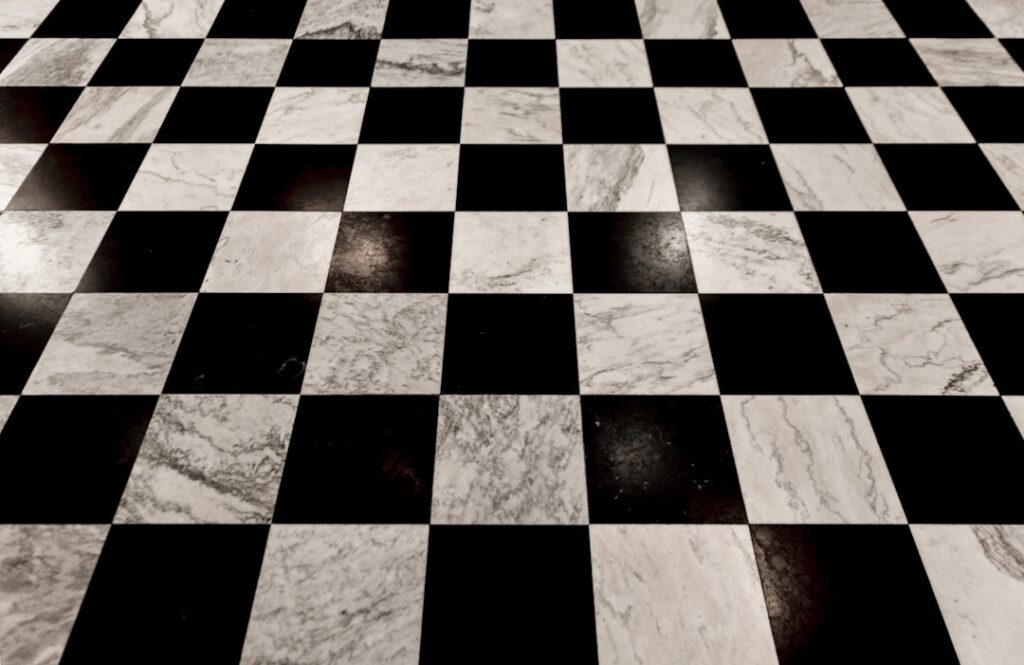
Few flooring patterns carry as much timeless punch as black and white checkerboard tile. From grand entry halls and French bistros to cheerful kitchens and vintage bathrooms, this bold two-tone grid has been a design staple for centuries and shows no sign of fading. It is graphic, high-contrast, and instantly characterful, capable of feeling classic, retro, or thoroughly modern depending on how you deploy it. This guide explores the layouts, sizes, materials, and costs that will help you bring this iconic pattern home with confidence.
Part of our Tile & Grout guide — explore the full guide →
- Why the Checkerboard Endures
- Layout Options That Change the Look
- Choosing Tile Size
- Materials for a Checkerboard Floor
- How Much Does Black and White Checkerboard Tile Cost
- Design Pairings and Wall Colors
- Installation Tips for a Crisp Grid
- Matte vs Polished Finish
- Styling Around a Checkerboard Floor
- Where the Checkerboard Look Works Best
- Maintaining a Checkerboard Floor
- Final Thoughts
Why the Checkerboard Endures
The appeal of black and white checkerboard tile lies in its perfect balance of order and drama. The alternating squares create strong visual rhythm that energizes a room, while the strict two-color palette keeps it from feeling chaotic. It reads as sophisticated in a formal foyer, playful in a kitchen, and nostalgic in a diner-inspired space. Because it is so recognizable, it anchors a room’s design and pairs easily with almost any wall color or cabinetry. It is a pattern with genuine staying power, having appeared in homes across many decades and styles.
Layout Options That Change the Look
How you orient and scale the grid dramatically affects the feel:
- Straight (square) layout: Tiles run parallel to the walls for a crisp, formal, traditional grid.
- Diagonal (diamond) layout: Turning the grid 45 degrees makes a room feel larger and adds dynamic movement, a classic entry-hall look.
- Bordered: Framing the checkerboard field with a solid black or white border defines the space and adds a tailored finish.
- Scaled variation: Large squares feel bold and modern; small squares read vintage and intricate.
The diagonal layout is especially popular in entryways because it draws the eye forward and disguises rooms that are not perfectly square.
Choosing Tile Size
Scale matters enormously with this pattern. Common square sizes include:
- Small (4×4 to 6×6): A busy, detailed, vintage feel suited to small bathrooms and period homes.
- Medium (8×8 to 12×12): The versatile middle ground that works in most kitchens and halls.
- Large (16×16 to 24×24): A bold, contemporary statement with fewer grout lines for a cleaner look.
Match the tile size to the room: oversized squares can overwhelm a small powder room, while tiny squares can look fussy in a large open kitchen. When in doubt, mock up the scale on the floor with tape before ordering.
Materials for a Checkerboard Floor
The pattern can be built from several materials. Porcelain is the most practical for floors, offering durability, water resistance, and low maintenance in convincing matte or polished finishes. Ceramic is a budget-friendly alternative for lighter-traffic rooms. Natural stone such as marble delivers an authentic, luxurious checkerboard, the look of grand historic interiors, but the black and white stones need sealing and gentler care. Vinyl and luxury vinyl tile offer an affordable, softer, water-resistant version for kitchens and laundries. For most homeowners, porcelain hits the best balance of looks, durability, and value.
How Much Does Black and White Checkerboard Tile Cost
Because you are buying two colors and often more cuts, budget realistically:
- Ceramic: $3 to $8 per square foot.
- Porcelain: $4 to $12 per square foot.
- Marble: $10 to $30 per square foot.
- Luxury vinyl tile: $3 to $9 per square foot.
Installation adds $8 to $16 per square foot for a straight layout and more for a diagonal or bordered design, which requires extra cutting and precision. A 100-square-foot kitchen floor might total $1,500 to $4,000 installed with mid-range porcelain. Order 15 percent extra, especially for diagonal layouts that generate many perimeter cuts.
Design Pairings and Wall Colors
The high-contrast floor is a strong statement, so surrounding choices should support it. It pairs beautifully with white or soft-colored cabinetry, bold accent walls in navy or forest green, warm wood tones, and brass or chrome fixtures. Because the floor is already busy, keep counters and backsplashes relatively simple. In a bathroom, a checkerboard floor with white subway walls and a black vanity delivers a crisp, classic bistro look that feels curated rather than cluttered.
Installation Tips for a Crisp Grid
- Find the room’s center and dry-lay the pattern to balance cuts on opposite walls.
- Use a laser or chalk lines to keep the grid perfectly straight; any drift is glaringly obvious in a checkerboard.
- Choose a gray grout as a neutral middle ground, or match grout to each square’s color for a more seamless field.
- Keep grout lines tight and uniform, since inconsistency ruins the crisp geometry.
- Seal marble squares before and after grouting to prevent staining and grout haze.
Matte vs Polished Finish
The finish you choose changes both the look and the practicality of a checkerboard floor. A polished or glossy surface reflects light, deepens the black, and creates a dramatic, formal effect suited to entryways and grand halls, but it shows scuffs and becomes slippery when wet. A matte finish reads softer and more contemporary, hides everyday marks better, and provides more grip underfoot, making it the safer choice for kitchens and bathrooms where spills happen. Some homeowners split the difference with a satin finish. Whatever you choose, apply the same finish to both colors so the checkerboard reads as one cohesive surface rather than a patchwork.
Styling Around a Checkerboard Floor
Because the floor is such a strong statement, the rest of the room should support rather than compete with it. In a kitchen, pair the pattern with simple shaker cabinets in white, soft green, or navy, and keep counters and backsplashes relatively plain. In a bathroom, white subway walls and a single bold vanity color let the floor lead. Warm wood tones and brass or chrome fixtures soften the graphic contrast, while a bold accent wall can echo one of the two tile colors. The goal is to let the checkerboard be the hero while everything around it stays calm and coordinated.
Where the Checkerboard Look Works Best
This pattern is most at home in entryways, kitchens, bathrooms, mudrooms, and laundry rooms, spaces where a hardworking floor benefits from a memorable design. It suits both period homes, where it nods to historic tradition, and modern spaces, where oversized squares feel fresh and bold. It is less ideal for very small, awkwardly shaped rooms where the grid cannot be balanced, or for open-plan areas where the busy pattern might overwhelm adjoining spaces. When the room can carry it, few floors deliver as much timeless personality for the investment.
Maintaining a Checkerboard Floor
Keeping a two-tone floor looking sharp is mostly about the grout and the white tiles, which show dirt most readily. Sweep or vacuum regularly to keep grit from scratching the surface, and mop with a pH-neutral cleaner suited to your tile material. On the white squares, prompt attention to spills prevents staining, while the black squares hide everyday grime well. The grout lines are the real maintenance point, so seal cement grout after installation and clean it periodically with a soft brush; choosing a mid-gray grout instead of bright white keeps the floor looking cleaner between deep cleans. For marble checkerboards, use only stone-safe cleaners and avoid acids that etch the surface. With this simple routine, the crisp contrast that makes a checkerboard so striking stays vivid for many years, and the classic pattern continues to anchor your room with timeless character.
Final Thoughts
A black and white checkerboard tile floor is one of the most enduring, high-impact choices in interior design, capable of feeling formal, retro, or modern depending on scale, layout, and material. Choose the tile size to suit your room, pick porcelain for everyday durability or marble for genuine luxury, and orient the grid straight or diagonal to set the mood. With careful layout, tight grout lines, and complementary surroundings, this iconic pattern delivers timeless character that will still look intentional and stylish decades from now.
Prefer to explore on your own?
See how new flooring looks in your actual room in seconds — free, no signup.
Try the free Floor Studio →