The fastest way to make exterior shutters look fake is to hang them too narrow for the window, and it is a mistake you see on nearly every street. Board and batten shutters are especially unforgiving because their rustic, hand-built look draws attention to proportion. Built from vertical boards tied together by horizontal battens, they date back to colonial barns and cottages where they actually closed against storms. Today they are a favorite on farmhouse, cottage, and craftsman homes. This guide covers materials, sizing, hardware, costs, and how to build and hang a set yourself.
- What Makes Board and Batten Shutters Different
- Materials: Wood, Composite, and Vinyl
- Sizing Board and Batten Shutters Correctly
- Hardware That Completes the Look
- How to Build Your Own Board and Batten Shutters
- Installing Shutters on Different Siding Types
- Mistakes That Make Shutters Look Wrong
- Colors, Maintenance, and Lifespan
- Frequently Asked Questions
What Makes Board and Batten Shutters Different
Most shutters fall into three families: louvered, raised panel, and board and batten. Louvered shutters have angled slats, and raised panel shutters have framed, beveled panels. Board and batten shutters are the simplest of the three, made from two to four vertical boards held together by two or three horizontal cross pieces called battens. Some designs add a diagonal brace forming a Z pattern, which historically prevented sagging on working shutters.
That simplicity is part of the appeal. The style pairs well with lap siding, stone, brick, and vertical board-and-batten siding, and it reads as honest and practical rather than ornamental. Variations include closed boards with tight joints, spaced boards with 1/4-inch gaps, and cutout designs featuring shapes like hearts, stars, or crescent moons near the top.
Materials: Wood, Composite, and Vinyl
Your material choice determines lifespan, maintenance, and cost more than any other decision.
Cedar and other softwoods
Western red cedar is the traditional choice. It resists rot, takes stain beautifully, and weighs little. Expect $150 to $400 per pair for pre-made cedar shutters on a standard window. Pine is cheaper but needs diligent painting and should be primed on all six sides.
Composite and PVC
Cellular PVC and engineered composites cost $200 to $500 per pair but will not rot, split, or attract insects. They hold paint well and are the best choice for humid Southern climates or coastal homes exposed to salt air.
Molded vinyl
Vinyl board and batten shutters cost $40 to $120 per pair and never need paint. The downside is a flatter, molded look with fake wood grain, and dark colors can fade or warp in strong sun. They are purely decorative and cannot be hinged.
If you want functional shutters that actually close, stick with wood or high-density composite and hang them on real hinges.
Sizing Board and Batten Shutters Correctly
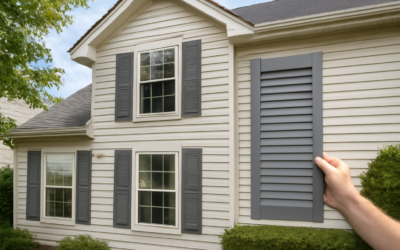
Proper sizing is what separates convincing shutters from stuck-on decorations. Each shutter should be half the width of the window opening, so that the pair would cover the window completely if closed. Height should match the window opening from the top of the casing to the sill.
- Measure the window opening width inside the trim, then divide by two for each shutter width.
- Measure height from the underside of the head trim to the top of the sill.
- For windows with a lot of trim, align shutters to the inside edge of the casing, not the outside.
- Standard widths run from 12 to 18 inches; custom sizes cost about 15 to 30 percent more.
Some homes do not have enough wall space between closely spaced windows for full-width shutters. In that case, consider shutters only on the outer sides of a window group, or choose a different treatment such as trim or window boxes. Squeezing narrow shutters between windows breaks the illusion and looks cluttered.
Hardware That Completes the Look
Authentic hardware adds a lot of character for a small cost. Most decorative installs use exterior screws, but hinges and tiebacks make even fixed shutters look functional.
- Strap hinges with a pintle mounted to the casing let shutters swing, typically $40 to $90 per pair.
- Shutter dogs, also called tiebacks, hold open shutters against the wall. S-shaped and rattail designs run $15 to $40 per pair.
- Slide bolts secure closed shutters from inside on functional installs.
Choose powder-coated steel, cast iron, or stainless steel. Plain steel stains siding with rust streaks within a season or two. Black is the classic finish, and it works on nearly every shutter color.
How to Build Your Own Board and Batten Shutters
A pair of DIY shutters costs roughly $40 to $100 in lumber and fasteners and takes an afternoon plus drying time. Use 1×6 or 1×4 cedar or PVC boards for the face and 1×4 for battens.
- Cut the boards. Rip or combine boards so that their total width equals your target shutter width. Three 1×6 boards (actual width 5 1/2 inches each) make a 16 1/2-inch shutter.
- Lay them face down. Arrange boards on a flat workbench with the best faces down, using 1/8-inch spacers if you want visible gaps.
- Position the battens. Place the top and bottom battens about 4 to 6 inches from each end. Add a middle batten for shutters over 48 inches tall.
- Fasten them. Glue with exterior-grade adhesive and drive 1 1/4-inch stainless screws through each batten into every board, keeping screws from breaking through the face.
- Add a Z brace if desired. Cut a diagonal piece to fit between battens, angled from the lower hinge side up toward the opposite top corner.
- Finish all surfaces. Prime and paint or stain every face and edge, including the back and end grain, before hanging.
Using a pocket-hole jig is an alternative on the back, but screws through battens are stronger and more traditional.
Installing Shutters on Different Siding Types
Mounting method depends on your exterior wall. On wood or fiber cement siding, drive 3-inch stainless or coated deck screws through the battens into the wall sheathing, pre-drilling to avoid splitting. Mount through the battens so screw heads are hidden in plain view as part of the design.
Vinyl siding needs a little more care because it expands and contracts. Use mounting blocks or spacers so shutters do not pinch the siding, and drill clearance holes in the vinyl larger than the screw shank. On brick or stone, use masonry anchors or tapcon screws set into mortar joints, which are easier to patch later than the brick face.
Hold shutters 1/4 inch off the wall with spacers to allow drainage and airflow. Moisture trapped behind a tight-mounted shutter is the main cause of rot and peeling paint on both the shutter and the siding.
Mistakes That Make Shutters Look Wrong
Beyond width, a few common errors undermine board and batten shutters. Hanging them upside down is surprisingly frequent with Z-braced designs; on a working shutter, the diagonal brace should rise from the bottom hinge side toward the top latch side, so the brace carries weight in compression instead of letting the boards sag. Mounting shutters flush against the trim with no hinge or dog also gives them away as purely decorative.
Another misstep is mixing styles across the facade. If the front of the house uses board and batten, carry the same style to side elevations visible from the street rather than switching to louvered units. Skipping shutters on some windows is fine, but mismatched types look accidental. Lastly, avoid placing shutters on windows where they could never physically close, such as against a porch column or a bay window’s angled wall. People notice, even if they cannot say exactly why the shutters look off.
Check with your homeowners association before ordering, too. Many HOAs specify approved colors, materials, and even shutter styles, and replacing a noncompliant set is an expensive lesson.
Colors, Maintenance, and Lifespan
Color should contrast with your siding while relating to the front door or trim. Classic combinations include black shutters on white siding, sage green on cream, navy on gray, and natural stained cedar on white or charcoal. Semi-transparent stains highlight cedar grain, while solid exterior paint in satin sheen offers the longest protection.
Inspect shutters every spring. Look for peeling paint at the bottom edges, loose screws, and gaps between boards. Painted wood shutters typically need a fresh coat every 5 to 7 years, and stained cedar every 3 to 5 years depending on sun exposure. Composite and vinyl require only a wash with mild soap and a soft brush. Well-built cedar or PVC board and batten shutters commonly last 20 years or more.
A modest upgrade for most homes, board and batten shutters add depth, texture, and a handcrafted feel to plain facades. Size them correctly, choose materials for your climate, and use quality hardware, and they will look like they have always belonged there.
Frequently Asked Questions
How wide should board and batten shutters be?
Each shutter should be half the width of the window opening so the pair would fully cover the glass if closed.
Can board and batten shutters go on vinyl siding?
Yes. Use spacers and oversized clearance holes so the siding can still move with temperature changes.
What wood is best for DIY shutters?
Cedar is the best natural choice for rot resistance and light weight. Cellular PVC is ideal if you want zero rot and easy painting.