Clothes dryer vent repair is one of those jobs people ignore until the clothes take two cycles to dry — or until the fire department shows up. A dryer moves hot, damp, lint-heavy air out of your house, and when that path clogs, kinks, or disconnects, everything gets worse and more dangerous. This guide covers clothes dryer vent repair from the wall cap to the transition hose, what you can do yourself, and where the real fire risk hides.
- Why This Matters: The Fire Hazard
- Warning Signs You Need a Repair
- Know Your Vent Anatomy
- Ditch the Wrong Duct Material
- DIY Vent Cleaning and Repair Steps
- Fixing a Crushed or Disconnected Duct
- Electric vs. Gas Dryers and the Vent
- How Duct Length and Elbows Kill Airflow
- When to Call a Professional
- Booster Fans and Long-Run Fixes
- Keep It From Happening Again
- Dryer Vent Replacement: Swapping Out the Whole Run
Why This Matters: The Fire Hazard
Start here, because it is the whole reason to care. Lint is essentially dry tinder, and a restricted vent traps it against a heat source. The US Fire Administration ties thousands of house fires every year to clothes dryers, and failure to clean them is the leading cause. A clogged vent also forces the dryer to run hotter and longer, which cooks thermal fuses, spikes your electric bill, and pumps humid air and — on a gas dryer — combustion byproducts back into your laundry room. Treat vent repair as a safety job, not a convenience one.
Warning Signs You Need a Repair
- Clothes are still damp or hot after a full cycle.
- The dryer top or laundry room feels unusually hot and humid.
- A burning or musty smell during a cycle.
- The outside vent flap barely moves, or no air blows from it while running.
- Lint collecting around the outdoor vent cap or behind the dryer.
- More than a year since the last full cleaning.
Any one of these means it is time to inspect the run end to end.
Know Your Vent Anatomy
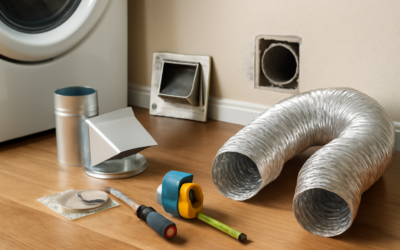
A dryer vent has three parts. The transition hose is the short flexible section from the dryer to the wall. The main duct is the rigid pipe running through wall or ceiling to the exterior. The wall cap or roof cap is the flapped outlet outside. Standard residential ducting is 4 inches in diameter, and that size is not optional — narrowing it chokes airflow and traps lint.
Ditch the Wrong Duct Material
Half the vent repairs I do start by ripping out the wrong hose. If you see white vinyl or thin plastic flex duct, replace it immediately — it sags, traps lint in its ribs, and can melt or ignite. The old foil “slinky” flex is only marginally better.
- Best: rigid galvanized or aluminum 4-inch duct for the concealed run. Smooth walls, minimal lint catch.
- Acceptable transition hose: semi-rigid aluminum, UL-listed for dryers, kept as short and straight as possible.
- Never: vinyl, plastic, or thin foil flex, and never a screwed joint inside the duct — interior screws snag lint. Seal joints with foil tape or clamps instead.
DIY Vent Cleaning and Repair Steps
Most vent problems are fixed in an afternoon with basic tools. Unplug an electric dryer, or shut off the gas and unplug a gas dryer, before you pull it from the wall.
- Pull the dryer out and disconnect the transition hose from both the dryer and the wall duct.
- Inspect the hose. Crushed, torn, or vinyl? Replace it with semi-rigid aluminum, sized to the 4-inch collar.
- Run a dryer-vent brush kit — the flexible rod-and-brush sets that thread through the full duct — from inside toward the exterior, spinning it with a drill on low. Vacuum the loosened lint.
- Go outside and clean the wall or roof cap. Clear the flap so it swings freely and pull any bird nest or lint mat blocking it.
- Reconnect with a proper clamp or foil tape, avoiding kinks. Keep the dryer far enough from the wall that the hose bends in a gentle curve, not a hard crush.
- Run the dryer on a heat cycle and confirm strong airflow at the outside cap.
A brush kit costs $15 to $40, a semi-rigid transition hose $10 to $25, and a new wall cap $10 to $30 — so a full DIY refresh often runs under $75.
Fixing a Crushed or Disconnected Duct
Two classic failures cause a dryer that will not dry. First, the hose crushes flat when the dryer is shoved tight to the wall — pull the machine out a few inches and swap to semi-rigid so it holds its shape. Second, the transition hose pops off the wall collar and dumps hot, wet, lint-laden air straight into the wall cavity or crawlspace. That is a mold and fire risk; reconnect it firmly and clamp it. If the concealed rigid duct itself is dented or separated inside a wall, that is where DIY often ends.
Electric vs. Gas Dryers and the Vent
The vent duct is identical whether your dryer is electric or gas, but the stakes differ. An electric dryer pushes hot, moist, lint-laden air out the duct, so a clog there wastes energy and feeds a fire risk. A gas dryer does all of that and vents combustion byproducts, including carbon monoxide, through the same duct. That makes a clear, correctly connected vent even more critical on a gas machine — a disconnected duct dumping into a crawlspace can let CO seep back toward living space. Either way, never vent a dryer into an attic, crawlspace, or garage; the exhaust must reach the outdoors.
How Duct Length and Elbows Kill Airflow
Most manufacturers cap the total duct run at about 25 to 35 feet, and every turn eats into that budget. A single 90-degree elbow adds roughly 5 feet of equivalent resistance, and a gentler 45-degree bend adds about 2.5 feet. So a run with the pipe, three sharp elbows, and a wall cap can hit the limit even if the straight distance is short. If your dryer struggles despite a clean duct, count the elbows — replacing two hard 90s with sweeping bends, or shortening the run, often restores airflow without any other repair. Keep the transition hose behind the dryer under about 8 feet and as straight as the space allows.
When to Call a Professional
Some clothes dryer vent repair jobs are beyond a brush and a screwdriver:
- Long or complex runs: ducts over about 25 feet, or with multiple elbows, need professional equipment to clean fully. Every 90-degree elbow effectively adds several feet of resistance.
- Roof terminations: vents that exit through the roof are a fall hazard and pack lint at the cap — leave those to a pro.
- Damage inside walls: a crushed or disconnected duct buried in finished wall or ceiling means opening drywall.
- Rerouting: moving a vent to shorten the run or meet code is a job for a licensed contractor.
Professional vent cleaning typically runs $100 to $200; a full reroute or wall repair can reach $500 or more. A good tech brings a rotary brush on a powered auger and, ideally, a camera to confirm the run is clear end to end. Ask them to show you the lint they pull and to check the outdoor cap — a thorough job includes both ends, not just a vacuum at the dryer.
Booster Fans and Long-Run Fixes
Some homes, especially condos and townhouses, have dryers stranded in a center closet with a 40-foot duct to the nearest exterior wall. That exceeds the safe limit and no amount of cleaning fully fixes it. In those cases a licensed installer can add an inline dryer duct booster fan — a lint-resistant blower wired to run whenever the dryer does — to keep air moving through the long run. It is not a substitute for cleaning, but it makes an otherwise marginal layout work safely. If you are staring at a run you cannot shorten, price a booster before you resign yourself to two-cycle drying.
Keep It From Happening Again
Clean the lint screen every single load — a screen caked with fabric softener film alone can cut airflow badly, so wash it with a brush every few months. Have the full duct cleaned at least once a year, more often for a big household or a long run. Keep the run as short and straight as the layout allows, use only rigid or semi-rigid metal, and check the outside flap each season to be sure it opens freely and no critter has moved in. A vent that breathes well dries clothes faster, cuts energy use, and — most important — keeps lint from turning your laundry room into a fire.
Dryer Vent Replacement: Swapping Out the Whole Run
Cleaning and a new transition hose fix most airflow problems, but some vents are past saving. Dryer vent replacement means pulling the old duct, sometimes the wall cap too, and installing a fresh metal run from the dryer to the outdoors. It is the right call when the existing duct is the wrong material, has been crushed or rusted through, or was routed so poorly that it never moved enough air in the first place.
When Replacement Beats Repair
Replace the run if you find any plastic or foil duct hidden in a wall, ceiling or crawlspace, since those materials should never be concealed. Replace it if joints were fastened with screws that poke into the airstream, if sections are dented flat, or if a duct in an attic or crawlspace has corroded from years of condensation. A wall cap with a cracked housing, a missing flap or a screen over the opening also needs to go, because screens catch lint and choke the outlet. Finally, if a professional camera inspection shows lint packed into sags along a long horizontal run, a straighter replacement path often solves the problem for good.
Planning the New Route
Before buying parts, map the shortest practical path to an exterior wall. Fewer turns mean better airflow and less lint buildup, so use gentle 45-degree bends where you can and keep 90-degree elbows to a minimum. Check the dryer manual for its maximum allowed length and subtract for every fitting. Keep the full run at the 4-inch diameter of the dryer outlet, and plan a slight downward pitch toward the outside on horizontal sections so any condensation drains out rather than pooling inside the duct.
Installing the Replacement Duct
Use rigid or semi-rigid metal for every section, with rigid metal for anything concealed. Assemble joints so the male end of each piece points in the direction of airflow, toward the exterior, which keeps lint from catching on the seams. Seal joints with foil tape rated for ductwork or with metal clamps, never cloth duct tape, which dries out and peels. Support long runs with metal straps every few feet so they cannot sag. Where the duct passes through an unheated attic or crawlspace, wrap it with insulation to reduce condensation, which mixes with lint into a damp paste. At the wall, install a cap with a gravity flap or damper that opens freely and closes tight to keep out pests and drafts, then seal around its flange with exterior caulk.
Safety and When to Hire the Job Out
Lint is highly flammable, so the replacement run should be as smooth and clean inside as possible, and the area behind the dryer should stay clear of stored items. Unplug an electric dryer before moving it. With a gas dryer, the gas connection is a job for a licensed professional: do not disconnect or reconnect the gas line yourself, and if you ever smell gas, leave the house and call the utility. Roof terminations, runs through finished walls and new openings in masonry are also good reasons to bring in a qualified installer, who can pull any required permit and confirm the vent meets local code. Afterward, run a heated cycle and confirm strong airflow at the cap.