A dryer vent brush is the single cheapest tool that can prevent a house fire — and clogged dryer vents cause thousands of home fires every year. Lint escapes past the lint screen and packs into the vent duct, choking airflow until your dryer overheats or, worse, ignites. A $15–$40 brush kit lets you clear that duct yourself in under an hour. This guide covers the brush types, how to use one properly, and how often the job needs doing.
The warning signs that your vent needs cleaning are worth memorizing: clothes take two cycles to dry, the dryer and laundry room get unusually hot, the outside vent flap barely opens, you smell a burning or musty odor, or the dryer shuts off mid-cycle from overheating. Any of these means lint has built up, and a dryer vent brush is the fix.
Types of Dryer Vent Brushes
Not all brushes are the same, and picking the right one for your vent’s length and shape matters.
- Flexible rod kits — the standard. A round brush head attaches to interlocking flexible fiberglass or nylon rods that screw together to reach 10, 20, even 40 feet. They bend around the gentle curves in most vent runs. This is what most homeowners need.
- Drill-attachment kits — the same flexible rods, but designed to spin with a cordless drill. The rotating brush aggressively scrubs the duct walls and pushes the flexible rod deeper around bends. Best for long or stubborn runs.
- Stiff-handle brushes — a shorter brush on a rigid or semi-rigid handle, good for cleaning the lint trap housing and the first few feet of duct behind the dryer.
- Lint trap brushes — a long, skinny brush specifically for the narrow lint screen slot, where lint that bypasses the screen collects.
For a complete job, many kits combine a flexible rod set with a lint-trap brush.
Sizing the Brush to Your Vent
Two dimensions matter. First, length: measure (or estimate) the run from your dryer to the exterior vent, then buy a kit that reaches it with a foot or two to spare. A short run to an exterior wall might be 6–10 feet; a run through an attic or across a basement to the roof can be 20–30 feet or more. Under-buying length means you can’t reach the far end where the worst clogs hide.
Second, brush diameter: standard residential dryer ducts are 4 inches, so a 4-inch brush head is the norm. The brush should fill the duct enough to scrub the walls without being so tight it jams. Most kits are sized for 4-inch duct by default.
How to Clean Your Dryer Vent, Step by Step
Set aside 45–60 minutes. Here’s the process I use:
- Unplug the dryer (and if it’s gas, shut off the gas valve and be careful not to disturb the gas line). Pull it away from the wall.
- Disconnect the vent duct from the back of the dryer by loosening the clamp. Have a vacuum ready — a lot of lint will fall out.
- Vacuum the immediate area — the duct opening on the dryer, the floor, and as far into the wall duct as the vacuum hose reaches.
- Assemble the brush. Attach the brush head to the first rod. Insert it into the duct — you can work from inside (where the dryer connects) or, for many runs, from the exterior vent outside.
- Push and rotate. Feed the brush in, twisting as you go (or run the drill at moderate speed) to scrub the walls. Add rods one at a time as you advance deeper. Always turn the drill and the rods clockwise so the sections don’t unscrew and get stuck in the duct.
- Work the full length until the brush passes through, dislodging lint. Pull it back out slowly, dragging debris with it.
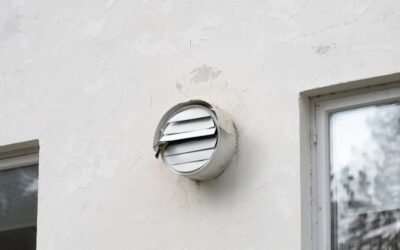
- Clean the exterior vent hood — clear lint from the flap and louvers so it opens freely.
- Vacuum up everything, reconnect the duct securely, plug the dryer back in, and run a short cycle to confirm strong airflow at the outside vent.
Drill vs. Manual: Which to Use
Manual twisting works fine for short, straight runs and is the safer choice if you’re worried about the rods separating. For longer runs, multiple bends, or heavy buildup, a drill-driven brush is far more effective — the spinning action scrubs the walls and helps push the flexible rod around elbows.
The one rule with a drill: keep it turning clockwise only. The rod sections screw together with right-hand threads, so reversing direction unscrews them and can leave a rod stranded in your duct — a genuine headache to retrieve. Run at moderate RPM, not full blast, to avoid whipping the rod and damaging the duct.
How Often to Clean the Vent
The standard recommendation is at least once a year for an average household. Clean more often — every six months — if you do a lot of laundry, have a large family, dry pet bedding, or have a long or winding vent run that traps more lint. Homes with a short, straight vent and light use can sometimes stretch closer to the annual mark.
Don’t wait for the warning signs. By the time clothes are taking two cycles to dry, you’ve already been running an overheating, fire-risk appliance. A once-a-year dryer vent brush session is cheap insurance against both a fire and a burned-out heating element.
Brush Kits and What to Spend
A basic flexible-rod dryer vent brush kit costs $15–$30 and handles most homes. Drill-attachment kits with 20–40 feet of rods and a lint-trap brush run $25–$45. Add a shop vacuum if you don’t own one. That’s a one-time investment of well under $50 that replaces a $100–$200 professional cleaning you’d otherwise pay for annually — the kit pays for itself the first time you use it.
Cleaning the Lint Trap Housing, Not Just the Screen
Everyone empties the lint screen after each load, but almost nobody cleans the slot the screen sits in — and that’s where a surprising amount of lint collects. Fine lint slips past the screen and packs into the housing below it, restricting airflow right at the source and, over time, building into a fire-prone wad deep in the trap. This is exactly what a lint-trap brush is for.
Pull the lint screen out, then feed the long, skinny brush down into the empty slot and work it up and down to drag out the accumulated lint. On many dryers you can reach a foot or more into the housing. Do this every few months, and vacuum out whatever the brush loosens. Combined with cleaning the full vent duct, clearing the lint trap housing restores airflow the screen alone never accounts for — and it’s a two-minute job most people never knew they were skipping.
Signs You Have a Serious Clog
Beyond slow drying, certain symptoms mean the vent is badly blocked and needs a brush immediately, not next month. If the dryer’s exterior or the top of the machine is hot to the touch, if the laundry room feels humid or smells musty after a cycle, or if the exterior vent flap barely lifts while the dryer runs, airflow is severely restricted. A burning smell is the most urgent warning — stop using the dryer and clean the vent before running it again, because that odor can mean lint is scorching against the heating element.
Modern dryers with a thermal cutoff will shut down mid-cycle when they overheat from a clog, leaving clothes damp and the machine refusing to restart until it cools. People often mistake this for a broken dryer and call for service, when a $20 vent brush and 45 minutes would have fixed it. If your dryer keeps shutting off partway through, clean the vent before you assume the appliance has failed — a clogged vent is the number-one cause.
The Bottom Line
A dryer vent brush is one of the highest-value tools in any home — it clears the lint that slows your dryer, spikes your energy bill, and starts fires. Buy a flexible-rod kit long enough to reach your full vent run in 4-inch diameter, disconnect and vacuum first, then brush the whole duct (drill clockwise only) and clean the exterior hood. Do it at least once a year, and you’ll dry clothes faster, cut energy waste, and remove one of the most common fire hazards in the house.