Almost every concrete slab cracks eventually, and most of those cracks are harmless. The real question is whether you are looking at a cosmetic hairline that a tube of filler can handle, or a warning sign of settling, water damage, or structural movement. That distinction drives your concrete crack repair cost more than anything else, from a few dollars for a DIY patch to thousands for professional injection or slab lifting.
In short: DIY crack filler for a driveway or patio usually costs very little in materials. Professional routing and sealing of exterior cracks is a modest service charge per job or per linear foot. Epoxy or polyurethane injection for foundation cracks typically runs several hundred dollars per crack, and slab lifting (mudjacking or polyurethane foam) often runs from several hundred into the thousands, depending on area. Structural repairs involving an engineer cost more still.
Below is a breakdown by method and location, what affects price, how to do a DIY repair properly, and how to tell a cheap crack from an expensive one.
Concrete Crack Repair Cost by Method
Repair method matters more than square footage. Here is how the common approaches compare:
- DIY crack filler or sealant: the lowest cost option. Flexible polyurethane or acrylic caulks and pourable self-leveling sealants for horizontal surfaces cost a few dollars to a couple dozen dollars per tube or bottle. A backer rod for deeper cracks adds little.
- DIY patching compound: for wider cracks and spalled edges, vinyl or polymer-modified patching mixes are also inexpensive per bag.
- Professional routing and sealing: a contractor widens the crack with a grinder, cleans it, and fills it with a flexible sealant. Pricing is often per linear foot, with a minimum service charge.
- Epoxy injection: used for structural bonding of non-moving foundation cracks. It welds the crack back together. Typically priced per crack, often several hundred dollars.
- Polyurethane injection: used for leaking foundation cracks; foam expands to seal water paths. Similar per-crack pricing to epoxy.
- Slab lifting (mudjacking or foam jacking): raises sunken sections of driveways, patios, sidewalks, and garage floors. Priced by area and volume of material; commonly several hundred to a few thousand dollars.
- Section replacement: tearing out and repouring a damaged section is the most expensive route but can be the right call for badly heaved or crumbling slabs.
Keep in mind that the cheapest option up front is not always the lowest concrete crack repair cost over time. A crack sealed with the wrong material may reopen within a season, and repeated patching can add up to more than one proper repair.
Cost by Location
Driveway
Cracked driveway repair cost depends on width and whether sections have sunk. Hairline and narrow cracks are cheap to seal DIY. Pro sealing of multiple cracks is moderate. If panels have settled and created trip edges, slab lifting or partial replacement raises the price significantly.
Patio and Sidewalk
Patios and walkways usually need cosmetic sealing to keep water out. Sunken or tilted sections near the house can direct water toward the foundation; leveling those is worth the cost.
Garage Floor and Interior Slab
Interior slab cracks are often shrinkage cracks and can be filled before coating or flooring. Wide or uneven cracks, or cracks with one side higher than the other, may indicate settlement and deserve inspection.
Foundation Walls
Basement wall cracks are the most expensive category because water and structure are at stake. Leaking cracks often get polyurethane injection; structural cracks get epoxy or reinforcement, sometimes with an engineer’s input.
What Affects the Price
- Crack width and length: wider and longer cracks need more material and labor.
- Movement: active, moving cracks need flexible sealants or structural solutions rather than rigid patching.
- Water intrusion: leaking cracks require waterproof sealing and sometimes drainage fixes.
- Access: finished basements or obstructed walls add labor.
- Cause: cracks caused by soil settlement, tree roots, or poor drainage may return unless the cause is fixed.
- Region: labor rates vary widely across the country.
Seasonal timing also plays a role. Many contractors are busiest in spring and summer, and scheduling non-urgent exterior work in the shoulder seasons can sometimes shorten wait times. Freeze-thaw cycles, however, make open cracks worse, so sealing exterior cracks before winter is worth prioritizing even if you wait on larger projects. Asking for a written quote that separates materials, labor, and any drainage corrections makes it easier to compare bids and understand your total concrete crack repair cost.
Cheap Crack or Warning Sign?
Use these rules of thumb to decide whether a DIY concrete crack filler is enough:
- Usually cosmetic: hairline cracks, shrinkage cracks, cracks narrower than about 1/8 inch with both sides level, cracks along control joints.
- Monitor: cracks around 1/8 to 1/4 inch wide. Mark the ends with a pencil and date; if they grow, get an inspection.
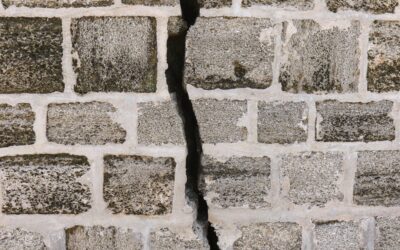
- Warning signs: cracks wider than 1/4 inch, one side higher than the other, stair-step cracks in block walls, horizontal cracks in foundation walls, cracks that let water in, doors and windows sticking, or cracks that keep widening.
Horizontal cracks in basement walls and bowing walls can indicate soil pressure and should be evaluated by a structural engineer or qualified foundation contractor promptly.
Tools and Materials for DIY Repair
- Wire brush and shop vacuum
- Cold chisel and hammer (to undercut edges on wider cracks)
- Foam backer rod for cracks deeper than about 1/4 inch
- Flexible polyurethane concrete sealant or self-leveling sealant for horizontal cracks
- Vinyl or polymer-modified patching compound for wider cracks
- Caulk gun, putty knife, and trowel
- Safety glasses, gloves, and a dust mask
How to Fill a Concrete Crack Yourself
- Check the weather. Most sealants need dry conditions and temperatures above roughly 40°F to 50°F; check the product label.
- Clean the crack. Remove loose concrete, dirt, weeds, and debris with a wire brush and vacuum. Pressure-wash if needed, then let it dry.
- Undercut wider cracks. For cracks over 1/4 inch, chisel the edges so the bottom is wider than the top; this locks patching material in place.
- Insert backer rod. For deep cracks, press backer rod in so the sealant depth is about half the crack width.
- Apply sealant or patch. Fill with flexible sealant for narrow cracks or trowel in patching compound for wide ones. Slightly overfill.
- Tool and smooth. Smooth flush with the surface and texture to match if possible.
- Cure. Keep traffic off per the manufacturer’s cure time, often a day or more for vehicles.
If you grind or chisel concrete, do it with ventilation, wear an N95 or P100 respirator, and use wet methods when possible, since concrete dust contains crystalline silica.
Troubleshooting Failed Repairs
- Filler cracked again: the crack is moving. Use a flexible sealant, or investigate the underlying cause.
- Patch popped out: the crack was not cleaned, undercut, or dry. Remove, clean, and redo.
- Sealant sinking: the crack was deep and lacked backer rod. Add backer rod and reseal.
- Repair is visible: color matching concrete is hard. Consider sealing or resurfacing the whole slab for a uniform look.
- Water still leaking into basement: DIY surface patches rarely stop wall leaks. Professional injection is usually needed.
DIY vs Pro: Which Makes Sense?
DIY is the smart choice for hairline to narrow cracks on driveways, patios, and garage floors where both sides are level. It keeps water and ice out, which prevents small cracks from growing. Hire a pro for foundation cracks that leak, any crack over 1/4 inch, uneven or sunken slabs, and cracks with structural warning signs. A professional repair also usually comes with a warranty, which matters for foundation work.
When to Call a Pro
Call a foundation contractor or structural engineer if you see horizontal or stair-step cracks in foundation walls, bowing walls, sloping floors, sticking doors, or cracks that widen over weeks. For sunken exterior slabs, a concrete leveling contractor can quote mudjacking or foam lifting. Getting at least two or three quotes is wise, since pricing varies widely.
Frequently Asked Questions
How much does it cost to fix a crack in concrete?
DIY sealing is usually inexpensive in materials. Professional sealing is a modest charge, while foundation crack injection typically runs several hundred dollars per crack, and slab lifting can reach into the thousands.
What is the cracked driveway repair cost?
Narrow driveway cracks can be sealed for very little with DIY filler. Sunken or heaved sections require slab lifting or section replacement, which costs considerably more.
Is epoxy or polyurethane injection better?
Epoxy bonds and restores strength in non-moving structural cracks. Polyurethane flexes and seals water, making it better for leaking foundation cracks.
When is a concrete crack serious?
Cracks wider than 1/4 inch, cracks with one side higher, horizontal or stair-step foundation cracks, and cracks that grow or leak water are warning signs.
Can I fill concrete cracks myself?
Yes, for narrow cracks on driveways, patios, and garage floors. Clean the crack, use backer rod if deep, and apply a flexible concrete sealant.