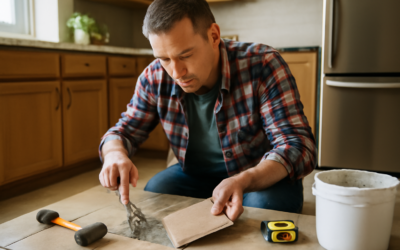
A single cracked tile has a way of drawing the eye every time you walk past it, and replacing the whole floor over one flaw makes no sense. The right tile crack filler lets you repair a hairline split, a chipped corner, or a cracked grout line in an hour, often invisibly, and stop water from creeping under the surface where it does real damage. The trick is matching the product to the type of crack you actually have.
Part of our Tile & Grout guide — explore the full guide →
This guide breaks down the filler options, how to pick and color-match one, and the exact steps to apply each for a repair that lasts.
- First, Diagnose the Crack
- Types of Tile Crack Filler
- Matching the Color
- How to Fill a Cracked Tile Step by Step
- Repairing a Cracked Grout Line
- Pro Tips for an Invisible Repair
- How Long Different Fillers Last
- Preventing Future Cracks
- When to Call a Pro
- How to Fill Tile Cracks in Porcelain, Natural Stone, and Shower Tile
First, Diagnose the Crack
Not every crack is a simple cosmetic fix, and treating a structural problem with a cosmetic filler wastes your time.
- Hairline surface cracks in the glaze are cosmetic and fill easily.
- Chipped corners and edges need a filler with body that can rebuild the missing shape.
- Cracked grout lines call for grout repair or flexible caulk, not tile filler.
- A single cracked tile with no pattern usually means an impact or a void under the tile.
- Multiple aligned cracks across several tiles signal substrate movement or a failing joint, which filler alone will not solve.
If cracks keep reappearing in a straight line, address the underlying movement first. For everything else, the right filler delivers a clean, durable repair.
Types of Tile Crack Filler
Two-Part Epoxy Filler
Epoxy is the strongest and most durable option for cracked and chipped tile. You mix a resin and hardener, apply it to the damage, and it cures rock-hard in a few hours. Epoxy bonds aggressively, resists water, and can be sanded and painted to match. Expect $12 to $25 for a repair kit. This is the go-to for floor tiles and any area that gets wet or takes weight.
Cyanoacrylate (Super Glue) Method
For a tight hairline crack in a tile still bonded firmly to the floor, thin cyanoacrylate glue wicks into the crack and seals it. Some pros dust the crack with matching grout or ceramic powder, then wick glue over it to fill and color at once. Cheap, fast, and effective for fine cracks.
Grout and Grout Repair Compound
Cracked or crumbling grout lines get raked out and refilled with fresh grout, or with a pre-mixed grout repair compound. For joints that flex, such as where a floor meets a wall or a tub, use flexible caulk instead, because rigid grout will re-crack.
Color-Matched Caulk and Sealant
Manufacturers sell caulk color-matched to popular grout shades. It stays flexible, making it ideal for corners, changes of plane, and tub surrounds where movement cracks rigid materials.
Matching the Color
A structurally sound repair still looks bad if the color is off, and color matching is where most DIY fixes fall short. For tile glaze, many epoxy kits include tint bases you blend to match. Test on a scrap or an inconspicuous spot first and let it fully cure, since colors shift as they dry.
For grout, take a small chip to the store to match the shade, or buy a grout pen to recolor an entire joint for a uniform look after a spot repair. Blending new grout to old is genuinely hard because existing grout has aged and stained, so recoloring the whole line often looks better than a patch.
How to Fill a Cracked Tile Step by Step
Clean, dry, and stable are the three conditions every filler needs to bond.
- Clean the crack with a degreaser, then wipe with rubbing alcohol and let it dry fully.
- Widen a very fine crack slightly with a utility knife tip so filler can penetrate rather than bridge the surface.
- Mix your two-part epoxy on a scrap of cardboard following the package ratio exactly.
- Press filler into the crack with a plastic putty knife or a toothpick for fine lines, slightly overfilling.
- Scrape flush with a razor blade held nearly flat before it sets.
- Let it cure fully, usually 4 to 24 hours, then sand smooth with fine-grit paper if needed.
- Tint or paint to match the glaze, and seal grout repairs after curing.
Repairing a Cracked Grout Line
Grout repair follows a different rhythm than tile repair.
- Rake out the cracked or loose grout with a grout saw or an oscillating tool down to a clean, solid base.
- Vacuum the debris so nothing interferes with the bond.
- Mix fresh grout to a peanut-butter consistency, or open a tube of matching flexible caulk.
- Press it into the joint with a grout float or your finger, then strike it smooth.
- Wipe the haze with a damp sponge and seal the new grout after it cures for 48 to 72 hours.
Pro Tips for an Invisible Repair
Work in thin layers rather than one thick glob, since deep fills shrink and crack as they cure. Keep a damp rag handy to clean epoxy off the surrounding glaze immediately, because cured epoxy is a nightmare to remove. On floors, keep foot traffic off the repair for the full cure time listed on the package, not just until it feels dry.
For a repair you want to disappear, finish glossy tiles with a dab of clear nail polish or a gloss sealer over the filled area to match the surrounding sheen. That final step is what separates a patch you can spot from one you cannot.
How Long Different Fillers Last
Setting realistic expectations keeps you from redoing a repair sooner than you should. A properly applied two-part epoxy repair on a cracked floor tile can last the life of the floor, since cured epoxy is harder and more stable than the tile glaze around it. That durability is why it is worth the extra mixing step on any surface that gets wet or takes weight.
Cyanoacrylate hairline repairs hold well for years on tiles that are still firmly bonded but tend to reopen if the tile itself is loose and flexing. Grout repairs last as long as the surrounding grout, provided you sealed them, while flexible caulk in movement joints typically needs replacing every three to five years as it yellows or pulls away. Knowing this, you can choose the filler that matches how permanent you need the fix to be.
Preventing Future Cracks
The best repair is the one you never have to make, and a few habits reduce cracking dramatically.
- Address a hollow-sounding tile early, before the void beneath it lets the tile flex and split.
- Use flexible caulk, never rigid grout, anywhere two planes meet or where a floor abuts a wall or tub.
- Put felt pads under heavy furniture and avoid dragging appliances across tile floors.
- Keep grout sealed so water cannot undermine the bond and cause movement.
- On new installs, insist on a proper uncoupling membrane over wood subfloors to absorb seasonal movement.
Small preventive steps spare you the recurring cycle of filling the same crack every year.
When to Call a Pro
Filler handles cosmetic and minor structural cracks well, but recurring cracks in a line, tiles that sound hollow when tapped, or widespread cracking point to a substrate or installation failure. In those cases the fix is removing the affected tiles and addressing the movement underneath. For the everyday chip, hairline, or tired grout line, though, a good tile crack filler and a careful hour of work restore the surface for a few dollars instead of a full replacement.
How to Fill Tile Cracks in Porcelain, Natural Stone, and Shower Tile
Most crack-repair advice assumes glazed ceramic on a dry floor. Your tile may be dense porcelain, soft natural stone, or a shower wall that gets soaked every day. The basic method in this guide stays the same, but the right product and the finishing details depend on the material. Here is how to fill tile cracks when the tile is not standard ceramic.
| Tile type | What to watch for | Filler approach |
|---|---|---|
| Glazed ceramic | The crack is in the glaze. The softer body underneath may show a different color. | Tinted epoxy or glue-and-powder method, then gloss sealer |
| Porcelain | Color usually runs all the way through, so a close tint match hides the crack well | Two-part epoxy tinted to the body color |
| Marble, travertine, limestone | Acid-sensitive and porous, and some products can stain or etch the surface | Stone-specific epoxy or polyester stone filler. Test in a hidden spot first. |
| Glass tile | Cracks show through the tile and are very hard to hide | Clear epoxy slows further damage, but replacing the tile usually looks better |
Filling Cracks in Shower and Wet-Area Tile
A crack in shower wall tile is more than a cosmetic problem. Water can get behind the tile. Fill it with a waterproof two-part epoxy, not a cosmetic touch-up product, and let it cure for the full time on the package before running the shower. Before you fill, press on the tile and the tiles around it, and tap them gently. If the tile moves, sounds hollow, or the grout nearby has dark staining that comes back after cleaning, water may already be behind it, and mold may be growing on the backer. Filling the crack will not fix that. Remove the tile, check the substrate, and let it dry before resetting.
When You Have to Cut Instead of Fill
If a crack is too wide to fill neatly, the fix is replacing the tile. That usually means cutting a new tile or grinding out the old grout. Cutting tile and grout produces respirable crystalline silica dust, which can damage your lungs. Use a wet saw where you can, keep the work area misted, vacuum with a HEPA shop vacuum instead of sweeping, and wear a properly fitted N95 or better respirator along with eye protection.
For natural stone especially, clean the crack with a pH-neutral cleaner instead of an acidic one, since acids can etch the stone around the repair. If the stone was sealed, reseal the whole tile once the filler has cured so the repaired area absorbs moisture the same way as the tiles around it.
Prefer to explore on your own?
See how new flooring looks in your actual room in seconds — free, no signup.
Try the free Floor Studio →