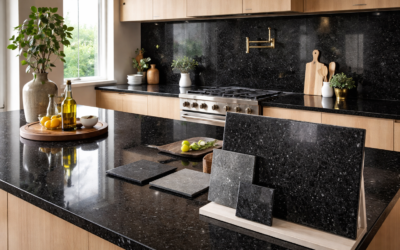
A single porcelain sheet can now cover a whole shower wall or a kitchen island with one or two pieces, and that changes how you plan a project. Daltile porcelain slabs are sold under the Panoramic Porcelain Surfaces name, and the first decision is not color. It is thickness, because 6mm and 12mm sheets are built for different jobs and need different handling.
Part of our Tile & Grout guide — explore the full guide →
In short: the full sheets measure roughly 63 by 126 inches in 6mm and 64 by 127 inches in 12mm, a through-body 2cm option is also offered for countertops, and a set of smaller stocked sizes lets you buy slab looks without cutting a giant sheet. Thin 6mm sheets suit walls, showers and floors. The 12mm sheets work on walls, floors and countertops, indoors or out. Finish (matte or glossy) and thickness vary by design, so every color has to be checked on its own product page.
- Daltile Porcelain Slabs Specs at a Glance
- 6mm vs 12mm vs 2cm: Which Thickness to Choose
- Where Each Slab Works: Countertops, Walls, Showers and Floors
- Tools and Materials for Large Format Slab Installs
- How a Porcelain Slab Job Goes, Step by Step
- Silica Dust and Handling Safety
- Troubleshooting Common Problems
- Cost Ranges for Porcelain Slab Projects
- When to Call a Pro
- Frequently Asked Questions
The sections that follow cover the spec numbers, which thickness fits which room, how installers move and cut these sheets, safety during fabrication, and what to expect on cost.
Daltile Porcelain Slabs Specs at a Glance
These figures come from the maker’s Panoramic product pages, its FlexFit size page and its Panoramic brochure. Treat them as a starting point and confirm the current spec sheet for the exact color you want, since stocked thicknesses and finishes change by design.
| Spec | Value | What it means |
|---|---|---|
| Full slab, 6mm | 126 x 63 in (160 x 320 cm), rectified | Light enough for wall panels and shower surrounds |
| Full slab, 12mm | 127 x 64 in (163 x 324 cm), not rectified | Stiffer sheet for countertops, floors and exterior use |
| Weight | About 2.92 lb/sq ft (6mm), 5.84 lb/sq ft (12mm) | A full 12mm sheet takes three or more people and proper lifting gear |
| 2cm option | Through-body veining | Edges can be profiled without mitering to fake thickness |
| Stocked smaller sizes | 124 x 31, 62 x 62, 62 x 31, 62 x 15.5, 31 x 31, 31 x 15.5, 20.5 x 20.5 in | Slab looks in panel sizes that fit a vehicle and a doorway |
| Finishes | Matte or glossy, varies by design | Matte is common for floors; glossy reads richer on walls and tops |
| Recommended grout joint | 1/8 in on the product pages checked | Very thin joints keep the stone look continuous |
| Sealing | Not required | Porcelain is dense, so routine cleaning is mild detergent and water |
One detail trips people up: the smaller stocked sizes come in 6mm, with 12mm offered only for select colors. If you want a 62 by 62 inch panel on a floor in 12mm, check that the design you like is stocked that way before you finalize a layout.
6mm vs 12mm vs 2cm: Which Thickness to Choose
Thickness decides where a slab can go and how much work it takes to install. Here is how the three options sort out in practice.
6mm slabs
The maker positions the 6mm sheet for walls and floors, and it shines on full-height shower walls, backsplashes, fireplace surrounds and accent walls. At under 3 pounds per square foot it puts far less load on framing than stone, and it can often go over existing tile once that surface is sound, flat and well bonded. The tradeoff is fragility before installation. A thin sheet flexes, so it must be carried on edge with handling frames and never lifted flat by hand.
If a 6mm sheet is used on a countertop, the brochure recommends backing it with a high-density foam backer board before cutting sink holes. Most homeowners who want a countertop are better served by 12mm or 2cm.
12mm slabs
The 12mm sheet is the all-rounder: walls, floors and countertops, indoors and outdoors. Countertop edges are usually mitered so the front reads like a thicker 2cm or 3cm top. Because the color and veining sit on the surface, a mitered edge keeps the pattern wrapping around the corner. Plan for 1/2 inch backer board over 3/4 inch plywood under a 12mm countertop, as the brochure describes.
2cm slabs
The 2cm option has through-body veining, so you can profile an edge without the look breaking at the cut. It is aimed at indoor and outdoor kitchens where you want a conventional countertop installation more like quartz or granite.
Where Each Slab Works: Countertops, Walls, Showers and Floors
Large porcelain is popular because one material can run across several surfaces in the same room. Common uses the manufacturer lists include kitchen and bath countertops, walls and floors in homes and commercial spaces, shower walls and surrounds, fireplaces and doors, exterior cladding and countertops, and pool waterlines.
- Shower walls. Two or three sheets can wrap an alcove with only a few vertical joints. Fewer grout lines mean less scrubbing and fewer places for mildew to start.
- Kitchen countertops and islands. Porcelain resists heat, stains and scratches, and some 12mm and 2cm designs are compatible with an under-counter induction cooking system. Ask the fabricator which colors qualify before you count on it.
- Floors. Matte finishes are the usual choice. On the product page checked, a matte design was marked suitable for dry and wet level interior floors with a wet DCOF target of 0.42 or higher, but not marked for shower floors, ramps or exterior floors. Ratings differ by design, so read the application table for your color.
- Backsplashes. A full-height slab backsplash behind a range is easy to wipe and pairs well with a matching countertop.
- Exterior. The 12mm and 2cm sheets are listed for outdoor use when installed with proper methods, including in freezing climates for designs that carry that note.
Designs are grouped into selections, including Elemental for marble and stone looks and Industrial for concrete-like solids. Some marble looks come in bookmatched pairs, where two neighboring slabs mirror each other. Bookmatching costs more and needs careful layout, but it is the best way to get a dramatic vein pattern on a feature wall.
Tools and Materials for Large Format Slab Installs
Large-format porcelain is not a weekend DIY tile job. Even so, knowing the tool list helps you judge bids and prep the space. A typical install uses:
- Handling frames or slab grips plus a slab cart for moving sheets on edge
- Large format tile suction cups for setting and adjusting pieces
- A rail-guided wet saw or a bridge saw at the fabricator’s shop
- Diamond core bits for plumbing and fixture holes, with water feed
- Large-notch trowels and a polymer-modified mortar rated for large and heavy tile
- A leveling clip system to control lippage at joints
- Backer board and adhesive for countertop builds
- Epoxy or color-matched filler for miters, plus polishing pads for edges
Suction cups deserve a note. Use cups rated for the weight of the piece, check that the seal holds before every lift, and never rely on one cup to carry a full sheet. They are for positioning, not for walking a slab across a room.
How a Porcelain Slab Job Goes, Step by Step
- Measure and template. Walls and tops are measured or digitally templated. Out-of-plumb walls and uneven floors must be flattened first, because large sheets show every hump.
- Choose sizes. Decide whether full sheets or stocked panels fit better. A 62 by 62 inch panel may cover a shower wall with one joint and avoids hauling a 10-foot sheet up the stairs.
- Prep the substrate. Floors and walls need to be flat within tight tolerances. Showers need a waterproofing membrane under the slab.
- Cut and drill. Cuts are made wet. Sink and cooktop openings get rounded inside corners to relieve stress, as the brochure recommends.
- Back-butter and set. Both the wall and the back of the sheet are covered in mortar for full contact, then the piece is pressed in with a beating tool.
- Grout and finish. Joints are kept to about 1/8 inch with grout or color-matched caulk at changes of plane. Countertop miters are glued and polished.
Silica Dust and Handling Safety
Cutting, drilling and grinding porcelain releases fine crystalline silica dust, which can scar the lungs over time. Always cut and drill wet, wear a fitted N95 or, better, a P100 respirator during any dry cleanup or grinding, and clean the work area with a HEPA vacuum rather than sweeping. Keep kids and pets away from the cutting zone. The maker also points fabricators to its safety data sheet and OSHA guidelines.
Weight and breakage are the other hazards. A full 12mm sheet weighs roughly 330 pounds at the listed 5.84 pounds per square foot. Move it on edge with at least three trained people and the right frames or a mechanical lifter. Wear cut-resistant gloves and eye protection, since a cracked slab breaks into sharp edges.
Troubleshooting Common Problems
- Lippage at joints. One sheet sits proud of the next. The usual causes are an uneven substrate or thin mortar coverage. Leveling clips and a flatter wall solve most cases.
- Hollow sound after setting. This points to voids in the mortar. Back-buttering both surfaces and using a large notch trowel prevents it.
- Cracks near cutouts. Sharp inside corners concentrate stress. Openings should have rounded corners and should not be placed too close to a slab edge.
- Color mismatch between sheets. Order everything from one lot and lay the pieces out dry before setting so the veining flows.
- Slippery floor. A glossy design on a wet floor is a mismatch. Choose a matte finish marked for wet interior floors.
Cost Ranges for Porcelain Slab Projects
Pricing varies by design, thickness and region, so treat these as broad ranges. Large porcelain usually lands in a mid to premium tier, often comparable to mid-range quartz once fabrication is included. Wall panels in 6mm are the most budget-friendly way in, while bookmatched designs and 2cm countertops sit at the top.
- Shower wall surround with slabs, installed: often a few thousand dollars, more for large walk-in showers
- Countertops with fabrication and mitered edges: frequently in the range of quartz or natural stone per square foot
- Labor: higher than standard tile because of handling crews, flatness prep and specialty tools
Ask for quotes that separate material, fabrication, edge work and install so you can compare bids fairly.
When to Call a Pro
Hire an installer or fabricator with documented large-format experience for any full slab, any countertop and any shower. They own the handling frames, saws and lifters, and they can confirm substrate flatness and waterproofing. A confident DIYer can sometimes handle the smallest stocked panels, such as 31 by 15.5 inch pieces on a backsplash, using standard large tile methods. For anything bigger, paying a crew costs less than replacing a cracked sheet.
Frequently Asked Questions
What sizes do Daltile porcelain slabs come in?
The full Panoramic sheets measure about 126 by 63 inches in 6mm and 127 by 64 inches in 12mm. Smaller stocked sizes run from 124 by 31 inches down to 20.5 by 20.5 inches.
Is 6mm porcelain slab thick enough for a countertop?
It can be used with a rigid backer board, but 12mm or 2cm is the more practical choice for most kitchens. The 6mm sheet is mainly intended for walls, showers and floors.
Do porcelain slabs need sealing?
No. The maker says sealing is not required. Clean with mild detergent and water, and avoid abrasive cleaners.
Can porcelain slabs go on a shower floor?
Only if the design is rated for it. Check the application table on the product page for a wet DCOF rating and a mark for shower floors. Many slab designs are rated for walls and level floors only.
How heavy is a porcelain slab?
About 2.92 pounds per square foot for 6mm and 5.84 pounds per square foot for 12mm. A full 12mm sheet needs at least three people with handling gear.
Can I install porcelain slabs over existing tile?
The brochure says 6mm and 12mm sheets can go over existing surfaces in some cases, but the old tile must be sound, flat and well bonded. An installer should check it first.
Prefer to explore on your own?
See how new flooring looks in your actual room in seconds — free, no signup.
Try the free Floor Studio →