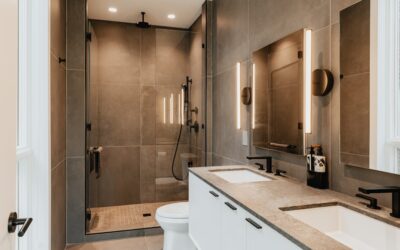
Most shower bases have one open side and three walls. A double threshold shower pan is built for the corner shower that has only two walls, leaving two open sides that meet at a right angle and are closed in with glass. Instead of one curb along the front, the pan has a raised threshold on both open edges, so the glass panels and door sit on top of those curbs and water stays inside.
Part of our Bathroom Remodeling & Flooring guide — explore the full guide →
It is the right choice when you want a square or rectangular corner shower with clear glass on two sides, a look that feels larger than an alcove but keeps more usable floor than a curved or angled base. The tradeoffs are more glass, more careful sizing, and slope that must drain away from two edges instead of one. Getting the drain location, door swing and wall framing right before you order is what separates a clean install from a leaky one.
- What a Double Threshold Shower Pan Is and How It Differs
- Two-Sided Entry Layouts
- Sizing and Door Compatibility
- Slope, Drain Location and Waterproofing
- Installation Overview
- Handling Glass Safely
- Trip Hazards and Accessibility
- Troubleshooting Common Problems
- Mold Prevention
- Typical Costs
- When to Call a Licensed Professional
- Frequently Asked Questions
What a Double Threshold Shower Pan Is and How It Differs
Corner showers come with three common base styles, and they are easy to confuse when shopping:
- Single threshold: One curb, three walls. The standard alcove base. It is the simplest to waterproof but needs a framed or tiled third wall.
- Double threshold: Two curbs meeting at a 90 degree corner, two walls. Glass encloses the two open sides, usually with a fixed panel on one side and a door on the other, or a corner-entry door.
- Neo-angle: Two short walls and three open faces cut at 45 degree angles, creating a diamond-shaped front. A neo angle shower base tucks into small corners and gives a centered door, but the angled glass is more complex.
A double threshold shower pan is squarer than a neo-angle unit, so you lose less corner space and the glass layout is simpler to measure. Compared to a single threshold base, it removes a full wall, which opens the room visually and can bring in light. Many shoppers see the same product listed as a double threshold shower base; the terms mean the same thing.
Two-Sided Entry Layouts
The two open sides give you choices for where to enter. Common layouts include:
- Door on the long side, fixed panel on the short side. The most common arrangement for rectangular pans such as 36 by 48 or 36 by 60 inches.
- Door on the short side. Useful when a toilet or vanity crowds the long side and limits door swing.
- Corner-entry sliding doors. Two sliding panels meet at the corner and open diagonally. They avoid swing clearance entirely but need a square pan and matching hardware.
Before you pick a layout, map the bathroom and check door clearance. A hinged door typically needs its full width of clear floor to swing outward, and many codes and guidelines call for the door to swing out of the shower, not in. Keep towel bars, vanity drawers and the toilet out of that arc.
Sizing and Door Compatibility
Double threshold pans come in square sizes like 36 by 36 and 42 by 42 inches, and rectangular sizes such as 32 by 48, 36 by 48 and 36 by 60 inches. Measure the finished wall surfaces, not the studs, and remember that tile backer and tile add thickness. Most pans have a tiling flange on the two wall sides that must sit tight against the studs, so frame-to-frame dimensions matter more than drywall dimensions.
Glass enclosures are sized to the pan, and this is where many projects go wrong. Buy the glass kit for the exact pan size, check that the kit is designed for double threshold bases, and confirm the threshold width is wide enough for the glass channel or clamps. Some thresholds are very narrow and only accept frameless glass with low-profile clips. Order the pan first, install it, then have the glass measured from the finished pan and walls. Walls are rarely perfectly plumb, and a fabricator measuring in place avoids gaps.
Slope, Drain Location and Waterproofing
Any shower floor needs to slope toward the drain, typically about 1/4 inch per foot. On a factory pan, the slope is molded in. With a double threshold shower pan, the slope has to carry water away from both open edges, so the drain is often set near the center or pushed toward the wall corner. Check the drain position against your existing plumbing before ordering: pans come with center, left, right or corner drains, and moving a drain is not a small job.
Relocating a drain means cutting the subfloor, re-pitching the waste line and possibly changing venting. That work should be done by a licensed plumber, and in most areas it needs a permit and inspection. The drain must connect to a properly vented trap, and a poorly pitched line can cause slow drainage and sewer odors.
Waterproofing is just as important. The pan’s tiling flanges on the two wall sides must be integrated with the wall membrane so water running down the tile lands on the pan, not behind it. Lap the wall membrane or moisture barrier over the flange rather than tucking it under. If you are building a tiled mud-bed or foam-tray version of this pan, the membrane has to wrap up and over both curbs completely, with reinforced inside and outside corners where the two curbs meet. Flood test any site-built pan for the time the membrane maker recommends before setting tile.
Installation Overview
- Shut off water and protect the drain. If you are replacing an old base, shut off the supply, relieve pressure at the valve, and plug the drain to keep debris out.
- Check the subfloor. It must be flat, level and solid. Soft spots or rot need repair first. Many pans require a mortar bed or specified setting material underneath for full support; follow the maker’s instructions.
- Dry fit the pan. Confirm the drain lines up, the flanges sit tight to the studs, and the pan is level in both directions. Shim or adjust the support bed as needed.
- Set the pan and connect the drain. Set it in the support bed, connect the drain assembly per its instructions, and let the bed cure.
- Install wall board and waterproofing. Fasten backer board so its bottom edge rests just over the flange without forcing the flange out of place, then apply the wall membrane, lapping it onto the flange.
- Tile the walls. Leave a small gap at the pan and fill it with flexible sealant, not grout.
- Install the glass. Mount channels or clamps to the curbs and walls, set the panels, and seal per the enclosure instructions.
Handling Glass Safely
Two open sides mean two large panels, and shower glass is heavy. Use only tempered safety glass rated for showers. Wear cut-resistant gloves and eye protection, carry panels with at least two people, and keep them vertical rather than flat. Never flex a panel or strike its edges or corners, because tempered glass can shatter all at once from an edge chip. Set panels on padded blocks, not directly on tile or the pan. Frameless enclosures with heavy glass are often best left to a glass installer who has suction lifters and the right clamps.
Trip Hazards and Accessibility
Each curb is something to step over, and a double threshold shower pan puts one along two sides. Low-profile thresholds around 2 inches tall are easier to step over than older 4 to 6 inch curbs. Choose a textured, slip-resistant floor finish, add a grab bar anchored into framing or solid blocking, and place a non-slip bath mat outside the entry side. For aging-in-place or wheelchair access, a curbless or barrier-free design is usually a better fit than any threshold pan.
Troubleshooting Common Problems
- Water escaping at the corner: The glass joint where the two panels meet is not sealed, or the sweep seal on the door is missing or worn. Replace seals and check alignment.
- Puddles near one curb: The pan is out of level or the subfloor has settled. Water should flow away from both curbs toward the drain.
- Flex or cracking when you step in: The pan lacks full support underneath. It usually has to be removed and reset on a proper bed.
- Mold at the wall flange: Water is getting behind the tile. Recheck the membrane lap and the sealant joint where tile meets the flange.
Mold Prevention
Any leak around a pan can hide under the floor for months. Fix moisture sources first, waterproof walls and curbs properly, and run the exhaust fan during and after showers. If you find mold during a remodel, small patches under about 10 sq ft can usually be cleaned with gloves, eye protection and an N95 respirator once the leak is fixed. Larger or structural mold should go to a professional remediation company.
Typical Costs
A factory double threshold shower pan in acrylic or composite commonly ranges from roughly $250 to $900 depending on size and material, with solid-surface models higher. Glass enclosures for two open sides generally cost more than the pan, often $800 to $3,000 or more for frameless tempered glass. Professional installation of the pan alone may run several hundred dollars, and drain relocation, new framing or a full tiled pan can add significantly to the total.
When to Call a Licensed Professional
Hire a licensed plumber for any drain relocation, vent changes or supply line work, and pull the permits your local building department requires for shower remodels. A glass installer should handle large frameless panels. Call a contractor if the subfloor shows rot or the framing is out of square, since both will undermine the pan and the glass. For a first shower build, a pro-installed pan with a field-measured enclosure is often the most reliable route.
Frequently Asked Questions
What is the difference between a double threshold and a neo angle shower base?
A double threshold base has two straight curbs meeting at a right angle, forming a square or rectangular corner shower. A neo-angle base has three angled open faces with a diamond-shaped front and fits tighter corners.
Can I use a standard shower door on a double threshold shower pan?
Only if it fits the pan’s curb width and dimensions. Buy an enclosure made for double threshold bases, and have glass measured after the pan and walls are finished.
Do I need a permit to install a new shower pan?
Replacing a pan in the same spot may or may not need one, depending on your area. Moving the drain or altering plumbing usually does. Check with your local building department.
Which way should the shower door swing?
Outward is the common recommendation so the door does not trap someone who falls inside. Make sure the swing clears the toilet, vanity and towel bars.
Are low-profile thresholds safer?
Yes. Lower curbs reduce tripping risk. Pair them with slip-resistant flooring, a grab bar and a non-slip mat outside the entry.