A single inch of rain on an average roof sheds more than 1,200 gallons of water, and every drop funnels down your gutters to just a few discharge points. Without a proper downspout extension carrying that flood away from the house, it pools against the foundation, seeps into the basement, and erodes the soil that supports your home. This inexpensive add-on, often under $20 per downspout, is one of the highest-value moisture defenses a homeowner can install in an afternoon. Get the water far enough away and you prevent thousands of dollars in foundation and water damage.
Part of our Roofing guide — explore the full guide →
- Why Downspout Extensions Matter
- How Far Water Should Travel
- Types of Downspout Extensions
- Choosing the Right Option
- Installing a Surface Extension
- Installing a Buried Drain Line
- What It Costs
- Avoiding Common Mistakes
- Where the Water Should End Up
- Seasonal Maintenance and Freeze Concerns
- Simple Protection, Big Payoff
Why Downspout Extensions Matter
Gutters do half the job. They collect roof runoff and route it to the downspout, but a downspout that dumps water right at the base of the wall simply relocates the problem. Saturated soil next to the foundation expands, presses against basement walls, and finds its way through hairline cracks. Over time it can undermine footings and cause settling.
An extension carries that concentrated stream well past the backfill zone, the disturbed soil around the foundation that drains poorly, and releases it where it can soak harmlessly into the yard or reach a drainage feature. The rule of thumb is simple: get roof water at least 4 to 6 feet from the house, and farther on flat lots that do not drain.
How Far Water Should Travel
The right discharge distance depends on your grade. On a lot that slopes away from the house, 4 feet may be enough because gravity keeps pulling water away. On flat ground or a lot that slopes toward the foundation, you may need 8 to 10 feet or a buried line that daylights downhill.
Watch where water goes during the next hard rain. If you see puddles hugging the foundation or a soggy strip along the wall, your extensions are too short or the grade is working against you. The soil around the house should slope down at least 6 inches over the first 10 feet.
Types of Downspout Extensions
Extensions range from a two-dollar splash block to a fully buried drainage system. Match the type to how much water you move and how much you care about appearance.
- Splash blocks: Molded concrete or plastic troughs that sit under the downspout and spread water a few feet. Cheap but limited reach.
- Rigid aluminum or vinyl extensions: Straight sections that bolt to the downspout elbow and carry water several feet. Durable and low profile.
- Flip-up (hinged) extensions: Fold up out of the way for mowing, then drop down when rain comes. Convenient for lawns.
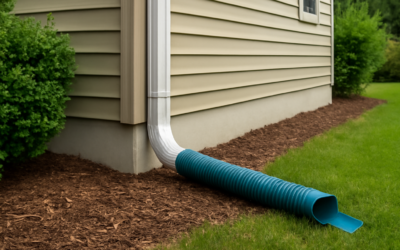
- Roll-out (accordion) sleeves: Flexible plastic that unrolls under water pressure and retracts when dry. Inexpensive but less durable.
- Buried drain lines: Corrugated or solid PVC pipe run underground to a pop-up emitter or dry well far from the house. The cleanest look and the best performance.
Choosing the Right Option
For most homeowners, a rigid aluminum extension strikes the best balance of durability, looks, and cost. Flip-up models solve the mowing headache along a lawn edge. If you want the extension to disappear entirely and you are willing to dig a trench, a buried line to a pop-up emitter is the gold standard, invisible until the water surfaces well out in the yard.
Avoid relying on splash blocks alone unless your grade already carries water away aggressively. They rarely move water past the critical backfill zone, and heavy flow just washes over the end and back toward the wall.
Installing a Surface Extension
Bolting on an above-ground extension is about as easy as home projects get, and it needs only basic tools. Set aside 20 minutes per downspout.
Start by removing the existing lower elbow at the bottom of the downspout. Slide or crimp the extension onto the elbow so the crimped, narrower end always points in the direction of flow; water should slip into each joint like a gutter, not catch on an exposed lip. Aim the outlet toward the lowest part of your yard and away from the neighbor’s property. Secure the connection with a self-tapping zip screw or a rivet so wind and water pressure cannot pop it loose, then set a splash block or a flat stone under the discharge point to stop erosion where the water lands.
Installing a Buried Drain Line
For a permanent, hidden solution, run a pipe underground. This takes more effort but delivers the best result and the cleanest yard.
- Dig a trench sloping away from the house at least 1/8 inch per foot.
- Connect a downspout adapter to 3- or 4-inch pipe. Use solid PVC over corrugated where you want fewer clogs.
- Run the pipe to a pop-up emitter at a low spot or into a gravel-filled dry well.
- Keep the outlet daylighted so water can escape rather than backing up.
- Backfill, tamp, and reseed the trench.
What It Costs
Surface extensions are pocket change; buried systems cost more but still land in reasonable-project territory.
- Splash block: $5 to $15 each.
- Rigid or flip-up extension: $10 to $30 each.
- Roll-out sleeve: $8 to $20 each.
- Buried drain line (DIY materials): $2 to $4 per foot.
- Professionally installed underground system: $8 to $20 per foot.
Avoiding Common Mistakes
The most frequent error is an extension that is simply too short, releasing water right back into the trouble zone. The second is a joint installed backward, so the seam faces uphill and water leaks out at every connection. Also avoid discharging toward a walkway, where winter runoff freezes into an ice hazard, or toward a neighbor’s yard, which invites a dispute and sometimes violates local drainage rules.
Clogs are the enemy of any extension. Keep your gutters clean so debris does not wash down and jam the outlet, and on buried lines choose smooth-wall pipe and add a cleanout if the run is long.
Where the Water Should End Up
Getting water away from the foundation is only half the equation; it also needs a good place to go. The ideal discharge point is a spot where the ground naturally slopes away and the soil can absorb runoff without pooling. A lawn area, a garden bed sized to handle the volume, or a gravel drainage swale all work well. What you want to avoid is trading a foundation problem for a soggy patch of yard that never dries out.
For homes on flat lots or in areas with heavy rain, a dry well offers a tidy solution. This is a buried perforated barrel or a pit filled with gravel that collects the water and lets it seep slowly into the surrounding soil. Rain barrels are another option, capturing downspout water for garden use, though they must have an overflow that itself routes water away from the house once the barrel fills.
Seasonal Maintenance and Freeze Concerns
Extensions need a little seasonal attention to keep working. In fall, clear leaves and debris that wash down from clogged gutters and jam the outlet, since a blocked extension backs water right up to the foundation it is meant to protect. Walk the yard during the first heavy rain after cleaning to confirm water is flowing freely all the way to the discharge point.
Winter brings its own challenge in cold climates. Water sitting in a low extension or a buried line can freeze, and a frozen outlet forces the next thaw’s runoff to overflow near the house. Flip-up extensions are handy here because you can lift them clear of ice and snow, and buried lines should always daylight at a downhill point so they drain fully rather than holding water that freezes solid. Avoid aiming any extension across a walkway or driveway, where winter discharge turns into a hidden sheet of ice.
Simple Protection, Big Payoff
Few upgrades protect your home’s structure as cheaply as moving roof water away from the walls. A properly installed downspout extension guards the foundation, keeps the basement dry, and stops the soil erosion that undermines landscaping and hardscape. Walk your home during the next storm, note where water lingers near the walls, and add or lengthen extensions until every downspout discharges well clear of the foundation. It is a modest Saturday project that pays dividends every time the sky opens up.