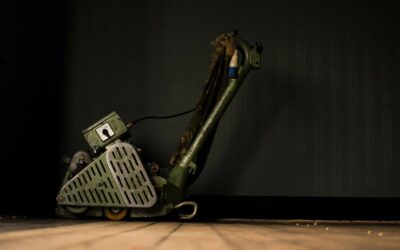
Anyone who has spent a weekend on their knees with a hand scraper, chiseling up old tile or stubborn adhesive, understands why an electric floor scraper is such a game-changer. This power tool does in an hour what manual scraping takes all day, sparing your back, knees, and patience. Whether you are pulling up old vinyl, ceramic tile, carpet glue, or thinset, the right scraper turns the most miserable part of a flooring project into a manageable task.
This guide explains how these tools work, the types available, how to choose blades, and how to use one safely and effectively.
How an Electric Floor Scraper Works
An electric floor scraper uses a powered blade that vibrates, oscillates, or drives forward rapidly to slip under flooring and break its bond with the subfloor. Instead of you supplying all the muscle, a motor delivers the repetitive force needed to shear adhesive and pop tiles loose. The result is faster removal with dramatically less physical effort, and a cleaner subfloor that is ready for new flooring sooner.
Types of Electric Floor Scrapers
These tools come in several forms to match the size of the job:
- Handheld electric scrapers — compact and affordable, great for small rooms, stairs, edges, and detail work.
- Walk-behind scrapers — larger machines you guide standing up, ideal for big open areas and heavy tile removal.
- Ride-on scrapers — heavy-duty commercial units for large-scale demolition, usually rented.
For most homeowners, a handheld unit handles a typical bathroom or kitchen, while a rented walk-behind makes sense for whole-floor or whole-house tile removal.
Buy or Rent?
The decision usually comes down to project size. A quality handheld electric scraper costs roughly $80 to $250 and is worth owning if you tackle DIY projects regularly. Walk-behind machines run into the thousands to purchase, so most people rent them — typically $80 to $200 per day from a tool rental center. For a one-time job removing tile across several rooms, renting the bigger machine for a day or two is far cheaper than buying.
Choosing the Right Blade
The blade does the work, and matching it to the material matters. Wider blades cover ground faster on open floors, while narrower blades give more force per inch for stubborn tile and thinset. Use a rigid, beveled blade for ceramic tile and hardened adhesive, and a flexible blade for sheet vinyl and carpet. Keep blades sharp — a dull blade glides over adhesive instead of cutting under it and wastes your time. Many users keep two or three blade widths on hand and switch as the job demands.
How to Use One Effectively
Technique multiplies the tool’s power. Work the blade at a low angle so it slides beneath the flooring rather than digging into the subfloor. Start at a loose edge or break a starter section free with a hand chisel to give the blade something to bite under. Let the machine do the work — pushing too hard or holding the blade too steep stalls progress and can gouge the subfloor. Work in steady rows and clear debris as you go so you can see your progress and the next bite.
Safety Considerations
Power and sharp blades demand respect. Always wear safety glasses, work gloves, hearing protection, and a dust mask or respirator, since tile and adhesive removal kicks up sharp shards and fine dust. Be aware that older flooring and adhesives may contain asbestos — if your home predates the 1980s, have suspect materials tested before disturbing them, and consult professionals if asbestos is present. Keep the cord clear of the blade, unplug the tool when changing blades, and watch for hidden pipes or wiring in the subfloor.
Matching the Scraper to the Material
Different flooring fights back in different ways, and knowing what you face helps you pick the right approach. Sheet vinyl often peels in large sections once you get under an edge, so a flexible blade and steady forward pressure work well. Ceramic and porcelain tile set in thinset are the toughest, requiring a rigid blade and sometimes a hand chisel to break the first tiles free. Glued-down carpet leaves behind a layer of cushion and adhesive that a wide, aggressive blade clears quickly. Engineered wood and laminate planks usually pop up with less force. Sizing the machine and blade to the material saves both time and wear on the tool.
Protecting the Subfloor
The goal is to remove the old flooring without chewing up the surface you need to reuse. On a plywood or OSB subfloor, keep the blade angle low so it shears adhesive rather than gouging the wood, and ease off where the blade wants to dig in. On a concrete slab you can be more aggressive, but watch for embedded conduit or radiant heat lines near the surface. If you do gouge the subfloor, plan to patch and level those spots before installing new flooring, since dips and ridges telegraph through to the finished floor. Working in controlled passes rather than forcing the machine gives the cleanest substrate.
Maintaining Your Scraper
A little upkeep keeps the tool cutting efficiently job after job. Inspect and replace or sharpen blades as they dull, since a worn blade dramatically slows progress and strains the motor. Clear adhesive and debris from the blade holder and the underside of the machine after each use so buildup does not affect the cutting angle. Check the cord for nicks and the housing for cracks before each session. Store the scraper clean and dry. Keeping a couple of spare blades on hand means a dull edge never stops your project mid-job.
Cleaning Up After Removal
Once the flooring is up, the subfloor often still has ridges of leftover adhesive or thinset. A scraper with a flat blade or a dedicated adhesive-removal pass cleans these down to a smooth surface. The subfloor must be flat, clean, and sound before new flooring goes down, so take time to scrape, sweep, and vacuum thoroughly. Patch any gouges and let the surface dry completely before installing.
Final Thoughts
An electric floor scraper transforms the worst chore in any flooring project from a back-breaking marathon into a fast, controlled task. Match the machine size to your job, keep the right sharp blade on hand, work the blade at a low angle, and gear up with proper safety equipment. Whether you buy a handheld unit or rent a walk-behind for the weekend, it pays for itself in saved time, effort, and sore muscles.
Prefer to explore on your own?
See how new flooring looks in your actual room in seconds — free, no signup.
Try the free Floor Studio →