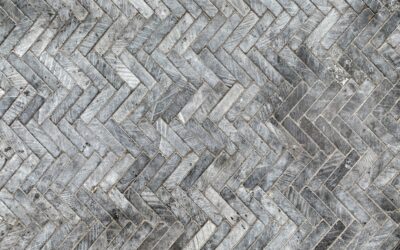
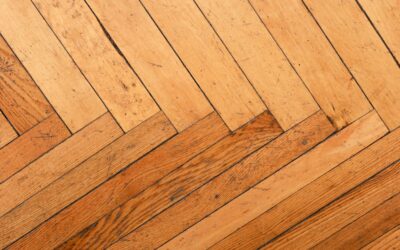
Herringbone flooring transforms an ordinary room into something visually striking. The distinctive V-shaped zigzag pattern has been used in architecture for thousands of years, from ancient Roman roads to the grand halls of European palaces. Today, herringbone floors are experiencing a major resurgence in both traditional and contemporary home design, available in materials ranging from solid hardwood to luxury vinyl plank.
This guide covers everything you need to know about herringbone flooring, including how the pattern works, the critical difference between herringbone and chevron, available materials, installation considerations, cost premiums, room suitability, and design tips for getting the look right.
What Is a Herringbone Pattern?
Herringbone is a pattern created by arranging rectangular pieces at 90-degree angles to each other in a staggered formation. Each piece meets the side of the next piece to form a continuous V-shaped zigzag across the floor. The pattern gets its name from its resemblance to the skeleton of a herring fish.
When applied to flooring, individual planks or tiles are cut to identical rectangular dimensions and laid at alternating 45-degree angles to create the signature pattern. The result is a floor with dramatic visual movement, directional flow, and a sense of craftsmanship that standard straight-lay or staggered patterns cannot match.
Herringbone vs Chevron: The Key Difference
Herringbone and chevron are often confused, but they are distinctly different patterns. Understanding the difference matters because it affects the look, the installation process, and the cost.
Herringbone
In herringbone, planks are cut with straight, 90-degree ends. When laid at alternating angles, the end of each plank butts against the side of the adjacent plank, creating a staggered, broken zigzag. The result looks like a series of interlocking L-shapes. The staggered joints create visual texture and a busier, more traditional pattern.
Chevron
In chevron, the ends of each plank are cut at an angle (typically 45 degrees) so they meet in a clean, continuous point. This creates a smooth, unbroken zigzag with sharp peaks and valleys. Chevron looks more streamlined, modern, and geometric than herringbone. It requires angled cuts on every piece, which adds to material waste and cost.
Which Should You Choose?
Herringbone is more traditional, textured, and forgiving of minor installation imperfections because the staggered joints hide small gaps. Chevron is sleeker and more modern but requires more precise cuts and tighter tolerances. Both are beautiful. Herringbone is more popular in residential settings because it is easier to install and costs less.
Herringbone Flooring Materials
Solid Hardwood
Solid hardwood herringbone is the most traditional and luxurious option. Oak is the most common species, particularly white oak for its tight grain and warm color. Walnut, hickory, and maple are also available. Solid hardwood herringbone planks are typically 3 to 5 inches wide and 12 to 24 inches long, smaller than standard hardwood planks because the pattern requires uniform rectangular pieces.
The advantage of solid hardwood is authenticity and the ability to refinish multiple times over decades. The disadvantage is susceptibility to moisture and the highest installation cost of any herringbone material. For more on hardwood, visit our hardwood flooring guide.
Engineered Hardwood
Engineered hardwood herringbone offers the real-wood surface of solid hardwood with better dimensional stability. The plywood or HDF core resists expansion and contraction from humidity changes, making engineered hardwood herringbone suitable for basements, concrete subfloors, and homes with radiant heating systems where solid hardwood would be risky.
Many manufacturers now offer pre-made herringbone engineered hardwood planks with tongue-and-groove or click-lock connections specifically designed for the pattern. These products simplify installation compared to traditional glue-down or nail-down methods.
Luxury Vinyl Plank (LVP)
LVP herringbone brings the pattern to a wider audience by dramatically reducing cost and installation complexity. Several LVP manufacturers now produce planks specifically sized and shaped for herringbone installation, complete with click-lock systems that snap into the pattern without glue or nails.
LVP herringbone is waterproof, durable, and comfortable underfoot. It works in every room including kitchens, bathrooms, and basements where real wood herringbone would be impractical. The visual quality of high-end LVP herringbone is impressive, though it does not have the depth and character of real wood when viewed up close.
Porcelain and Ceramic Tile
Herringbone tile, typically in wood-look or natural stone formats, creates a stunning effect in bathrooms, entryways, and kitchens. Tile herringbone is completely waterproof and extremely durable. The pattern works beautifully with elongated rectangular tiles (such as 3×12, 4×12, or 2×8 formats) that create clean, proportional zigzag lines.
Tile herringbone is the most labor-intensive option to install due to the number of precise cuts required along walls and at transitions. However, the result is a floor that lasts a lifetime with virtually no maintenance. Learn more in our tile flooring guide.
Laminate
Some laminate manufacturers offer herringbone-format planks, though options are more limited than other materials. Laminate herringbone provides the pattern at a budget-friendly price point with easy DIY installation. The realistic wood prints look convincing from standing height, and click-lock systems make installation accessible for handy homeowners.
Installation Complexity
Herringbone flooring is significantly more complex to install than standard straight-lay flooring. This is true regardless of the material you choose.
Layout Planning
The pattern must be carefully planned before the first piece goes down. You need to establish a center line, determine the starting point, and decide whether the pattern runs parallel to the longest wall or at an angle to the room. Getting the starting layout wrong means the entire floor will look off.
More Cuts
Herringbone patterns require significantly more cuts along walls, doorways, and transitions than straight-lay installations. Every wall edge requires angled cuts to terminate the pattern cleanly. This increases material waste (plan for 15 to 20 percent waste versus 10 percent for straight-lay) and labor time.
Precision Requirements
Each piece must align precisely with the surrounding pieces. Small errors compound across the floor, resulting in visible misalignment, gaps, or irregular zigzag lines. This is why herringbone installation is generally recommended as a professional job rather than a DIY project, especially for hardwood and tile.
Subfloor Requirements
Herringbone patterns highlight subfloor imperfections more than straight-lay patterns because the eye follows the pattern lines closely. Any dips, bumps, or unevenness in the subfloor will be telegraphed through the finished pattern. Thorough subfloor preparation is essential.
Cost Premium for Herringbone Floors
Expect to pay a premium for herringbone compared to the same material installed in a standard pattern. The premium comes from three sources: specialty plank sizing (herringbone planks are often sold at a higher per-square-foot price), increased material waste from additional cuts, and higher labor costs due to the complexity and time required for installation.
Material Cost Ranges
Solid hardwood herringbone: $6 to $15 per square foot for materials. Engineered hardwood herringbone: $5 to $12 per square foot. LVP herringbone: $3 to $7 per square foot. Tile herringbone: $3 to $12 per square foot. Laminate herringbone: $2.50 to $5 per square foot.
Installation Cost
Professional installation of herringbone flooring typically costs 30 to 50 percent more than standard installation for the same material. Where standard hardwood installation might run $4 to $8 per square foot, herringbone hardwood installation costs $6 to $12 per square foot. Tile herringbone installation is similarly premium due to the number of cuts and precision required.
Total Project Cost Example
For a 300-square-foot living room with engineered hardwood herringbone, expect total installed costs of $3,300 to $7,200. The same room with standard straight-lay engineered hardwood would cost $2,100 to $4,800. The herringbone premium is real but delivers a dramatically different visual impact.
Best Rooms for Herringbone Floors
Entryways and Foyers
Herringbone in an entryway makes an immediate impression. It signals quality and attention to detail the moment someone walks through the door. The pattern also handles directional foot traffic well, as the zigzag visual breaks up the linear flow of a hallway or foyer.
Living Rooms
Large living rooms benefit most from herringbone because the pattern has room to develop and repeat. The visual effect is diminished in very small rooms where only a few rows of the pattern are visible. In open-concept living and dining areas, herringbone creates a stunning continuous floor that anchors the entire space.
Kitchens
Herringbone tile or LVP in kitchens adds visual interest to what is often the most used room in the home. The pattern works especially well as a contrast to simple cabinet designs, creating a floor that serves as the room’s focal point.
Bathrooms
Small-format herringbone tile on bathroom floors creates a luxurious, spa-like effect. The smaller tile size and intricate pattern add visual richness to compact spaces. Mosaic herringbone on shower floors is particularly popular.
Design Tips for Herringbone Floors
Keep walls and furnishings simple. Herringbone is a strong visual pattern that can overwhelm a room if paired with too many competing patterns or bold colors. Let the floor be the star and keep surrounding elements understated.
Choose plank width carefully. Wider planks create a bolder, more modern herringbone. Narrower planks create a more traditional, intricate pattern. Match the scale to the room size and design style.
Consider direction. Herringbone can run parallel to the room’s longest wall, perpendicular to it, or at a 45-degree angle. Each orientation creates a different visual effect. Parallel to the longest wall tends to make rooms feel longer. Perpendicular creates a sense of width. Angled (diagonal) herringbone is the most dynamic but requires the most cuts and waste.
Use contrasting borders. A straight-lay border of the same material framing a herringbone field creates a classic, formal look reminiscent of European grand halls and historic estates.
Final Thoughts
Herringbone flooring is an investment in visual impact. The pattern elevates any material it is applied to, turning standard hardwood into a design statement and making LVP or tile feel custom and intentional. The cost and installation complexity are higher than standard patterns, but the result is a floor that draws compliments and adds genuine character to your home. Explore our hardwood flooring guide and tile flooring guide for more on the materials that work best in herringbone patterns.
Prefer to explore on your own?
See how new flooring looks in your actual room in seconds — free, no signup.
Try the free Floor Studio →